(Our 16' x 16' covered run containing an 8' x 8' henhouse structure)
This was my first time building something at this scale. The biggest/ most complex thing I built before was a wooden fence. After reading a ton of articles here I came up with an idea based on wooden fence posts.
Before diving into the long process, here are the highlights and lessons learned from the experience:
- Don't get chickens thinking "yah, I can build this by the time they are out of the brooder". This took much longer than planned, and I was constantly stressed about the chicks being increasingly crowded in the brooder.
- Check with local authority if you need a permit. Turns out that due to the size (over 200sqf) and location (close to wetlands) I needed a permit which further delayed my project.
- Make actual detailed plans and check the materials prices before you start. I had a sort of general idea of design and improvised each step when I got to it. This resulted in more expensive parts and more complex design than needed. As an example, the roof panels I liked came in 8' and 12' lengths. My 8'6" diagonal roof was such a waste. Could have easily avoided by making the whole thing just a tad smaller. Overall, the little time I saved from not making a plan was like a drop in the bucket compared with the time wasted in complex solutions where some dimensions were just a few inches longer than the standard 8' materials.
- Consider drainage. I built the coop on a flat area just under a long downward sloped driveway. When it rains, the water from the driveway floods the area. Now I need to build a french drain or something to deal with the saturated ground in the run. Could have just positioned the coop elsewhere.
So, I started this with 9 wooden fence posts (pressure treated 4x4) that were planted 8' apart in a square shape, and had this general idea:


Here they are in reality:

I then cut them to length and attached ridge beams

I measured and cut one prototype rafter
Attached strappings to install the rafters:
(Also in this photo are cement blocks to be the ground contact of the walls)
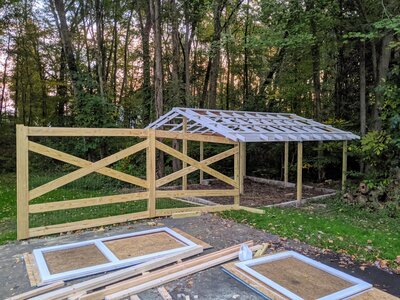
Rafters and purlins installed:
I wanted clear plastic roof, so the roof framing needs to be pained white to prevent excessive heat buildup. It was quite scary to stand on this thing I built and paint.
(I also constructed the main door with a dutch-door like window, and painted them too while at it)
The whole structure is suspended from the posts, these 2x4s are attached to the posts and are floating above the cement blocks. The blocks themselves have no structural support/function except to be the thing in contact with the ground. When the muddy ground causes them to settle I can re-position them to keep gaps to a minimum. Thus the only pressure treated wood are the posts.
In the picture below I'm digging up the grass to place a 3' apron (made from 2"x2" welded wire fence), attach it to the 2x4s, and cover it back with the turf. To discreetly protect against digging predators.
Started framing the run (the hardware cloth is 4' wide so splitting the 8' gaps in two) and attached the clear pvc roof panels. Notice they are short? They come as 8' long panels, I didn't want to pay for 12' and cut/throw away so much. I'll add more pieces at the edges.
(In that picture you can also see the top of the predator apron coming our of the turf and attached to the frame)
Attached the door and started framing the henhouse quarter
Framing ventilation window at the back and egg hatch at the side. Also painting the inside frames. We will use black hardware cloth and prefer to paint before it is attached to keep it clean.
Framing the henhouse walls. We got Brahma chickens so their door is extra large!
The last foot or so of the henhouse will be walled off to accommodate the nesting boxes. The rest of that space will be used for storage (externally accessible through doors)
Framing of the nesting boxes/storage area
Another angle and support for the wood sheets:
Now that these walls are in place I can glue a vinyl sheet to support deep litter. That pattern was the cheapest one we found.
Hardware cloth attached, attaching more sidings.
Painted 1*4s white and attaching them to effectively sandwich the hardware cloth, making the run prettier and theoretically reinforce the wire mesh attachment
Done! The new wall is in fact two large windows and a long hinged panel to support deep litter.
We also blocked off the wire beneath the henhouse because winter is coming and this will be an area protected from wind. We'll remove these panels in the spring.
This whole side can be completely ventilated when the weather gets warm
Roosting bars, "stairs" to get to them and blocked-off nesting boxes inside the henhouse
Egg hatch and storage doors on the side
Another view of the storage space created around the nesting boxes (we still need to decide how to use this space and if we want to add shelves):
This is pretty much done. I still want to install gutters, add a rainwater collection system with automatic heated waterer and such. I'll update this in due time.