If you are unfamiliar with the signs of a broody, this is what to look for.
The very first sign is a puffed-up hen sitting in your nest box.

The turkey walk is the next sign to look for. The hen will do this when off the nest, around the feeder and when making her way back to the nest.
The shrieking turkey will often greet you when you attempt to remove the lovely lady from her chosen maternity site.
This girl ultimately hatched out 6 bantam eggs for me but turned out to be Mommy Dearest and was unceremoniously tossed into the clink screaming her damn fool head off for the entire day while her chicks cried in the brooder for her.
I went against my gut instinct and let her hatch. I always felt this hen's cheese was a little off her cracker. When the chicks were big enough to be out from under her for the majority of the day, she would grab them by their new wing feathers, shake them while they screamed and shove them back under herself. All the chicks had twisted wing feathers. I couldn't take it any longer as I felt she would injure one and it was in their best interest that she be stripped of her maternal duties.
Cry not for them! They were adopted 10 days later by a wonderful mother hen you will meet later. Astrid.
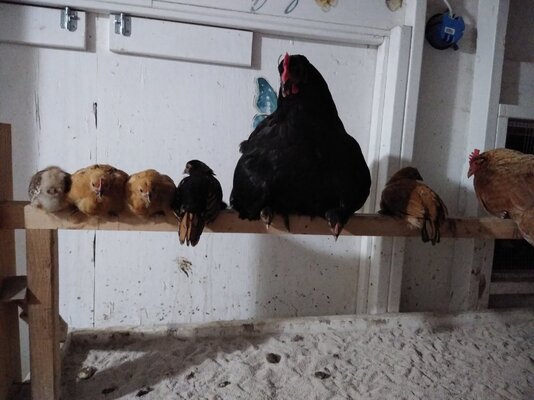
Getting caught on an empty nest at night combined with shrieking and turkey tail.
Notice the bare spots on her belly from plucking.
This stubborn little girl was tossed in the clink the next morning.
The unbelievably persistent broody!!!
The early signs of a broody are the cluck-cluck-clucking around the flock often accompanied by some level of turkey impersonation. Some broody hens are nasty and will peck or bite and twist when you reach under them.
Also, check for a plucked belly. Broody hens pluck their belly feathers for better contact between their bodies and the incubating eggs.
Before we get going, let me preface this section with the following: I am NOT a Chicken Math enabler! I have suffered both ends of the Chicken Math spectrum. The desire to grow my flock resulted in the building of The Mulligan and the other end where I am so overwhelmed with chicken troubles I can barely keep up with their needs.
So when your hens decide they must have chicks, you need to be the one to evaluate your situation to determine if that's the right thing for your flock and yourself. If broody hens had their way, we'd be overrun with chickens.
Do you have enough space?
And we are not just talking about "how many birds can I fit in my coop?" and the oft sited 'Rule of Thumb': 4 square feet per bird in the coop, 10 square feet per bird in the run, and 1 linear foot of roost space.
Broody hens need room to work with. Hell hath no fury as a broody hen that thinks you are too close to her chicks!
They will viscously drive off flock members that they do not want near their chicks. These flock members need space to get away. This is especially true when mom brings the kids to roost somewhere between 3 and 5 weeks of age. Also, the departing flock member may run right over one of the babies in her panic to get away from the growling, shrieking turkey with chicks that was once a normal chicken.
Another point on space: when the chicks are weaned they will have a hard time finding space on the roost. They will be put to the least desirable roost space. The pullets/cockerels will become a sub-flock. It's a brutal time for them. They will need lots of space until they start to lay and the boys are separated or rehomed.
I have my flock contained within a 1/3 acre pen so there is a lot of space for the broody to work with. I've never had issues.
Do you have a plan for the cockerels?
This could be a simple matter of rehoming them as soon as you know who the boys are. Or putting them in a grow-out pen to prepare them for the table.
But if you are not permitted roosters where you are, think seriously about letting a broody hatch. The boys can start crowing pretty young and you'll be scrambling to get them off the property before your neighbors form a lynch mob.
Is your coop elevated or at ground level?
It's not impossible at all to have a broody in an elevated coop but is much simpler to have broodies in ground-level coops, which generally means a walk-in coop.
It's best to move a broody to a ground nest BEFORE you give her fertile eggs. If the hen is a heeled in broody, she will graft to a ground nest faster. Once they go full tilt broody, they will try to hatch a rock in their nest. It's the nest they graft to, not the eggs. I'll discuss my grafting process later.
Do I have time/money to care for an enlarged flock?
It's a valid question.
The more birds you have, the longer chores take.
The more birds you have, the greater the chance of something going wrong with one that may need a lot of attention to treat.
The more birds you have, the higher your expenses.
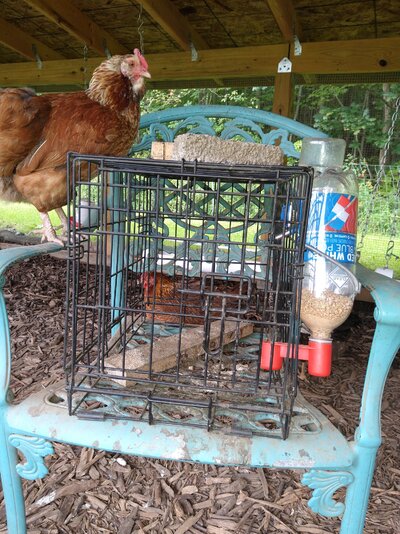
The hands-down best and fastest way to break a broody is to put her in an elevated wire dog crate in the shade for three days and 2 nights to start.
This is my current setup in my predator-proof run:
 I normally do not put two broodies in the same crate. However, these two brats get along just fine and it worked well. They continued to go broody with the arrival of each heatwave and were my ultimate undoing this year. But THEY were not the new mothers...
I used a rodent water bottle for them.
I have some work to do to get the food dispenser bottle working properly but this was another great idea I used from @aart.
I also toss a flat board in the crate so the hen(s) have something to sit on and keep her feet off the wire bottom of the crate.

Why a wire crate and why elevate it?
The reason this works to break a broody is it helps cool her belly down and get her body off the nesting material that she instinctively wants to be on to incubate. If the broodiness has gone on for more than a couple of days unchecked, it will benefit her (keep telling her that while she screams in your face) to dunk her in a bath of COOL water and put her back in the crate soaking wet (and madder than a wet hen) with a fan aimed at her. For the ultra stubborn broody, I will do this multiple times a day if the weather is quite warm.
My broody breaking rule of thumb: She gets locked in the clink when I find her on the nest for the third day in a row, usually late morning after I already saw her there early morning. I let her out about an hour before roost time after her third day and observe.
If she goes to roost. Great. She's been granted parole.
If she goes back to the nest box, her sentence is extended another night and day.
We repeat this until she roosts.
For those who feel bad about locking up your broody hen, think of it this way. She is perfectly willing to deprive herself of all the normal chicken activities including regular meals and potty breaks, preening, dust bathing, sunbathing and hanging with her friends all in the interest of motherhood. And she'll do this for three weeks straight! What's 3 or 4 days? Nothing in comparison. Just lock her up.
Grafting the Broody to the Incubation Nest
It is never a good idea to allow a broody to set in a nest box.
In a more natural setting, mom will find a hidden nest site to lay her clutch. The chickens know where she is. The intent is to hide her and the eggs from predators. A hen set up in a secure coop is safe from predators. She still shouldn't be set up in Grand Central Station. I use the built-in brooder I made in my coop for my broody hens. I now refer to this area as the Maternity Ward. It has its own run and sliding door I can close to keep the flock out when needed. They can still see her during the hatch through the hardware cloth wall.
To graft the broody to the new nest site you provide, you need to create a nice plush nest tucked in the corner of the coop, maybe with a piece of plywood over the top of a very large wire dog crate. Put some fake eggs or golf balls in the nest. When she is first moved into the incubation nest, she may very well panic and try to get back to the nest she chose. If you give her real eggs, they can be crushed. If she wasn't well heeled in, she may also break. You need to get to know your hen and how to manage her.
Most hens will settle on the nest you give them happily enough. Once she does, leave the door closed for the day to help lock her down.
ALWAYS leave her with fresh water. I like to use a baby bottle and hang it within reach of her.
 Baby bottle made from a sports bottle with a flip-top screw cap with a handle that I got at a thrift store for 75 cents. I drilled a hole in the bottom of the bottle and inserted a vertical chicken nipple. It works great for keeping mom hydrated during incubation and helps her cool her body down during the actual hatch.

She teaches her kids to drink from it and she will bring them to it while they are still too young to drink from the adult drinker.

I prefer to manage my broody hen's morning breaks for inspection of the nest during the entire incubation and to ensure she is getting off the nest at least once daily to take care of herself. The grafting period is the time when I will monitor how well grafted she is to her new nest.
Each morning before I let the flock out of the run, I remove the broody from her nest and put her outside. It takes a while for her to break out of her broody trance. You can give her a few pokes or a shove to get her going. She usually tears off running, gives a great broody poop, flaps her wings hard a few times, scratches a wee bit frantically, gets something to eat, may take a quick bath and preen, then heads back to the nest.
You want to be there when she heads back as the first few times she will make mistakes and go back to the wrong nest. You want to cut her off at the pass and place her NEAR (not on) her incubation nest and aim her in the right direction. Let her walk back into the incubation nest on her own and settle in. This is important so she can get it in her head that this is where she belongs. Once she settles, close the door to her broody nest area again.
It typically takes her about 3 days to get it right. I verify with observation for one more day to ensure that she does indeed need no correction. She is now ready for her fertile eggs and it is now time to leave the door open to her incubation area.
Setting up the Broody to Incubate
During the grafting period, collect or procure the eggs you want her to hatch. I always select the largest, best formed, and cleanest eggs to set. I will gently rinse poop off of good eggs. I've never had a problem with them not hatching.
If you are going to set shipped eggs, I would order them early during the grafting period and plan on a 50% hatch rate. They need to settle for a day before setting them under your hen.
All her eggs should be marked with a pencil all the way around the center of the egg unless the eggs you are setting are completely different from the eggs all your hens lay. The purpose is to be able to easily identify her fertile eggs from eggs visiting hens may lay in the broody nest when mom leaves for breaks.
NEVER allow newly laid fertile eggs to remain in your broody nest. You do not want a staggered hatch.
Astrid had visitors daily during her latest incubation.
I do not set more eggs under the hen than she can comfortably cover with her body.
I prefer to set no more eggs under the hen than chicks she can handle in the flock should she have a 100% hatch. That will depend on where she ranked in the flock before going broody, how cold it is when she was allowed to set and how large the flock is. I've never set more than 9 eggs.
THE Nest
I also created a special nest for my broody hens that as closely as possible replicates a natural soil nest that helps regulate humidity and is much more comfortable for the hen to set in.
I got a 16" x 16" wood box from work that was going to be tossed and cut it down to about 6" high. I put three coats of polyurethane on all surfaces to waterproof it. Then I put about 5" of cheap topsoil in it and formed a bowl in the center.


The soil was covered with sheets of live moss I peeled off of logs in the woods. This is used as a barrier to help keep the chopped straw and/or pine shavings from getting too wet.
The moss is covered with chopped straw or pine shavings for more padding.

For more recent hatches I've further prepared the nest by giving it a quick dusting with Permethrin-based poultry dust and dust the hen before placing her as well.
Eggs are placed.
Then the hen.
I periodically add water to the corners of the nest directly to the soil to keep it just damp during incubation. Mom's body heat regulates the humidity naturally.
Eggs should be candled on day 7 and day 14. If any are found that haven't developed or have quit, they should be removed from the nest. If I'm not sure, the egg stays put.
Before the chicks are due to hatch, I add quite a bit more bedding to the Maternity Ward and bank it up to the sides of the box so chicks can get back in if they fall out of the nest box.
Mom is removed from the nest every morning right up until day 19 before the eggs start to pip. The door is closed on day 20 and I don't open it again until the chicks are 2 days old and very mobile.
When the hatch is over and mom leaves the wet nest, it is removed from the Ward and she nests directly in the bedding with the chicks, generally with her butt backed into a solid-walled corner.
Mom typically stays in the Ward for a few days to a week or 2 before leaving so I provide food for her and the chicks there until she's ready to come out. She will take them out at one day old to the Ward run so she can relieve herself and take a dust bath. Two very curious hens watching the new mother from the main run dust bath annex.

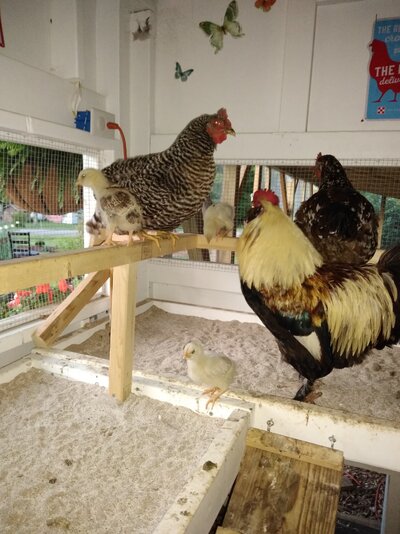
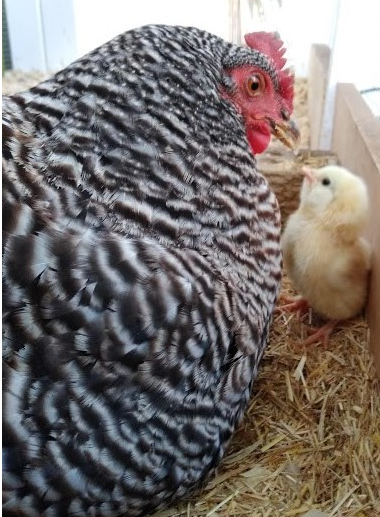
My senior rooster, Fabio, LOVES to visit his hens when they are setting and wants to be the very first to meet the chicks. This is Kerrie with her brood under her the day after hatching.

This is Astrid a few days before her eggs hatched.

Fabio was allowed in 2 days after hatch to help feed the chicks.
As was the junior rooster, Napoleon, who incidentally is one of the bantams Astrid adopted from the Mommy Dearest debacle.
Astrid was the first hen Barb allowed in to meet her chicks.

Barb's hatch.

Barb's first day out with her little brood with Big Daddy strutting up to see his kids.

Kerrie's first day out (she took a very long time)
 Both fathers of Kerrie's brood are seen around the little family.

Astrid's second brood, first day out.
When the chicks are around 3-5 weeks old, mom will take them to roost.


All 9 of Kerrie's eggs hatched but she lost the one that fell out of the nest. She took the chicks to roost at 4.5 weeks old and boy did she have a hard time! That poor girl probably didn't get a wink of sleep that night and she didn't take them back up until they were nearly old enough to wean.

Keeping the kids warm on a chilly morning.

Let's not forget the rest of the flock!
Mom will feed the chicks. Period. She will allow the roosters to help if they want. If you try to feed the chicks, they will ignore you. Even if it's a much coveted treat that mom has shown them in the past. They will not take it from you, only her. She will take it from you and give it to the chicks.
Therefore, the flock should be put on chick starter, Flock Raiser or All Flock (any complete feed with 18-20% protein and 1-1.3% calcium) with a container or two of oyster shell on the side for the active layers if they are not already eating such a diet when the broody hen starts setting.
Honestly, this is the best way to feed a flock regardless of the presence of males or chicks. I've always fed my flock this way since the very first batch were chicks. Layer feed offers just the minimum amount of protein and offers only active layer levels of calcium.
Let's say you have a layer-only flock. Why do these layers need that extra calcium when they are molting and not laying? What about when they stop laying because, oh, they've gone broody? If you constantly feed all that excess calcium, their kidneys have to process that extra calcium and it's an unnecessary strain on them. And why feed the bare minimum amount of protein? These minimal values were developed by the commercial poultry industry with the goal of minimal expense to keep the hen laying the maximum amount of eggs until she is 18 months old. Then she's off to the chopping block to become soup. These studies were never conducted with the intent of long-term health and longevity in mind. The birds were never intended to live past their first molt.
And a few more pictures to illustrate how a normal, well-balanced flock with proper space will not attack chicks, most especially the roosters.
Fabio with one of his daughters stuffed under him after he was giving me attitude.
As far as he is concerned, every chick hatched here is his genetic offspring and he will defend it. It is in his biological interest to do so. Neither he nor any other rooster here has ever shown the slightest aggression towards chicks.

Astrid out with the flock, kids in tow. There are four hens around her and Fabio. All of them have shown interest in the chicks but have never hurt them. They are just natural new additions to the flock to them. Remember, they saw Astrid setting and know these chicks belong in the flock.
07/14/25 update:
Savannah, Fabio's youngest daughter, with her newly hatched batch of ermine Ameraucanas. The beginning of my new breeding flock.
Fabio looking over 'his' last batch of chicks. He was euthanized about 2 weeks later at the age of 7. I'm glad he got to meet them.
Weaning time
This is a tough behavior to watch.
Your heart melts a little to see mom snuggle up to her new kids on the roost.
Then one day her lovely little kids jump up next to her and...
BAM.
BAM.
BAM.
Mom drives her very confused chicks away! Talk about tough love.
But when mom feels she's taught her brood everything they need to know to survive and no longer need her physically for warmth, she is D - O - N - E, done.
And the sub-flock forms.
Usually in your nest boxes.
There will be several weeks where you will be plucking pullets and cockerels out of your nest boxes after nightfall as this is the safest place they usually retreat to after being weaned. As they continue to learn how to navigate their way through the flock sans mom's protection, some of the bolder ones will hold their ground somewhere near the roosts.
As with any other integration, the lowest ranking flock members will be hardest on these youngsters when they are finding their way. When the boys become sexually mature, they will attempt to mate their sisters, their mother, and other females in the flock. Many of the older hens will put these boys straight in their place. Their father will tolerate this behavior just so long before he gets involved in behavior modification. I will permit the cockerels to remain in the population at large up to the point of true annoyance or stressing out the hens. I've yet to have a very obnoxious boy that won't toe the line.
7/14/25 update.
I have since had that very obnoxious boy! Ironically he was the son of Fabio and Astrid, my two favorite birds in the flock. He grew very quickly to be extremely large. And he felt he could throw his weight around with any and all girls. His half sisters hated him and would attack him on sight! He ended up on someone's dinner table.
None of the boys will stay. I have the two roosters I will keep until Fabio passes.
I've posted to many BYC members looking for ways to rehome their boys. I've had great success on Craigslist and local and regional Facebook Poultry Groups. I've rehomed 14 boys this way. It takes time. Start early. Take the best pictures you can. This is the result of a photoshoot for the first cockerel I rehomed, Dexter. The lady that adopted him said she fell in love with him as soon as she saw his picture.
 Someone eventually comes along and wants them. This is why great consideration must be taken when considering hatching in a "no rooster" zone. It can take many, many weeks for someone to come along and take them off your hands. This is a moot point if you are willing to process them at first crow.
The very first sign is a puffed-up hen sitting in your nest box.
The turkey walk is the next sign to look for. The hen will do this when off the nest, around the feeder and when making her way back to the nest.
The shrieking turkey will often greet you when you attempt to remove the lovely lady from her chosen maternity site.
I went against my gut instinct and let her hatch. I always felt this hen's cheese was a little off her cracker. When the chicks were big enough to be out from under her for the majority of the day, she would grab them by their new wing feathers, shake them while they screamed and shove them back under herself. All the chicks had twisted wing feathers. I couldn't take it any longer as I felt she would injure one and it was in their best interest that she be stripped of her maternal duties.
Cry not for them! They were adopted 10 days later by a wonderful mother hen you will meet later. Astrid.
Getting caught on an empty nest at night combined with shrieking and turkey tail.
This stubborn little girl was tossed in the clink the next morning.
The unbelievably persistent broody!!!
The early signs of a broody are the cluck-cluck-clucking around the flock often accompanied by some level of turkey impersonation. Some broody hens are nasty and will peck or bite and twist
when you reach under them.Also, check for a plucked belly. Broody hens pluck their belly feathers for better contact between their bodies and the incubating eggs.
So. You have a broody girl. Now what??
Before we get going, let me preface this section with the following: I am NOT a Chicken Math enabler! I have suffered both ends of the Chicken Math spectrum. The desire to grow my flock resulted in the building of The Mulligan and the other end where I am so overwhelmed with chicken troubles I can barely keep up with their needs.
So when your hens decide they must have chicks, you need to be the one to evaluate your situation to determine if that's the right thing for your flock and yourself. If broody hens had their way, we'd be overrun with chickens.
Do you have enough space?
And we are not just talking about "how many birds can I fit in my coop?" and the oft sited 'Rule of Thumb': 4 square feet per bird in the coop, 10 square feet per bird in the run, and 1 linear foot of roost space.
Broody hens need room to work with. Hell hath no fury as a broody hen that thinks you are too close to her chicks!
They will viscously drive off flock members that they do not want near their chicks. These flock members need space to get away. This is especially true when mom brings the kids to roost somewhere between 3 and 5 weeks of age. Also, the departing flock member may run right over one of the babies in her panic to get away from the growling, shrieking turkey with chicks that was once a normal chicken.
Another point on space: when the chicks are weaned they will have a hard time finding space on the roost. They will be put to the least desirable roost space. The pullets/cockerels will become a sub-flock. It's a brutal time for them. They will need lots of space until they start to lay and the boys are separated or rehomed.
I have my flock contained within a 1/3 acre pen so there is a lot of space for the broody to work with. I've never had issues.
Do you have a plan for the cockerels?
This could be a simple matter of rehoming them as soon as you know who the boys are. Or putting them in a grow-out pen to prepare them for the table.
But if you are not permitted roosters where you are, think seriously about letting a broody hatch. The boys can start crowing pretty young and you'll be scrambling to get them off the property before your neighbors form a lynch mob.
Is your coop elevated or at ground level?
It's not impossible at all to have a broody in an elevated coop but is much simpler to have broodies in ground-level coops, which generally means a walk-in coop.
It's best to move a broody to a ground nest BEFORE you give her fertile eggs. If the hen is a heeled in broody, she will graft to a ground nest faster. Once they go full tilt broody, they will try to hatch a rock in their nest. It's the nest they graft to, not the eggs. I'll discuss my grafting process later.
Do I have time/money to care for an enlarged flock?
It's a valid question.
The more birds you have, the longer chores take.
The more birds you have, the greater the chance of something going wrong with one that may need a lot of attention to treat.
The more birds you have, the higher your expenses.
No, I don't want my broody to hatch right now. It's just not the right time for me.
Okay. Now you have to BREAK her.The hands-down best and fastest way to break a broody is to put her in an elevated wire dog crate in the shade for three days and 2 nights to start.
This is my current setup in my predator-proof run:
I used a rodent water bottle for them.
I have some work to do to get the food dispenser bottle working properly but this was another great idea I used from @aart.
I also toss a flat board in the crate so the hen(s) have something to sit on and keep her feet off the wire bottom of the crate.
Why a wire crate and why elevate it?
The reason this works to break a broody is it helps cool her belly down and get her body off the nesting material that she instinctively wants to be on to incubate. If the broodiness has gone on for more than a couple of days unchecked, it will benefit her (keep telling her that while she screams in your face) to dunk her in a bath of COOL water and put her back in the crate soaking wet (and madder than a wet hen) with a fan aimed at her. For the ultra stubborn broody, I will do this multiple times a day if the weather is quite warm.
My broody breaking rule of thumb: She gets locked in the clink when I find her on the nest for the third day in a row, usually late morning after I already saw her there early morning. I let her out about an hour before roost time after her third day and observe.
If she goes to roost. Great. She's been granted parole.
If she goes back to the nest box, her sentence is extended another night and day.
We repeat this until she roosts.
For those who feel bad about locking up your broody hen, think of it this way. She is perfectly willing to deprive herself of all the normal chicken activities including regular meals and potty breaks, preening, dust bathing, sunbathing and hanging with her friends all in the interest of motherhood. And she'll do this for three weeks straight! What's 3 or 4 days? Nothing in comparison. Just lock her up.
YES! I finally have a broody and can't wait to have some chicks!!
Okay. Now you have to MOVE her.Grafting the Broody to the Incubation Nest
It is never a good idea to allow a broody to set in a nest box.
- Other hens may become agitated with her shrieking presence in the nest boxes.
- Broodiness is catching. You may end up with half your hens broody and the others with no place to lay.
- Chicks can fall out of the nest after hatching. Surviving the fall is not the issue. Surviving being out from under their mother is. They will die. If a chick gets out of the nest while mom is still hatching the rest of the eggs, it needs to be able to get back under her. It's a heartbreaking sight to excitedly check on your broody to see how many chicks hatched only to find that one is cold and dead about 2 feet from her because it couldn't get back in the nest.
In a more natural setting, mom will find a hidden nest site to lay her clutch. The chickens know where she is. The intent is to hide her and the eggs from predators. A hen set up in a secure coop is safe from predators. She still shouldn't be set up in Grand Central Station. I use the built-in brooder I made in my coop for my broody hens. I now refer to this area as the Maternity Ward. It has its own run and sliding door I can close to keep the flock out when needed. They can still see her during the hatch through the hardware cloth wall.
To graft the broody to the new nest site you provide, you need to create a nice plush nest tucked in the corner of the coop, maybe with a piece of plywood over the top of a very large wire dog crate. Put some fake eggs or golf balls in the nest. When she is first moved into the incubation nest, she may very well panic and try to get back to the nest she chose. If you give her real eggs, they can be crushed. If she wasn't well heeled in, she may also break. You need to get to know your hen and how to manage her.
Most hens will settle on the nest you give them happily enough. Once she does, leave the door closed for the day to help lock her down.
ALWAYS leave her with fresh water. I like to use a baby bottle and hang it within reach of her.
She teaches her kids to drink from it and she will bring them to it while they are still too young to drink from the adult drinker.
I prefer to manage my broody hen's morning breaks for inspection of the nest during the entire incubation and to ensure she is getting off the nest at least once daily to take care of herself. The grafting period is the time when I will monitor how well grafted she is to her new nest.
Each morning before I let the flock out of the run, I remove the broody from her nest and put her outside. It takes a while for her to break out of her broody trance. You can give her a few pokes or a shove to get her going. She usually tears off running, gives a great broody poop, flaps her wings hard a few times, scratches a wee bit frantically, gets something to eat, may take a quick bath and preen, then heads back to the nest.
You want to be there when she heads back as the first few times she will make mistakes and go back to the wrong nest. You want to cut her off at the pass and place her NEAR (not on) her incubation nest and aim her in the right direction. Let her walk back into the incubation nest on her own and settle in. This is important so she can get it in her head that this is where she belongs. Once she settles, close the door to her broody nest area again.
It typically takes her about 3 days to get it right. I verify with observation for one more day to ensure that she does indeed need no correction. She is now ready for her fertile eggs and it is now time to leave the door open to her incubation area.
Setting up the Broody to Incubate
During the grafting period, collect or procure the eggs you want her to hatch. I always select the largest, best formed, and cleanest eggs to set. I will gently rinse poop off of good eggs. I've never had a problem with them not hatching.
If you are going to set shipped eggs, I would order them early during the grafting period and plan on a 50% hatch rate. They need to settle for a day before setting them under your hen.
All her eggs should be marked with a pencil all the way around the center of the egg unless the eggs you are setting are completely different from the eggs all your hens lay. The purpose is to be able to easily identify her fertile eggs from eggs visiting hens may lay in the broody nest when mom leaves for breaks.
NEVER allow newly laid fertile eggs to remain in your broody nest. You do not want a staggered hatch.
Astrid had visitors daily during her latest incubation.
I do not set more eggs under the hen than she can comfortably cover with her body.
I prefer to set no more eggs under the hen than chicks she can handle in the flock should she have a 100% hatch. That will depend on where she ranked in the flock before going broody, how cold it is when she was allowed to set and how large the flock is. I've never set more than 9 eggs.
THE Nest
I also created a special nest for my broody hens that as closely as possible replicates a natural soil nest that helps regulate humidity and is much more comfortable for the hen to set in.
I got a 16" x 16" wood box from work that was going to be tossed and cut it down to about 6" high. I put three coats of polyurethane on all surfaces to waterproof it. Then I put about 5" of cheap topsoil in it and formed a bowl in the center.
The soil was covered with sheets of live moss I peeled off of logs in the woods. This is used as a barrier to help keep the chopped straw and/or pine shavings from getting too wet.
The moss is covered with chopped straw or pine shavings for more padding.
For more recent hatches I've further prepared the nest by giving it a quick dusting with Permethrin-based poultry dust and dust the hen before placing her as well.
Eggs are placed.
Then the hen.
I periodically add water to the corners of the nest directly to the soil to keep it just damp during incubation. Mom's body heat regulates the humidity naturally.
Eggs should be candled on day 7 and day 14. If any are found that haven't developed or have quit, they should be removed from the nest. If I'm not sure, the egg stays put.
Before the chicks are due to hatch, I add quite a bit more bedding to the Maternity Ward and bank it up to the sides of the box so chicks can get back in if they fall out of the nest box.
Mom is removed from the nest every morning right up until day 19 before the eggs start to pip. The door is closed on day 20 and I don't open it again until the chicks are 2 days old and very mobile.
When the hatch is over and mom leaves the wet nest, it is removed from the Ward and she nests directly in the bedding with the chicks, generally with her butt backed into a solid-walled corner.
Mom typically stays in the Ward for a few days to a week or 2 before leaving so I provide food for her and the chicks there until she's ready to come out. She will take them out at one day old to the Ward run so she can relieve herself and take a dust bath. Two very curious hens watching the new mother from the main run dust bath annex.
This is Astrid a few days before her eggs hatched.
Fabio was allowed in 2 days after hatch to help feed the chicks.
As was the junior rooster, Napoleon, who incidentally is one of the bantams Astrid adopted from the Mommy Dearest debacle.
Astrid was the first hen Barb allowed in to meet her chicks.
Barb's hatch.
Barb's first day out with her little brood with Big Daddy strutting up to see his kids.
Kerrie's first day out (she took a very long time)
Astrid's second brood, first day out.
When the chicks are around 3-5 weeks old, mom will take them to roost.
All 9 of Kerrie's eggs hatched but she lost the one that fell out of the nest. She took the chicks to roost at 4.5 weeks old and boy did she have a hard time! That poor girl probably didn't get a wink of sleep that night and she didn't take them back up until they were nearly old enough to wean.
Keeping the kids warm on a chilly morning.
Let's not forget the rest of the flock!
Mom will feed the chicks. Period. She will allow the roosters to help if they want. If you try to feed the chicks, they will ignore you. Even if it's a much coveted treat that mom has shown them in the past. They will not take it from you, only her. She will take it from you and give it to the chicks.
Therefore, the flock should be put on chick starter, Flock Raiser or All Flock (any complete feed with 18-20% protein and 1-1.3% calcium) with a container or two of oyster shell on the side for the active layers if they are not already eating such a diet when the broody hen starts setting.
Honestly, this is the best way to feed a flock regardless of the presence of males or chicks. I've always fed my flock this way since the very first batch were chicks. Layer feed offers just the minimum amount of protein and offers only active layer levels of calcium.
Let's say you have a layer-only flock. Why do these layers need that extra calcium when they are molting and not laying? What about when they stop laying because, oh, they've gone broody? If you constantly feed all that excess calcium, their kidneys have to process that extra calcium and it's an unnecessary strain on them. And why feed the bare minimum amount of protein? These minimal values were developed by the commercial poultry industry with the goal of minimal expense to keep the hen laying the maximum amount of eggs until she is 18 months old. Then she's off to the chopping block to become soup. These studies were never conducted with the intent of long-term health and longevity in mind. The birds were never intended to live past their first molt.
And a few more pictures to illustrate how a normal, well-balanced flock with proper space will not attack chicks, most especially the roosters.
Fabio with one of his daughters stuffed under him after he was giving me attitude.
As far as he is concerned, every chick hatched here is his genetic offspring and he will defend it. It is in his biological interest to do so. Neither he nor any other rooster here has ever shown the slightest aggression towards chicks.
07/14/25 update:
Savannah, Fabio's youngest daughter, with her newly hatched batch of ermine Ameraucanas. The beginning of my new breeding flock.
Fabio looking over 'his' last batch of chicks. He was euthanized about 2 weeks later at the age of 7. I'm glad he got to meet them.
Weaning time
This is a tough behavior to watch.
Your heart melts a little to see mom snuggle up to her new kids on the roost.
Then one day her lovely little kids jump up next to her and...
BAM.
BAM.
BAM.
Mom drives her very confused chicks away! Talk about tough love.
But when mom feels she's taught her brood everything they need to know to survive and no longer need her physically for warmth, she is D - O - N - E, done.
And the sub-flock forms.
Usually in your nest boxes.
There will be several weeks where you will be plucking pullets and cockerels out of your nest boxes after nightfall as this is the safest place they usually retreat to after being weaned. As they continue to learn how to navigate their way through the flock sans mom's protection, some of the bolder ones will hold their ground somewhere near the roosts.
As with any other integration, the lowest ranking flock members will be hardest on these youngsters when they are finding their way. When the boys become sexually mature, they will attempt to mate their sisters, their mother, and other females in the flock. Many of the older hens will put these boys straight in their place. Their father will tolerate this behavior just so long before he gets involved in behavior modification. I will permit the cockerels to remain in the population at large up to the point of true annoyance or stressing out the hens. I've yet to have a very obnoxious boy that won't toe the line.
7/14/25 update.
I have since had that very obnoxious boy! Ironically he was the son of Fabio and Astrid, my two favorite birds in the flock. He grew very quickly to be extremely large. And he felt he could throw his weight around with any and all girls. His half sisters hated him and would attack him on sight! He ended up on someone's dinner table.
None of the boys will stay. I have the two roosters I will keep until Fabio passes.
I've posted to many BYC members looking for ways to rehome their boys. I've had great success on Craigslist and local and regional Facebook Poultry Groups. I've rehomed 14 boys this way. It takes time. Start early. Take the best pictures you can. This is the result of a photoshoot for the first cockerel I rehomed, Dexter. The lady that adopted him said she fell in love with him as soon as she saw his picture.
I hope this article gives people with broody hens ideas on how to manage them whether or not they want them to hatch.
Enjoy your girls.
Enjoy your girls.


") Thank you!!
Thank you!! It has something to teach even those of us who've broken and set multiple broodies before: for example, I shall have to try out the soil nest next time I have a broody! And I couldn't agree more with everything you say on feeding and on roosters. Thanks again