So my wife and I had been wanting to have a place in the country so that we could have room to have a garden and some chickens, but ended up buying a house in the city limits. Fortunately, we learned that our fair city sees fit to have laws on the books which allow hens to be kept in city limits for non commercial purposes!!!! Whoop Whoop!!!! OR should I say Coop Coop!!
Well, when we learned that our city allowed this it was a Sunday and we were on the second day of a week of vacation with nothing really planned. We spent saturday cleaning out the corner of our yard and de-weeding it and clearing it off. So, you can see how things started to develop here. "We have all week, we could build a coop." We started researching chickens online and found this wonderful resource in backyard chicken and after a couple hours of looking at things online we had decided to give it a shot. We had this barren spot in our yard that was a large patch of dirt and weeds that was asking to be developed and a week off from work to knock it out. It did not get done in one week. but the end result is exactly what we had envisioned and totally worth it.
I asked my wife to take a picture of the bare dirt before we set the posts but she forgot. Day one we took a trip to the hardware store and I started with 6 4x4x8 PT posts, six bags of concrete, 6 pieces of 3/4 plywood and 3 pieces of 3/4 inch OSB. A couple boxes of 3 inch nails, 8 pieces of PT 2x4X8 and something like 10 2x4x8 white wood for the interior structure. I told my wife that was enough to get me into trouble.
Heres our try at a coop. We did not have a plan to go on. This is the design I envisioned while I was staring at the dirt patch after seeing everyones great coops on here which inspired us and finding the things we liked most about our favorite desgins.
Heres the patch of dirt on 8/7/12 after I set the posts and built the floor. It rained everyday. After day two, I moved the sawing operating into the garage because the rain kept chasing me in. I had to take my time outside when I could, and cut and work in the garage while it rained. Went to the hardware store almost everyday and worked from 8-6 everyday at a casual pace. The work can be theraputic because everything else seems to fade away while you are concentrating on design and construction.
So the design evolved as it came together. I orginally forsaw cutting all four of the posts and putting the floor directly onto those four corners. However, when I saw the two 4x4 posts next to the other two that would be cut I had discoverd a nice little doorway frame. I decided to tie into the side of the two 4x4s on the left here and not cut them off. The yard slopes down from the fence line but levels out as you get away from the fence. This was a perfect area to put the coop because it allowed for drainage which will keep water from sitting and puddling in the run. The front sits 2 Feet off the ground. It is 4 ft wide by just a little shy of 6 feet deep. I capped the 4x4s with the PT 2x4x8 to make up the start of the framing for the Hardware cloth that we enclosed it with.
So as I said, it rained all week. The interior wood was never left out in the rain. I put the tarp over the wood at all times when it rained or overnight when I wasn't working. It was a pain because we are in Florida and it was the first week of august and these isolated storms kept coming and going. I was running in and out. Covering and uncovering. It was worth it and I was glad the white wood was never wet though.
The front door is 2 ft by 2 ft to access for cleaning and changing the water and feed
Pop Door side
Corner braces to tie in the walls
Nest box frankenstein. It was an evolving design. I tackled a problem when I got to it. We never came across something that we couldn't work out.
Got a roof and tar paper.
This area where the post and the roof tied in was a little puzzle to figure out.
The roof has a Cobra Roof Vent. It is plastic and came in 4 ft sections. It was easier to work with than the original metal one I tried and mangled to pieces. That was $18 i chalked up to progress. I read on one of the threads here that moisture is an issue with coops and we live in florida where the heat can be an issue so I wanted to make sure the heat and moisture could rise into the top area and move out and through.
Roof Flashing and Ridge Vent. Roof flashing is very sharp by the way. If you take this step into your design, have a Dremel tool to cut it and GLOVES!
This is how far we got by the end of the day on Thursday Aug 9th and we are 4 days into the project. I got the doors on and considered it dried in. It was tested heavily with some serious severe thunderstorms and it was solid and water tight!!
This is Sunday 8/19/12 and our chicks are to hatch and ship the next day. We went to the Tractor Supply store and got our first chick feeders and waters. This was our idea of a Brooder box. We had the red heat lamp to regulate the temperature the first three weeks as we were instructed. We lined the bottom with a black trash bag and secured it with duct tape. This was a great idea cause as the chicks got a couple weeks old they started to spill their water which I figured out a fix for.
Our chicks arrived right on time on Tuesday 8/21/12. The post office called me and told me that my delivery was there and I rushed out of the office to collect our new friends. I spent about an hour with them, made sure they were drinking and eating and I had to go back to work. I was a proud Pappa! We spent the next month in the garage every night after work hanging out with them for a bit.
Our chicks are GSL, Barred Rock, Blue Silkie Bantam, and a Bantam Buff Brahma!!
Our one week photo
Getting BIG!! And scraggly looking! juvenile birds.
Our chicks free ranging.... with close supervision. They instantly took to scratching and dirt bathing.
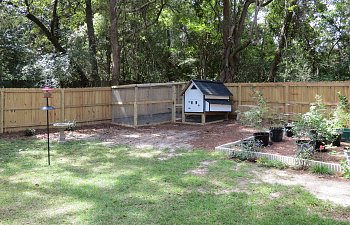
So after 5 Weeks of plugging away at this thing and working on it for an hour or so in the evenings after work and dedicating most of my weekends for over a month we have our finished product. I went through the interior with the dremel tool and cut any exposed nails or screw heads. We painted the inside to assist with wood protection and easier cleaning.
The hardware cloth is buried down 1 foot to keep things from digging under. We ran some additional hardware cloth inside the run along the bottom of the privacy fence and buried it in one section. The other parts the fence boards are already 6 inch down and there is buried bob wire and hard dirt so I think it will be secure.
We read some stuff on different bedding types. We went with regular wood shavings. Seems very cost effective and has kept pretty good so far. I am a neat freak though and plan on changing it out weekley and we only have 4 birds for now.
An outdoor roost.
This back corner near the pop door was screened off with hardware cloth and attached to the back of the house and the fence and under side of the roof. It was the last piece to the puzzle of the enclosure.
Were Home!!!!
They seemed happy and healthy and stayed on their own on 9/16/12 just about 4 1/2 weeks old. The temp was perfect around 82-86 in the day and 72 at night. It's been a lot of fun hanging out with them. We were out their with them after work and on saturday, sunday let them roam the whole yard while we supervise. They are really neat to watch and their little voices are so sweet. They love to come up to us and almost seem to forget that we're not chickens and just peck and scratch right underneath you if you are croutching down to their level.
Thanks to my wife and daughter who inspired me, helped me every step of the way and gave me the motivation to see it through!
Thanks to everyone on Backyard chicken that inspired our design! Hope you guys like it!!!