My husband and I live in Northern Wisconsin. On the 26 acre property, there is a 150+ tree apple orchard, several large gardens where we grow pumpkins, gourds, veggies and more. In my spare time, I love to make pottery (I work full time). My husband is retired and is a beekeeper and loves wood working. From spring to late fall, we sell our goodies on our property and the biggest joy for us in doing so is meeting all of the fun people along the way. And fun people ALWAYS love chickens! After many years of leafing through chicken magazines and dreaming, I wanted 2020 to be THE year for MY chickens (little did I know that apparently everyone wanted it to be their year, too). I didn't want to be on the hunt for something on FB Marketplace or Craig's List, mainly because I didn't want to haul away someone else's stuff and then get motivated to put it back together. So I dug into my little savings from my pottery sales and bought a coop, and some chickens, and well, the rest is a journey that I'll take while my grandmother - a chicken farmer - fills the heavens with laughter as she watches down on me.
Welcome to my coop!
Built in Texas, shipped to Wisconsin ...
Sensing that this year was going to be a crazy year for want-to-be chickeneers, I ordered the coop in mid-January for an early April delivery. It was shipped by freight and took about 5 days to get from Roost & Root - located in Dripping Springs, Texas - to our place in Northern Wisconsin.
But first things first ...
We needed to build the frame for the whole thing - including the chicken run - to sit on.
Time to build the Coop
The coop took approx. 1.5 hours to put together. Pre-drilled holes made assembly very simple and straight forward - only a drill was needed to assemble. The coop is made from 100% cedar, untreated. The wire areas are made of heavy duty 16-gauge galvanized welded wire. Galvanized metal hardware for hinges, and locks.
Now on to building the chicken run ...
Knowing that there would be times our chickens couldn't free-range, we needed to build a run. My first idea was a 10' run that was 4' high, with a top that flipped open so I could get in and clean - easy-peasey, right? Nope, even better. Hubby suggested building something that matched the design of the new coop and wow am I ever glad I let him take the reigns on this one ...
"Coop! (There it is)": The inside
Inside the run and the outside of coop and run
The long, cold, winter months
In my opinion, my chickens get a LOT of free range time - 6-8 hours a day. I can usually find them lounging underneath a pine tree behind their coop, or pecking at the gravel driveway for a dropped seed, or a lone bug. On the days when it's rainy, or we are not here, they do just fine in this coop. Especially if I throw an extra handful of cracked corn or meal worms in. I was very social with my chickens when I was raising them in the brooder. I had coffee in the a.m., and cocktails in the afternoons and I still do. Pancake, my Buff Orpington loves to sit on my lap for a pet. Oreo, my Barred Rock, might like a sip or two of my cocktail. Henrietta, my Barnevelder, is pretty dittzy. She's usually the last one in because she's found something to pick at. Eggatha, my Splash Orpington, is quite vocal that she does not want to be touched but will tolerate sitting by my feet. They all look different, they each have their own personalities, and generally, they all get along. As I sit and watch them do their chicken things, I wonder why we can't all be more like chickens.

My 12 Chickens: Black Jersey Giant ("Black Betty - except she is a he so his name is "Bob"); Easter Egger ("Mel"); Olive Egger ("Picholine"); Barnevelder ("Henrietta"); Austra White ("Sally"); Crested Cream Legbar ("Hen Solo"); Buff Orpington ("Pancake"); Lavender Orpington ("Lilac"); Splash Orpington ("Eggetha"); Rhode Island Red ("Scarlet"); Light Brahma ("Freebie"); Barred Rock ("Oreo")
Welcome to my coop!

|
Built in Texas, shipped to Wisconsin ...
Sensing that this year was going to be a crazy year for want-to-be chickeneers, I ordered the coop in mid-January for an early April delivery. It was shipped by freight and took about 5 days to get from Roost & Root - located in Dripping Springs, Texas - to our place in Northern Wisconsin.

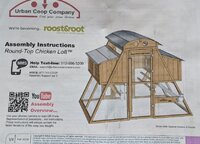
I ordered the Round-Top Chicken Loft Coop. I added the optional water/feeder package as well as the "winterize" package. The total cost for this coop was $3,937.49. My coop kit came with detailed instructions - 52 pages - on how to assemble. Phone support is avail for any questions, and there are YouTube videos as well. Coop dimensions: approx. 9' wide x 6' long x 7' high. Chicken capacity: 10 standard sized chickens with free-range time. | 
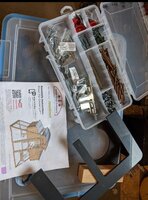
The kit came with all hardware necessary to assemble, including drill bits. All that was required to assemble the coop is a drill. | 
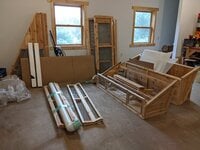
These are the parts of the coop once they were unpacked from the shipping carton. |
But first things first ...
We needed to build the frame for the whole thing - including the chicken run - to sit on.

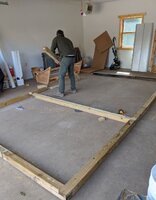
Spring in Wisconsin has a hard time deciding when to actually start so we built the frame in our garage. The 9' x 16' frame was built using treated 4x4s and joined together using lap joints. | 
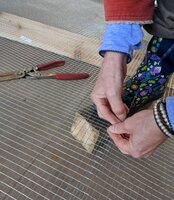
We covered the entire frame bottom with 3' wide 16 gauge hardware cloth - we extended it 2' beyond the edge of the frame as a protective barrier against predators. We stapled the hardware cloth to the frame using heavy duty staples and a pneumatic staple gun. We used heavy wire to join the 3' pieces together, tying them every 6" or so along the length. |

We dug out a shallow area for the frame. Once the frame was built, we moved it from our garage to the final location. IT WAS HEAVY. VERY, VERY HEAVY. And VERY awkward to move. Once we had the frame moved to where we wanted it, we had to flip it over so that the "top" would be the bottom." IT TOO WAS HEAVY. VERY, VERY HEAVY. And VERY awkward to flip over. If it would have been nicer outside, we would have built it "on site" and it would have been much easier. | 
Once in position, we filled the entire frame with dirt. We spent quite a bit of time pushing dirt and sand in through the hardware cloth to fill in the gaps between the wire and the ground. We figured once the chickens were in their new home, they'd do a lot more of the fill-in by scratching around. The dirt floor will also be good for using the deep litter method. |
Time to build the Coop
The coop took approx. 1.5 hours to put together. Pre-drilled holes made assembly very simple and straight forward - only a drill was needed to assemble. The coop is made from 100% cedar, untreated. The wire areas are made of heavy duty 16-gauge galvanized welded wire. Galvanized metal hardware for hinges, and locks.

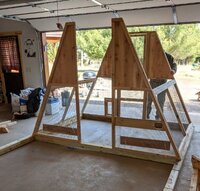
Before we moved the frame outside, we did a dry run on the main coop assembly. | 
We put together the roof in the garage as it is fairly light and we could lift on top of the coop once the coop was in place. | 
Next, we moved the coop onto the frame and bolted it down. We installed the roof and the nest boxes. Those are on the right, above where the waterer would go. The roost area will be installed on the left. | 
WHOO, HOO! It's done! Last year, hubby and I assembled a portable saw mill. This was by far the easier of the two projects and a lot of fun to put together. Cost of our time spent together: $$Priceless$$ |
Now on to building the chicken run ...
Knowing that there would be times our chickens couldn't free-range, we needed to build a run. My first idea was a 10' run that was 4' high, with a top that flipped open so I could get in and clean - easy-peasey, right? Nope, even better. Hubby suggested building something that matched the design of the new coop and wow am I ever glad I let him take the reigns on this one ...

We used rough cut cedar 2 x 4's and cut cut them down to 2 x 2's We then framed up the "walls" and door opening, matching the frame and design of the coop. | 
Next, we added to the structural integrity by adding bracing/panels and covered them with hardware cloth that is stapled on the inside. | 
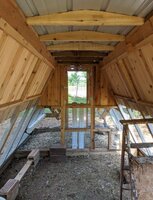
In order to match the rounded top of the coop, hubby rounded the cedar roof braces and we set them in place. (The white panels you see are the "winter" panels that attach to the hardware cloth on the coop's backside. They can be easily removed.) | 
Then we added 1 x 6 cedar fencing for a nice finish for the roof/siding. Total cost for the run including wood hardware cloth, screws, staples, and paint: $788. |
"Coop! (There it is)": The inside

The roost bar is on the left side. It is 50" from the floor of the coop and 9" from the wall. The jump bars are 28" from the floor - there are no ladders. 
Below the roost bar are poop boards. The poop boards are easily cleaned by scraping or removing the plastic panels and washing. I simply push the shavings and droppings to the floor where it gets mixed in with dirt, leaves and grass clippings by the chickens. Underneath the roost area, the chickens can just relax. They can also access the run area from a little chicken door. | 
The self-feeders are made of PVC and hold about 10 lbs of feed each. The door above the feeders makes it so that you do not have to enter the coop to fill but I do anyway as it gives me an opportunity to check on other things. Above the feeder, I've hung the poop-scraper and some dried lavender. 
| 
The nest boxes are adjacent to the roost - on the right side of the coop - with an appropriately egg-shaped opening in case there's any confusion as to what should happen inside. The floor of the nest boxes is 40" inches from the floor. The jump bars are 28" from the floor. 
I've filled nest boxes with dried meadow grass. I'm a potter so I made a few ceramic eggs - mostly just because they are fun to look at until my chickens start laying. | 
Under the nest box is the self-waterer. It holds about 8 gallons of water and is filled from outside the coop. The nipples are vertical. Knowing I had these types of nipples in my coop, I started my chicks off with them when they were in the brooder. When it's time to winterize the coop, the waterer came with "no freeze" nipples made with a copper nipple and I will switch them out. 
An aquatic heater is inserted into the slot on the cover so the water does not freeze - also lessening the chance of a fire hazard. Below is a picture of one of the "winter" nipples and the aquatic heater I will use. 
|
Inside the run and the outside of coop and run

The door to fill the food containers. I do not use this door but it's very good for ventilation. | 
Length of run is 10' with plenty of room for some old wood stumps, a low perch, an old ladder, a hanging bucket of grit, and another water station. | 
I just love this wee chicken door! I close it at night when the hens are on their roost. I've ordered an automatic chicken door so I don't have to get up so early to let them out into the run. |

Coop and run from the back. I decided to use a colored stain to help protect the wood. As it's Cedar, it probably wasn't necessary but I'm not fond of weathered wood. The winters up here can be brutal and I wanted to protect the wood + I think it looks nice. I used Pittsburgh Paints All Weather Latex Stain. It took 1 gallon of red and 1/2 gallon of the grey. | 
I've lined the outside edge of the coop and run with rocks we've found in our fields. While there is hardware cloth that extends out 2' around the coop, I thought a predator might have a tough time digging in the rocks, too. Plus, I think it looks nice. | 
Last year I made a bunch of concrete leaves. I decided to use them as an entrance into both the run and the coop. Picture above is going into the run. Picture below is looking out from the coop door onto the lawn. 
|

The egg box doors from the outside. | 
Looking forward to opening this one day to find some eggs! |
The long, cold, winter months

Knowing that the winter here in northern Wisconsin can be long, cold, and snowy I invested a little bit more and purchased the "winterize" package. This includes corrugated plastic panels that can cover every single one of the wire areas. The above picture shows three attached. Below is a picture of the inside of the coop with the panels on. Sometimes, if I know it's going to rain hard/storm, I will strategically put on panels to keep the coop dry and to help keep blowing rain from the chickens. 
| 
This is the front door, top panel. It has three knobs that attach through the hardware cloth. They are turned 45 degrees where they lock into place. 
This is the front door, top panel attached (looking at it from the inside of the coop). |
In my opinion, my chickens get a LOT of free range time - 6-8 hours a day. I can usually find them lounging underneath a pine tree behind their coop, or pecking at the gravel driveway for a dropped seed, or a lone bug. On the days when it's rainy, or we are not here, they do just fine in this coop. Especially if I throw an extra handful of cracked corn or meal worms in. I was very social with my chickens when I was raising them in the brooder. I had coffee in the a.m., and cocktails in the afternoons and I still do. Pancake, my Buff Orpington loves to sit on my lap for a pet. Oreo, my Barred Rock, might like a sip or two of my cocktail. Henrietta, my Barnevelder, is pretty dittzy. She's usually the last one in because she's found something to pick at. Eggatha, my Splash Orpington, is quite vocal that she does not want to be touched but will tolerate sitting by my feet. They all look different, they each have their own personalities, and generally, they all get along. As I sit and watch them do their chicken things, I wonder why we can't all be more like chickens.
My 12 Chickens: Black Jersey Giant ("Black Betty - except she is a he so his name is "Bob"); Easter Egger ("Mel"); Olive Egger ("Picholine"); Barnevelder ("Henrietta"); Austra White ("Sally"); Crested Cream Legbar ("Hen Solo"); Buff Orpington ("Pancake"); Lavender Orpington ("Lilac"); Splash Orpington ("Eggetha"); Rhode Island Red ("Scarlet"); Light Brahma ("Freebie"); Barred Rock ("Oreo")