This page is under construction and will change as I get further into the build.
So we got into chicken's for the first time this year. My son is 7 years old and my wife and I thought it would be a good time to introduce him to what its like to have responsibility. All of the wood for my coop has been stuff that I got for free. I am a LTL freight delivery driver for Estes Express Lines here in Grand Junction Colorado, and I simply asked my customers if they had and wood they did not want anymore. The only things we have paid for so far have been the metal plates I used to attach the 6x6 posts to the pallet, a box of screws, and the tile for the floor. Outside of that it's all essentially recycled wood.
We decided that we would have an elevated design so the girl's would have more roaming room in the scratch area. I searched around the site here and took ideas from other design's and came up with what you will see here.
First off we have a picture of the corner of the yard that will be used for the coop area that housed my son's club house I tried to make him with almost zero wood. Boy the lack of 2x4 material took its tole on the roof!

Here is the end result of tearing down the clubhouse. The dog run panels will be used as walls for the scratch area.
I will wrap chicken wire around the fencing for better protection and to not allow the bird's to get their head's stuck when they first arrive in their new home.
Here we have Linkin and myself working on the upright's to get that floor off the ground. In the interest of keeping the cost down I used tie plates to attach the 6x6's to the pallet.
I was very pleased with the results and how strong the tie plates turned out for support.
Here we have the end result of the post's being attached and getting the unit flipped over on the correct side.
Final addition for the day was to add the tile to the floor to help cut down on the air rushing up through the bottom, and is also for moisture protection.
Now the girl's are walking on clouds!
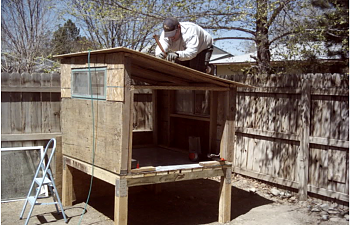
Now to get it almost 100% complete. Time to get back after this thing so I can get it finished up. Original plan called for 4ft walls on each side but after framing one,
I saw that it was going to be bigger than I wanted it with the a frame style roof. Change of plans converted it to a sloped roof design.
I even managed to get my son in on the fun of nail guns!
Man its been a long time since I framed anything, hrm whats missing here? Oh thats right a 2x4 supporting the bottom of the window!
Got some more sheeting on the coop and it's now starting to take shape!
Ah the joys of roofing. Another small expense here we bought a roll of rolled roofing since I was unable to procure any unwanted shingles.
Here's a great shot of the side door's with the ventilation up top. Both door's swing open for easy cleaning and egg collection.
Here's the scratch area with the fencing up around it. We added chicken wire around the base of it to deter our dog's from thinking of grabbing at a bird.
Thanks for looking at my coop page, I'm sure it will change as we go along. All the wood for this project is 100% recycled wood that I grabbed from customers
as I went about my deliveries throughout my day. If you ever doubt being able to get wood for free please don't because I got more than I needed to make this happen
all you have to do is ask people and you'll find that most have something they want to get rid of.
We decided that we would have an elevated design so the girl's would have more roaming room in the scratch area. I searched around the site here and took ideas from other design's and came up with what you will see here.
First off we have a picture of the corner of the yard that will be used for the coop area that housed my son's club house I tried to make him with almost zero wood. Boy the lack of 2x4 material took its tole on the roof!

Here is the end result of tearing down the clubhouse. The dog run panels will be used as walls for the scratch area.
I will wrap chicken wire around the fencing for better protection and to not allow the bird's to get their head's stuck when they first arrive in their new home.

Here we have Linkin and myself working on the upright's to get that floor off the ground. In the interest of keeping the cost down I used tie plates to attach the 6x6's to the pallet.
I was very pleased with the results and how strong the tie plates turned out for support.

Here we have the end result of the post's being attached and getting the unit flipped over on the correct side.

Final addition for the day was to add the tile to the floor to help cut down on the air rushing up through the bottom, and is also for moisture protection.
Now the girl's are walking on clouds!

Now to get it almost 100% complete. Time to get back after this thing so I can get it finished up. Original plan called for 4ft walls on each side but after framing one,
I saw that it was going to be bigger than I wanted it with the a frame style roof. Change of plans converted it to a sloped roof design.

I even managed to get my son in on the fun of nail guns!

Man its been a long time since I framed anything, hrm whats missing here? Oh thats right a 2x4 supporting the bottom of the window!

Got some more sheeting on the coop and it's now starting to take shape!

Ah the joys of roofing. Another small expense here we bought a roll of rolled roofing since I was unable to procure any unwanted shingles.

Here's a great shot of the side door's with the ventilation up top. Both door's swing open for easy cleaning and egg collection.

Here's the scratch area with the fencing up around it. We added chicken wire around the base of it to deter our dog's from thinking of grabbing at a bird.

Thanks for looking at my coop page, I'm sure it will change as we go along. All the wood for this project is 100% recycled wood that I grabbed from customers
as I went about my deliveries throughout my day. If you ever doubt being able to get wood for free please don't because I got more than I needed to make this happen
all you have to do is ask people and you'll find that most have something they want to get rid of.