My 15'x15' run has 6 inches of sand and is completely covered by a roof, so up until recently I never had any drainage issues. Then I added a pop door from my Pekin coop into the run, and let my 7 Pekin ducks into the run with my chickens and mallards. The Pekins proceeded to play in the waterers, and quickly drained my three 5 gallon waterers onto the ground. After a few days of repeating this routine, my sand floor was a swamp with standing water in the low spots. With winter coming on, I knew I needed to find a solution or I would have major ice problems in a month or two.
So I decided to add a drainage system to the run, and build catch basins for each of the three 5 gallon waterers and the two 3 gallon bathing bowls. The basins are built with 2x4 and 2x6 walls and galvanized steel bottoms that are V shaped with a 1.5" PVC drain pipe at the bottom of the V which drains the water from the catch basin and takes the water outside the run. The catch basins are filled with 1.5" round river rocks, and the waterers are placed on a large octagon flat paver stone for a little extra height, I've been very pleased with the results. My sand is dry again, and the water now drains outside the coop.
It took me a one day to build the 5 catch basins, and a half day to install them. I am hoping this may inspire anyone who has drainage problems, and wants their coop to have better drainage than their house!

Here is a close up of one of the catch basins. Each one is 24"x24". The short walls are 2x4's that are 24" long, and the V shaped walls are 2x6's that are 21" long. I cut the V on a table saw, making the outer edge even with the height of the 2x4's that attach to both sides. I beveled the edge of the 2x4's so they matched the angle of the 2x6 walls. This allowed the sheet metal bottom to line up with the bottom edge without any gaps. The wood frame is screwed together with 3" deck screws. The floor is galvanized sheet metal that I cut to size with a 5" angle grinder and a cutoff wheel. I creased the center line of the metal sheet using an aluminum level as the straightedge. I put a bead of Liquid Nails construction adhesive around the wood frame, and then screwed the sheet metal to the wood frame with 1" sheet metal screws spaced every 4 inches. The adhesive formed a waterproof seal where the wood and metal meet, and that forces all of the water to drain out the 1.5" diameter PVC pipe located on one end of the basin. I covered the PVC pipe exit hole with 1/2" hardware wire so that no critters could crawl into the run via the exit pipe.
Here are the three basins for the three 5 gallon waterers. Each one is connected to the others with 1.5" diameter PVC pipes, and each is built with a slight downward grade so the water flows from the right to the left and out of the run. I measured the grade of the pipes and basins with a short level to make sure I got it right. The PVC pipes connecting each one are buried under the sand. I cut the PVC pipes to length with a chop saw.
Here is one of the finished basins for the open bowls. Each basin is filled with about 75 lbs of 1.5" round river rocks. I graded the rocks to make sure the bowls and waterers were level. The waterers can be finicky if they are not perfectly level. My ducks like to splash around and bathe in the bowls. The funny thing is there is a 2 acre pond 150 feet from the coop, and the ducks refuse to swim in the pond, preferring the bowls!
Here are two of the three exit pipes from the basins. Each one empties the water into a rain gutter splash block, which directs the water out into the yard and eliminates any potential washout. Note that the pipe sticks out 2" from the wood wall. This keeps the water from flowing down and soaking into the wood, and allows it to drop cleanly into the rain gutter splash block. I used a corded 1/2" drill with a 1 5/8" hole cutter. This was the hardest part of the job as the wood foundation is made up of 6" of pressure treated wood.
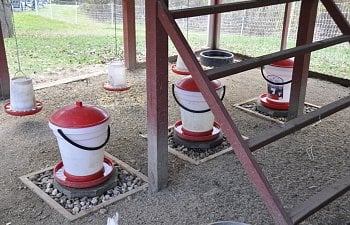
Here is the finished run. Notice the dry sand, and complete lack of standing water! Once a week, I take a garden hose and wash any debris that is in the basins out the exit pipes. This keeps the rocks from getting clogged up with sand and dirt, and allows the basins to drain properly. In the winter, I may have to use hot water to clear any ice. We will have to see how that goes.
Parts List (Per Basin):
2 24" 2x4's
2 21" 2x6's
1 24"x36" galvanized metal sheet
3"x4" piece of 1/2" hardware wire
1.5" PVC Pipe, cut to length
16"x16" Paver Stepping Stone
75 lbs of 1.5" round river rocks
Plastic rain gutter splash block
1/2 tube of Liquid Nails construction adhesive
20 1" sheet metal screws
Tools Used:
Table Saw
Angle Grinder with Cut Off Wheel
Cordless Drill
Corded Drill
Caulking Gun
Chop Saw
Skill Saw with Masonry Blade
Each basin cost me $24. As the popular credit card ad goes, lumber $3, sheet metal $5, PVC pipe $2, paver stone $4, 75 lbs of river rocks $2, rain gutter splash block $5, liquid nails $2, screws $1. Having a dry chicken - duck run, priceless!
So I decided to add a drainage system to the run, and build catch basins for each of the three 5 gallon waterers and the two 3 gallon bathing bowls. The basins are built with 2x4 and 2x6 walls and galvanized steel bottoms that are V shaped with a 1.5" PVC drain pipe at the bottom of the V which drains the water from the catch basin and takes the water outside the run. The catch basins are filled with 1.5" round river rocks, and the waterers are placed on a large octagon flat paver stone for a little extra height, I've been very pleased with the results. My sand is dry again, and the water now drains outside the coop.
It took me a one day to build the 5 catch basins, and a half day to install them. I am hoping this may inspire anyone who has drainage problems, and wants their coop to have better drainage than their house!
Here is a close up of one of the catch basins. Each one is 24"x24". The short walls are 2x4's that are 24" long, and the V shaped walls are 2x6's that are 21" long. I cut the V on a table saw, making the outer edge even with the height of the 2x4's that attach to both sides. I beveled the edge of the 2x4's so they matched the angle of the 2x6 walls. This allowed the sheet metal bottom to line up with the bottom edge without any gaps. The wood frame is screwed together with 3" deck screws. The floor is galvanized sheet metal that I cut to size with a 5" angle grinder and a cutoff wheel. I creased the center line of the metal sheet using an aluminum level as the straightedge. I put a bead of Liquid Nails construction adhesive around the wood frame, and then screwed the sheet metal to the wood frame with 1" sheet metal screws spaced every 4 inches. The adhesive formed a waterproof seal where the wood and metal meet, and that forces all of the water to drain out the 1.5" diameter PVC pipe located on one end of the basin. I covered the PVC pipe exit hole with 1/2" hardware wire so that no critters could crawl into the run via the exit pipe.
Here are the three basins for the three 5 gallon waterers. Each one is connected to the others with 1.5" diameter PVC pipes, and each is built with a slight downward grade so the water flows from the right to the left and out of the run. I measured the grade of the pipes and basins with a short level to make sure I got it right. The PVC pipes connecting each one are buried under the sand. I cut the PVC pipes to length with a chop saw.
Here is one of the finished basins for the open bowls. Each basin is filled with about 75 lbs of 1.5" round river rocks. I graded the rocks to make sure the bowls and waterers were level. The waterers can be finicky if they are not perfectly level. My ducks like to splash around and bathe in the bowls. The funny thing is there is a 2 acre pond 150 feet from the coop, and the ducks refuse to swim in the pond, preferring the bowls!
Here are two of the three exit pipes from the basins. Each one empties the water into a rain gutter splash block, which directs the water out into the yard and eliminates any potential washout. Note that the pipe sticks out 2" from the wood wall. This keeps the water from flowing down and soaking into the wood, and allows it to drop cleanly into the rain gutter splash block. I used a corded 1/2" drill with a 1 5/8" hole cutter. This was the hardest part of the job as the wood foundation is made up of 6" of pressure treated wood.
Here is the finished run. Notice the dry sand, and complete lack of standing water! Once a week, I take a garden hose and wash any debris that is in the basins out the exit pipes. This keeps the rocks from getting clogged up with sand and dirt, and allows the basins to drain properly. In the winter, I may have to use hot water to clear any ice. We will have to see how that goes.
Parts List (Per Basin):
2 24" 2x4's
2 21" 2x6's
1 24"x36" galvanized metal sheet
3"x4" piece of 1/2" hardware wire
1.5" PVC Pipe, cut to length
16"x16" Paver Stepping Stone
75 lbs of 1.5" round river rocks
Plastic rain gutter splash block
1/2 tube of Liquid Nails construction adhesive
20 1" sheet metal screws
Tools Used:
Table Saw
Angle Grinder with Cut Off Wheel
Cordless Drill
Corded Drill
Caulking Gun
Chop Saw
Skill Saw with Masonry Blade
Each basin cost me $24. As the popular credit card ad goes, lumber $3, sheet metal $5, PVC pipe $2, paver stone $4, 75 lbs of river rocks $2, rain gutter splash block $5, liquid nails $2, screws $1. Having a dry chicken - duck run, priceless!