How I built my hatcher:
Well, I started by fighting off the raccoons and snagging a few styrofoam fish-shipping boxes from the dumpster behind PetSmart.") It was dark, and I could reach four boxes and lids without actually climbing the dumpster, so I brought home four. Extras!into
It was dark, and I could reach four boxes and lids without actually climbing the dumpster, so I brought home four. Extras!into
I painted the whole inside of the box with white glossy latex paint, to help with cleanup and minimize how much the styrofoam would hold bad smells over time. Don't use spray paint unless it's the paint specifically for styrofoam from the craftstore - or you can try the new water-based Krylon which is not available anywhere in my town - and even then, be careful. The accelerants in spray paint will melt your styrofoam away like a wedding dress on a honeymoon. Just not as pretty.
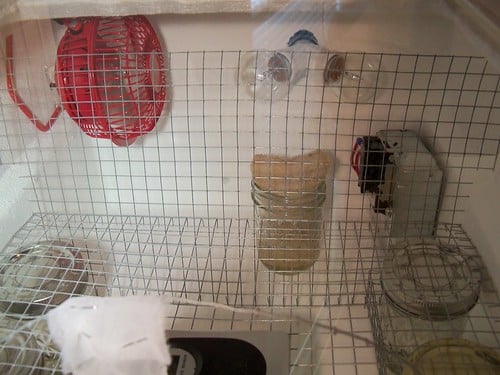
This is my setup on the heating end. It changed a little from the initial, as I progressed, but I'll tell you the changes I made as we go along.

That's a $6 fan from WalMart. I wanted to mount it as close to the upper corner as I could while still making allowances for the stand it came with and allowing for closing the lid. I did a few test positions, just holding it up there, to decide on best placement to blow straight across the short end of the box and across where I was going to install the light bulbs. I punched two holes through with my styrofoam melter/cutter ($13 from Michael's craft store, for making floral arrangements and such, but I've had it for years). I ran a long ziptie in through the hole, over the base of the fan, and back out through the hole, and then I used three 6" wooden skewers, like for shishkabobs, held together, and zipped down both the ties over the top of the skewer. That distributes the pull of the ties against the styrofoam over a larger area, so the zipties don't just rip through the styrofoam. Make sense? I ran the plug for the fan out through another hole, behind it, just large enough for the plug itself - and used a part of the styrofoam that I cut out to close that hole back up again. I don't want too much room air coming directly from outside into my fan - I'd rather bring fresh air in in small amounts, in multiple places elsewhere around the hatcher, than have that fan suck in massive amounts of cool air all at once right there. I did not worry about sealing the hole completely, just mostly. I also had to, after the fan was mounted, push the lid down onto the leg of the fan where it interfered with closing, and then cut that bit of lip out of the underside of the lid to clear it. Now there's a channel in the lip of the lid where the fan stand fits through neatly.
I drilled three extra air holes into the housing on a water heater thermostat (instructions on the drilling on youtube, water heater thermostat from Lowes) and then mounted the thermostat on a 4" metal gangbox as a heatsink. I checked my wiring for the thermostat to the lightsocket as per instructions found all over BYC, but did yet complete the wiring.not
I put two small clear 20w decorative bulbs - to save room - into my socket splitter. The point of the socket splitter is that if a bulb blows, I have a backup, and the remaining bulb can just stay on twice as long until I notice and replaced the blown one. I held up the splitter with the bulbs in line with the fan, to make sure my spacing worked, and I pressed the base of the splitter up against the styrofoam to mark the place. Then I pressed the open end of the lamp socket over the place where the splitter had marked, and I used my styrofoam cutter to open up that hole. I kept it a tad snug so I would be more like ... wallowing/squeezing the socket into the hole, so it would stay better.
I completed the wiring to the underside of the light socket and - as a nod to my electrically paranoid husband - wrapped it all up in electrical tape. I installed the socket through the hole from the outside, then screwed the socket splitter into the socket from the inside. At this point, the lamp socket is not yet wired to the thermostat.
I melted/cut a small hole centered under the socket splitter, high, just large enough for my wire connections for the thermostat to go through. I fed the connections through and hooked up the thermostat per my earlier testing notes. Tested it again, just to make sure it was all working, and then used electrical tape to cover my connections there. There's going to be a lot of water working it's way around in there - better safe than sorry, I guess.
The thermostat needs to be positioned just beneath the light bulbs, close - like, within 1/2". It's easier if you can place the thermostat so that you can get to the adjustment from above, rather than from the side. Note: Please don't try to set the thermostat based on the numbers on the thermostat dial. That's just not going to work. Plan on having another thermometer over by the eggs, and to adjust the WHT so as to make the reading on the other thermometer your target. I filled four of the 4oz jelly jars, sold for canning, with water as additional heat sinks, and sat the gang box on top of the water jars, wedged between them and the light splitter socket.
Then I raise the chicks up in the box, and to separate them from the light bulbs. I filled some more 4oz jelly jars with water and closed them all up, and I put them in the bottom of the box for heatsinks and shelf supports under the hatching area. I measured out from the heating area to what I felt would be an appropriate distance to put a hardware cloth wall up - to me, 2-3" away from the lightbulbs gave me an area that fit the fan as it was mounted in the corner, and a heating alley to be separated from the hatching area.
I measured the area needed at the top of the jelly jars for the hatching area shelf. I cut it out of 1/2" hardware cloth left from building my coop. Now, when I cut, I cut it so that I left "sprigs" sticking out around the perimeter of the area I needed. So - I didn't cut so that there was an outlining line of full squares around the perimeter - I cut on the other side of the wire. Let me try to demonstrate with text: I did not cut so the outside looked like ________. I cut so the outside looked like !_!_!_!_!_!_!_!_!_! with the tops of the exclamation points being wires sticking out. Then I trimmed those wires off on one short side - the side that would go up against the short side of the box opposite the heating alley - and left them on the other three sides of the rectangle.
To position the shelf, I placed the trimmed side up against the wall, holding one long side bent upward and the other long side down on top of the jelly jars. Then, I slipped the exposed wire bits into the styrofoam on the level of the tops of the jars, so the hardware cloth was helping to support itself on top of the jars. Now's why I trimmed that short end - I kind of bucked up the center of the shelf and slipped the wires on the other side into the wall into position.
Now we've got more wires sticking out of the short side of the shelf, nearest the heating alley. So, I cut the wall of more hardware cloth, shaped to fit the vertical dimensions of the inside of the box. Again, I left wires sticking outside on the edges, so that wall could help to hold itself up.
I positioned the wall up against the remaining open short end of the shelf, skooching it in closely so that the wires left poked through the new wall I was putting in. I folded the wires from the shelf down over one row of the hardware cloth, giving the shelf more support on that end. I worked the wires on the other edges into the styrofoam walls. I did not leave any wires sticking up across the top, but trimmed them all down for safety.
As I was first hatching in this box, I put a piece of aluminum foil over the wall in front of the bulbs. Not all the way to the walls - I stopped it about 3" from the wall on each end. I was just afraid that the eggs closest to the light were getting too hot, despite the air circulation. I'm going to replace that with a piece of acrylic, cut to fit, possibly spray painted to block the heat from the light waves as well.
Then I put a layer of rubberized, nonslip shelf liner over the hardware cloth shelf. Easy to clean or replace, and secure footing for little ones as they hatch.
Now we need windows. I went to the hardware store and looked at glass, but noticed acrylic right next to it for about $1 more per 11x14 piece. And claiming 20x the energy efficiency. Well, I want energy efficiency. I want to hold heat into the hatcher. So I bought two pieces. I reminded myself, again, how far the wall for the heating alley was from the end of the box, and I mentally eliminated that much of the lid from my calculations. So - if the wall was 6" from the end, then I centered one of the 11x14 pieces of acrylic on the remaining area of the lid. I used an exacto knife to lightly cut out around the piece of acrylic. I was very careful, at this point, to only cut as far into the styrofoam as the acrylic was deep. You can give or take a little, but the point here is that I was making a little shelf for the acrylic to sit in on the lid.
I took the acrylic away from where it was resting on the lid, and was left with a lightly outlined 11x14 rectangle. I took my straight-edge, and first outlined with a pen, then cut out a smaller rectangle inside that outline, 1/4" smaller on all sides, with my hot styrofoam cutter. At this point I did go all the way through the styrofoam. Then I took the exacto knife again, and cut horizontal to the surface of the lid about 1/8" from the top, joining to where I had traced the rectangle before. This lets me cut a little recessed lip for the styrofoam to sit on. I then removed the protective films from the acrylic and ran a bead of silicone sealant around the lip, and dropped the window in.
When I make my next one, I will let that dry, then repeat the lipping process on the inside of the lid, making a double-paned window on the lid to hold in the heat better.
I cannot tell you how happy I was to have a side window when the hatching began. It was so exciting to be able to see more angles! To make the side window, I cut an 11x14 piece down to 4x14, and then repeated the above process, lining it up with the window I had placed on the top, and setting it low in the side, almost to the level of the shelf. To hold it on while the silicone was drying - since I couldn't rely on gravity for this - I used the piece that I cut out of the side and put it up against the acrylic, then ran a piece of electrical tape from the short end, across the styrofoam (against the acrylic, holding it in place) and around to the other short end.
I have three large-ish - about 1/2" - holes cut in the top for ventilation, and about ten very small ones as well. I have three large-ish holes cut around the bottom of the heating alley, and I use these to feed in aquarium line tubing to add water during lockdown.
I am, soon, going to the hardware store to try to jerry-rig some sort of dripper to sit on top of the heating alley end of the hatcher, running down onto - maybe hanging pieces of cotton cloth - in a controlled manner, to keep my humidity more constant. That's another day's project, though - today I typed all this up.
When I make my second one, I will price out all my parts and add in a detailed parts list, and I will take lots of pictures of all the steps for y'all.
Happy hatching!
Well, I started by fighting off the raccoons and snagging a few styrofoam fish-shipping boxes from the dumpster behind PetSmart.
It was dark, and I could reach four boxes and lids without actually climbing the dumpster, so I brought home four. Extras!intoI painted the whole inside of the box with white glossy latex paint, to help with cleanup and minimize how much the styrofoam would hold bad smells over time. Don't use spray paint unless it's the paint specifically for styrofoam from the craftstore - or you can try the new water-based Krylon which is not available anywhere in my town - and even then, be careful. The accelerants in spray paint will melt your styrofoam away like a wedding dress on a honeymoon. Just not as pretty.
This is my setup on the heating end. It changed a little from the initial, as I progressed, but I'll tell you the changes I made as we go along.
That's a $6 fan from WalMart. I wanted to mount it as close to the upper corner as I could while still making allowances for the stand it came with and allowing for closing the lid. I did a few test positions, just holding it up there, to decide on best placement to blow straight across the short end of the box and across where I was going to install the light bulbs. I punched two holes through with my styrofoam melter/cutter ($13 from Michael's craft store, for making floral arrangements and such, but I've had it for years). I ran a long ziptie in through the hole, over the base of the fan, and back out through the hole, and then I used three 6" wooden skewers, like for shishkabobs, held together, and zipped down both the ties over the top of the skewer. That distributes the pull of the ties against the styrofoam over a larger area, so the zipties don't just rip through the styrofoam. Make sense? I ran the plug for the fan out through another hole, behind it, just large enough for the plug itself - and used a part of the styrofoam that I cut out to close that hole back up again. I don't want too much room air coming directly from outside into my fan - I'd rather bring fresh air in in small amounts, in multiple places elsewhere around the hatcher, than have that fan suck in massive amounts of cool air all at once right there. I did not worry about sealing the hole completely, just mostly. I also had to, after the fan was mounted, push the lid down onto the leg of the fan where it interfered with closing, and then cut that bit of lip out of the underside of the lid to clear it. Now there's a channel in the lip of the lid where the fan stand fits through neatly.
I drilled three extra air holes into the housing on a water heater thermostat (instructions on the drilling on youtube, water heater thermostat from Lowes) and then mounted the thermostat on a 4" metal gangbox as a heatsink. I checked my wiring for the thermostat to the lightsocket as per instructions found all over BYC, but did yet complete the wiring.not
I put two small clear 20w decorative bulbs - to save room - into my socket splitter. The point of the socket splitter is that if a bulb blows, I have a backup, and the remaining bulb can just stay on twice as long until I notice and replaced the blown one. I held up the splitter with the bulbs in line with the fan, to make sure my spacing worked, and I pressed the base of the splitter up against the styrofoam to mark the place. Then I pressed the open end of the lamp socket over the place where the splitter had marked, and I used my styrofoam cutter to open up that hole. I kept it a tad snug so I would be more like ... wallowing/squeezing the socket into the hole, so it would stay better.
I completed the wiring to the underside of the light socket and - as a nod to my electrically paranoid husband - wrapped it all up in electrical tape. I installed the socket through the hole from the outside, then screwed the socket splitter into the socket from the inside. At this point, the lamp socket is not yet wired to the thermostat.
I melted/cut a small hole centered under the socket splitter, high, just large enough for my wire connections for the thermostat to go through. I fed the connections through and hooked up the thermostat per my earlier testing notes. Tested it again, just to make sure it was all working, and then used electrical tape to cover my connections there. There's going to be a lot of water working it's way around in there - better safe than sorry, I guess.
The thermostat needs to be positioned just beneath the light bulbs, close - like, within 1/2". It's easier if you can place the thermostat so that you can get to the adjustment from above, rather than from the side. Note: Please don't try to set the thermostat based on the numbers on the thermostat dial. That's just not going to work. Plan on having another thermometer over by the eggs, and to adjust the WHT so as to make the reading on the other thermometer your target. I filled four of the 4oz jelly jars, sold for canning, with water as additional heat sinks, and sat the gang box on top of the water jars, wedged between them and the light splitter socket.
Then I raise the chicks up in the box, and to separate them from the light bulbs. I filled some more 4oz jelly jars with water and closed them all up, and I put them in the bottom of the box for heatsinks and shelf supports under the hatching area. I measured out from the heating area to what I felt would be an appropriate distance to put a hardware cloth wall up - to me, 2-3" away from the lightbulbs gave me an area that fit the fan as it was mounted in the corner, and a heating alley to be separated from the hatching area.
I measured the area needed at the top of the jelly jars for the hatching area shelf. I cut it out of 1/2" hardware cloth left from building my coop. Now, when I cut, I cut it so that I left "sprigs" sticking out around the perimeter of the area I needed. So - I didn't cut so that there was an outlining line of full squares around the perimeter - I cut on the other side of the wire. Let me try to demonstrate with text: I did not cut so the outside looked like ________. I cut so the outside looked like !_!_!_!_!_!_!_!_!_! with the tops of the exclamation points being wires sticking out. Then I trimmed those wires off on one short side - the side that would go up against the short side of the box opposite the heating alley - and left them on the other three sides of the rectangle.
To position the shelf, I placed the trimmed side up against the wall, holding one long side bent upward and the other long side down on top of the jelly jars. Then, I slipped the exposed wire bits into the styrofoam on the level of the tops of the jars, so the hardware cloth was helping to support itself on top of the jars. Now's why I trimmed that short end - I kind of bucked up the center of the shelf and slipped the wires on the other side into the wall into position.
Now we've got more wires sticking out of the short side of the shelf, nearest the heating alley. So, I cut the wall of more hardware cloth, shaped to fit the vertical dimensions of the inside of the box. Again, I left wires sticking outside on the edges, so that wall could help to hold itself up.
I positioned the wall up against the remaining open short end of the shelf, skooching it in closely so that the wires left poked through the new wall I was putting in. I folded the wires from the shelf down over one row of the hardware cloth, giving the shelf more support on that end. I worked the wires on the other edges into the styrofoam walls. I did not leave any wires sticking up across the top, but trimmed them all down for safety.
As I was first hatching in this box, I put a piece of aluminum foil over the wall in front of the bulbs. Not all the way to the walls - I stopped it about 3" from the wall on each end. I was just afraid that the eggs closest to the light were getting too hot, despite the air circulation. I'm going to replace that with a piece of acrylic, cut to fit, possibly spray painted to block the heat from the light waves as well.
Then I put a layer of rubberized, nonslip shelf liner over the hardware cloth shelf. Easy to clean or replace, and secure footing for little ones as they hatch.
Now we need windows. I went to the hardware store and looked at glass, but noticed acrylic right next to it for about $1 more per 11x14 piece. And claiming 20x the energy efficiency. Well, I want energy efficiency. I want to hold heat into the hatcher. So I bought two pieces. I reminded myself, again, how far the wall for the heating alley was from the end of the box, and I mentally eliminated that much of the lid from my calculations. So - if the wall was 6" from the end, then I centered one of the 11x14 pieces of acrylic on the remaining area of the lid. I used an exacto knife to lightly cut out around the piece of acrylic. I was very careful, at this point, to only cut as far into the styrofoam as the acrylic was deep. You can give or take a little, but the point here is that I was making a little shelf for the acrylic to sit in on the lid.
I took the acrylic away from where it was resting on the lid, and was left with a lightly outlined 11x14 rectangle. I took my straight-edge, and first outlined with a pen, then cut out a smaller rectangle inside that outline, 1/4" smaller on all sides, with my hot styrofoam cutter. At this point I did go all the way through the styrofoam. Then I took the exacto knife again, and cut horizontal to the surface of the lid about 1/8" from the top, joining to where I had traced the rectangle before. This lets me cut a little recessed lip for the styrofoam to sit on. I then removed the protective films from the acrylic and ran a bead of silicone sealant around the lip, and dropped the window in.
When I make my next one, I will let that dry, then repeat the lipping process on the inside of the lid, making a double-paned window on the lid to hold in the heat better.
I cannot tell you how happy I was to have a side window when the hatching began. It was so exciting to be able to see more angles! To make the side window, I cut an 11x14 piece down to 4x14, and then repeated the above process, lining it up with the window I had placed on the top, and setting it low in the side, almost to the level of the shelf. To hold it on while the silicone was drying - since I couldn't rely on gravity for this - I used the piece that I cut out of the side and put it up against the acrylic, then ran a piece of electrical tape from the short end, across the styrofoam (against the acrylic, holding it in place) and around to the other short end.
I have three large-ish - about 1/2" - holes cut in the top for ventilation, and about ten very small ones as well. I have three large-ish holes cut around the bottom of the heating alley, and I use these to feed in aquarium line tubing to add water during lockdown.
I am, soon, going to the hardware store to try to jerry-rig some sort of dripper to sit on top of the heating alley end of the hatcher, running down onto - maybe hanging pieces of cotton cloth - in a controlled manner, to keep my humidity more constant. That's another day's project, though - today I typed all this up.
When I make my second one, I will price out all my parts and add in a detailed parts list, and I will take lots of pictures of all the steps for y'all.
Happy hatching!