Disclaimer: These plans are for someone who has more money than time and or construction skills (me)!
In order to get my sweet husband's approval for my scheme to have backyard chickens I agreed to the following parameters: The coop and run would not be made of wood, but of plastic and/or PVC so that they would be easier to keep clean and would not be pecked and destroyed by the chickens. We have a fenced back yard where I plan to allow the chickens free range when I am home to supervise, but because we work, they will need a roomy run to stay in much of the time. We live in S.C. so I expect the chickens to spend most of their days outside the coop year-round.
Here is the site I picked out for the run and coop. It's against the back wall of our garage. It's ideal because water and electricity are readily available, it gets morning sun but is shady most of the day, and it's out of sight of that one set of neighbors that might not fully appreciate the delight of having chickens next-door.

Given my limited time and construction skills and my handy husband's even more limited time, I preferred some kind of kit or ready-made coop. I'm sold on the plastic coops made by Snap Lock. They are well designed and a fairly good value.
Although I plan to have only 4 hens, I opted for the larger coop after reading about "chicken math" on the BYC forums. I also wanted a roomy coop since heat will be an issue more often than cold in our climate.
The kit was delivered within a couple days of my order. The box arrived a bit beat up but all the contents were fine. Here's what came out of the shipping carton.
It was not a hard job to put together with the help of my 10-year-old daughter. Most of the pieces were easy to snap together once they were aligned properly. The only exception was the awning piece. I'd say that the rubber mallet wasn't a bit helpful in putting it together. It just takes a bit of finesse to line the pieces up properly and then they snap right in (except for the awning, but the mallet didn't help there either except to vent frustration.)
I was pleased with the quality and the details. I like the carabiners and split rings to attach to all the latches to keep everything connected. Nice detail.
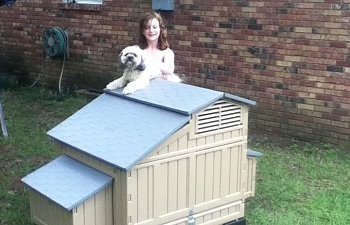
Once it was put together I was pretty pleased with the result. Our only concern upon first inspection is that it is very dark inside.
Note that I did finally get the awning attached! It's cute once it's on.
I set the coop up on a stand.
That added support piece is optional on the plans, but probably needed for the larger coop.
I wanted a run that was tall enough to walk in. I discovered lots of neat-o free plans for making things out of PVC pipe online.
These plans are easy to alter to increase or decrease the length of the structure in 3-foot increments. just add (or remove) a section from the middle. For each additional 3-foot section you will need to add (or subtract) the following to the materials list:
Part Qty Description
A 6 36-inch tube
E 3 4-way LT - 1 inch
G 2 58-inch tube
M 2 50-inch tube
Z 2 18-inch tube
BB 2 45 degree PVC fitting
AA 2 1 3/4 inch tube
CC 2 2 x/cross PVC fitting
Also, to make this a chicken run instead of a greenhouse, substitute hardware cloth for the cover (Parts T,U,V and W) and use zip ties to attach the hardware cloth instead of snap clamps (Parts X & Y)
The first step: cut the PVC tubes and metal conduit to the sizes specified in the plans. PVC comes in 10-foot poles. I measured and marked the lengths needed and my sweetie cut. (Power saw for PVC and hack saw for the metal conduit.) This took about an hour.
Here's some of my PVC all neatly cut and lined up ready to roll:
Large Snap Lock Coop - $695
Hardware Cloth $109 (ordered online it was half the cost of buying locally and I could get a 100-foot roll)
PVC, Fittings & other supplies $ 235
Here is wht the pvc structure looked like before adding the hardware cloth:
the hardest part was figuring out how to put the door assembly together. Here's a photo:
We used two methods to cut the hardware cloth. Handy husband used a demolition saw, holding the wire mesh up off the ground between two-by-fours.
I just used my hand wire cutter and cut every square. That worked well to cut it once it was in place.
This shows how we used the zip ties to attach the hardware cloth. We used outdoor zip ties in hopes they will withstand the weather longer, but I expect they will have to be replaced periodically.
We started beside the door and wrapped the hardware cloth around the structure, tying it on as we went. Then we did another pass above that, overlapping the pieces by 2 or 3 squares. Then we took some wire and secured the two layers of hardware cloth together so there wouldn't be a gap for critters to wiggle in.
In order to get my sweet husband's approval for my scheme to have backyard chickens I agreed to the following parameters: The coop and run would not be made of wood, but of plastic and/or PVC so that they would be easier to keep clean and would not be pecked and destroyed by the chickens. We have a fenced back yard where I plan to allow the chickens free range when I am home to supervise, but because we work, they will need a roomy run to stay in much of the time. We live in S.C. so I expect the chickens to spend most of their days outside the coop year-round.
Coop and Stand
Here is the site I picked out for the run and coop. It's against the back wall of our garage. It's ideal because water and electricity are readily available, it gets morning sun but is shady most of the day, and it's out of sight of that one set of neighbors that might not fully appreciate the delight of having chickens next-door.
Given my limited time and construction skills and my handy husband's even more limited time, I preferred some kind of kit or ready-made coop. I'm sold on the plastic coops made by Snap Lock. They are well designed and a fairly good value.
Although I plan to have only 4 hens, I opted for the larger coop after reading about "chicken math" on the BYC forums. I also wanted a roomy coop since heat will be an issue more often than cold in our climate.
The kit was delivered within a couple days of my order. The box arrived a bit beat up but all the contents were fine. Here's what came out of the shipping carton.
It was not a hard job to put together with the help of my 10-year-old daughter. Most of the pieces were easy to snap together once they were aligned properly. The only exception was the awning piece. I'd say that the rubber mallet wasn't a bit helpful in putting it together. It just takes a bit of finesse to line the pieces up properly and then they snap right in (except for the awning, but the mallet didn't help there either except to vent frustration.)
I was pleased with the quality and the details. I like the carabiners and split rings to attach to all the latches to keep everything connected. Nice detail.
Once it was put together I was pretty pleased with the result. Our only concern upon first inspection is that it is very dark inside.
Note that I did finally get the awning attached! It's cute once it's on.
I set the coop up on a stand.
That added support piece is optional on the plans, but probably needed for the larger coop.
The 6' x 12' Run
I wanted a run that was tall enough to walk in. I discovered lots of neat-o free plans for making things out of PVC pipe online.
These plans are easy to alter to increase or decrease the length of the structure in 3-foot increments. just add (or remove) a section from the middle. For each additional 3-foot section you will need to add (or subtract) the following to the materials list:
Part Qty Description
A 6 36-inch tube
E 3 4-way LT - 1 inch
G 2 58-inch tube
M 2 50-inch tube
Z 2 18-inch tube
BB 2 45 degree PVC fitting
AA 2 1 3/4 inch tube
CC 2 2 x/cross PVC fitting
Also, to make this a chicken run instead of a greenhouse, substitute hardware cloth for the cover (Parts T,U,V and W) and use zip ties to attach the hardware cloth instead of snap clamps (Parts X & Y)
The first step: cut the PVC tubes and metal conduit to the sizes specified in the plans. PVC comes in 10-foot poles. I measured and marked the lengths needed and my sweetie cut. (Power saw for PVC and hack saw for the metal conduit.) This took about an hour.
Here's some of my PVC all neatly cut and lined up ready to roll:
Cost of Materials
Here's the approximate cost for the materials I used (all new materials purchased at Lowe's Home Depo or ordered from Amazon).
Large Snap Lock Coop - $695
Hardware Cloth $109 (ordered online it was half the cost of buying locally and I could get a 100-foot roll)
PVC, Fittings & other supplies $ 235
Here is wht the pvc structure looked like before adding the hardware cloth:
the hardest part was figuring out how to put the door assembly together. Here's a photo:
We used two methods to cut the hardware cloth. Handy husband used a demolition saw, holding the wire mesh up off the ground between two-by-fours.
I just used my hand wire cutter and cut every square. That worked well to cut it once it was in place.
This shows how we used the zip ties to attach the hardware cloth. We used outdoor zip ties in hopes they will withstand the weather longer, but I expect they will have to be replaced periodically.
We started beside the door and wrapped the hardware cloth around the structure, tying it on as we went. Then we did another pass above that, overlapping the pieces by 2 or 3 squares. Then we took some wire and secured the two layers of hardware cloth together so there wouldn't be a gap for critters to wiggle in.