This is my story. My kids all left me . Took my Grandkids with them ! I was devastated. So what better to fill the void of an empty nest, then a new nest full of chickens !!
I fought with the husband for 3 weeks about getting a couple of chickens, building a small coop out of recycled materials I could gather up here and there and from around
the community. I tell him I have $400.00 saved up for this project out of my own money. Finally, husband gets on board, comes up with his own design and plans, and thus begins our chicken adventure.
April 15th, 2011. Day 1: I go to TSC , pick out their 6 chick minimum, and bring the babies home . 2 black sex links, 2 ISA browns, 2 barred rocks.
Six babies all settled into their brooder, carefully being babysat by the family Jack Russell, and the family cat.

Day 2: Husband informs me that all new materials are needed, if he is going to build this. At this point I am just happy he is helping out, so I stay silent.
He is a truck driver and only home on the weekends so I am grateful he is giving up his weekend time for me !
First trip to the lumberyard he makes a $250.00 dent in my savings.
I am at work at and receiving updates from husbands cell phone of lumber piles and a new saw he HAD to buy to complete the task.
Floor built by the time I am home from work ( The smokiness was my BBQ in the closed garage because of the cold and rain )
Day 3 :
3 walls completed while I am at work , again. He stops to watch the Nascar race and to confer with me about hen door placement.
Day 4 :
Husband leaves for his week of truck driving. Hope to have the coop done by the time they are needing it, so they are not roosting on my kitchen chairs.
Week 2:
Second trip to the lumber yard, takes another $350.00 dent out of my savings. Whoa honey ! Wait a minute. I said I
only had $400.00 for this chicken project. 250+350 = 600.00 . And we have no run yet ! Ahem ! He says " if you are going to do it, do it big ! "
The 2 Jack Russells approve of the hen door.
End of Week 2. Today is Easter and DH leaves again today. At least I can start laying the linoleum, and get started primering while he is gone .
My DS came over and laid the linoleum for me. We even have enough extra to lay on the poop pit under the roosts when we get to the inside .
And got the outside walls primered.
Adding insulation , so they don't freeze in the Indiana winters !
Week 3:
Need some walls ! I was working when the DH and DS did the walls, so I missed those pics ! But I got it all primered and ready to paint ! Here you can see
his thoughts for vents. They will have slider doors to be opened or closed as needed. We placed them above where the roost will be .
Next step is painting the inside before he builds the roost and nesting boxes. I am using some left over paint we had from bedrooms and
the living room. He asks why not buy paint, I said I am out of money, honey ! I have to use what we got ! ugh !
The girls are 3 weeks old and are getting so funny !
They love their veggies!
The Jeep is coming out and the chicken coop will be shoved, pulled, and pushed back into this hole, in the lean to.
Then the run will be roofed off of the shed, and the run will be built along and next to the shed.
I wanted to put it on this end of the lean to's ( we have a total of 3 that run behind the shed) where the garden tractor can be seen in this picture, but
the idea was nixed. I gave in too easy on this one. Oh well.
May 12, 2011. Day ? Week 3 or 4 ? Coop progress : Inside is painted, ready for the roost, poop shelf, and nesting boxes. And exterior door and hen door.
Friday the 13 !!! Came home from work to find :
Slidable vents, covered in hardware cloth, the length of the coop ! 3 large , 2 small, all slide open and closed as needed. ( 1 large and one small shown in pic )
A 4 layer ( ha ha ) nesting box , still needs a facing across front and baseboards to trim it out . And painted of course.
And the roost , with linoleum on poop shelf
Ok, nesting boxes are done ! Ready to be painted !
Silly dog ! It is not a doggy condo !!
May 15, 2010:
Nesting boxes painted, feed box painted
Roost and poop shelf trim painted
The people door is built and primered. The Hen door is built and primered.
Getting closer to moving day !!!!
( Projected moving day is Memorial Weekend ! )
Saturday May 21, 2011 : It's done !!! It's done !!!! woot ! woot !
Ok it is complete. The babies are in it, but the coop is still in the garage. They love all the extra room !!
The people door, including an emergency pull string in case the door closes by accident with me in it .
The front view, hen door, and flower boxes under the window !
We will be pushing , pulling, and dragging it out to it's location next weekend. husband has a Bobcat lined up to use next weekend too.
May 28th, 2011
Moving Day !
We took this
and moved it here
First you gotta get Grandpa's chains around
Then you gotta go get Granpa's tractor
The you gotta bring the tractor up
Then you hook up the chains and slowly pull , but keeping an eye on what you are pulling
Then it got pulled across the lawn
Then you gotta lay the pavers
And pack them down tight
Then you have to carefully measure
Then wait for Grandpa to bring the Bobcat around (Garden = parking lot right now )
Then slowly push it back into the hole !
My view from my kitchen window
Rewarding the "helpers" with a golf cart ride around the yard !
Tomorrow the husband will be setting the posts for the run, and prepping the area to attach the roof to the grey shed roof !!!!!
To be continued . . . . .
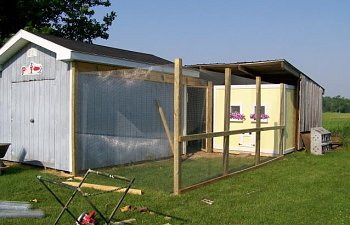
June 3rd and 4th : Starting of the run . The pole holes were dug, and they were cemented in a few days prior.
Approx of the run will be 9 ' X 16 ' / It will be finished off with a tin roof coming off the existing shed.
My outside area is inside under the leanto's , out of the weather !
The pile of lumber is for the rafters and roof and will be gone upon completion.
Cant really tell but the black thing holding the dustpan is a rooster candle holder that I cut the candle holder part off of and
grinded it smooth and painted the tips for hanging whatever. Also have a thermometer on this shed wall and one inside the coop to check the differences.
I dont know if she was waiting impatiently for us to finsh the fencing , or just wanting to see what was going on ! LOL
Finally they are able to be "free " !! I didn't get pictures because I was videoing taping it ! Yes I have lost my mind.
To be continued tomorrow !!!
I fought with the husband for 3 weeks about getting a couple of chickens, building a small coop out of recycled materials I could gather up here and there and from around
the community. I tell him I have $400.00 saved up for this project out of my own money. Finally, husband gets on board, comes up with his own design and plans, and thus begins our chicken adventure.
April 15th, 2011. Day 1: I go to TSC , pick out their 6 chick minimum, and bring the babies home . 2 black sex links, 2 ISA browns, 2 barred rocks.
Six babies all settled into their brooder, carefully being babysat by the family Jack Russell, and the family cat.


Day 2: Husband informs me that all new materials are needed, if he is going to build this. At this point I am just happy he is helping out, so I stay silent.
He is a truck driver and only home on the weekends so I am grateful he is giving up his weekend time for me !
First trip to the lumberyard he makes a $250.00 dent in my savings.
I am at work at and receiving updates from husbands cell phone of lumber piles and a new saw he HAD to buy to complete the task.
Floor built by the time I am home from work ( The smokiness was my BBQ in the closed garage because of the cold and rain )

Day 3 :
3 walls completed while I am at work , again. He stops to watch the Nascar race and to confer with me about hen door placement.

Day 4 :
Husband leaves for his week of truck driving. Hope to have the coop done by the time they are needing it, so they are not roosting on my kitchen chairs.
Week 2:

Second trip to the lumber yard, takes another $350.00 dent out of my savings. Whoa honey ! Wait a minute. I said I
only had $400.00 for this chicken project. 250+350 = 600.00 . And we have no run yet ! Ahem ! He says " if you are going to do it, do it big ! "

The 2 Jack Russells approve of the hen door.


End of Week 2. Today is Easter and DH leaves again today. At least I can start laying the linoleum, and get started primering while he is gone .
My DS came over and laid the linoleum for me. We even have enough extra to lay on the poop pit under the roosts when we get to the inside .

And got the outside walls primered.

Adding insulation , so they don't freeze in the Indiana winters !

Week 3:
Need some walls ! I was working when the DH and DS did the walls, so I missed those pics ! But I got it all primered and ready to paint ! Here you can see
his thoughts for vents. They will have slider doors to be opened or closed as needed. We placed them above where the roost will be .


Next step is painting the inside before he builds the roost and nesting boxes. I am using some left over paint we had from bedrooms and
the living room. He asks why not buy paint, I said I am out of money, honey ! I have to use what we got ! ugh !
The girls are 3 weeks old and are getting so funny !

They love their veggies!


The Jeep is coming out and the chicken coop will be shoved, pulled, and pushed back into this hole, in the lean to.

Then the run will be roofed off of the shed, and the run will be built along and next to the shed.

I wanted to put it on this end of the lean to's ( we have a total of 3 that run behind the shed) where the garden tractor can be seen in this picture, but
the idea was nixed. I gave in too easy on this one. Oh well.
May 12, 2011. Day ? Week 3 or 4 ? Coop progress : Inside is painted, ready for the roost, poop shelf, and nesting boxes. And exterior door and hen door.
Friday the 13 !!! Came home from work to find :
Slidable vents, covered in hardware cloth, the length of the coop ! 3 large , 2 small, all slide open and closed as needed. ( 1 large and one small shown in pic )

A 4 layer ( ha ha ) nesting box , still needs a facing across front and baseboards to trim it out . And painted of course.

And the roost , with linoleum on poop shelf

Ok, nesting boxes are done ! Ready to be painted !

Silly dog ! It is not a doggy condo !!

May 15, 2010:
Nesting boxes painted, feed box painted

Roost and poop shelf trim painted

The people door is built and primered. The Hen door is built and primered.
Getting closer to moving day !!!!
( Projected moving day is Memorial Weekend ! )
Saturday May 21, 2011 : It's done !!! It's done !!!! woot ! woot !
Ok it is complete. The babies are in it, but the coop is still in the garage. They love all the extra room !!


The people door, including an emergency pull string in case the door closes by accident with me in it .
The front view, hen door, and flower boxes under the window !


We will be pushing , pulling, and dragging it out to it's location next weekend. husband has a Bobcat lined up to use next weekend too.
May 28th, 2011
Moving Day !
We took this

and moved it here

First you gotta get Grandpa's chains around

Then you gotta go get Granpa's tractor

The you gotta bring the tractor up

Then you hook up the chains and slowly pull , but keeping an eye on what you are pulling

Then it got pulled across the lawn


Then you gotta lay the pavers

And pack them down tight

Then you have to carefully measure

Then wait for Grandpa to bring the Bobcat around (Garden = parking lot right now )

Then slowly push it back into the hole !


My view from my kitchen window

Rewarding the "helpers" with a golf cart ride around the yard !

Tomorrow the husband will be setting the posts for the run, and prepping the area to attach the roof to the grey shed roof !!!!!
To be continued . . . . .
June 3rd and 4th : Starting of the run . The pole holes were dug, and they were cemented in a few days prior.

Approx of the run will be 9 ' X 16 ' / It will be finished off with a tin roof coming off the existing shed.

My outside area is inside under the leanto's , out of the weather !

The pile of lumber is for the rafters and roof and will be gone upon completion.

Cant really tell but the black thing holding the dustpan is a rooster candle holder that I cut the candle holder part off of and
grinded it smooth and painted the tips for hanging whatever. Also have a thermometer on this shed wall and one inside the coop to check the differences.

I dont know if she was waiting impatiently for us to finsh the fencing , or just wanting to see what was going on ! LOL

Finally they are able to be "free " !! I didn't get pictures because I was videoing taping it ! Yes I have lost my mind.


To be continued tomorrow !!!