SUMMARY
This document details how to make chicken kill cones used to restrain chickens calmly in place as they are being slaughtered. It makes the slaughter process simple, easy, and efficient especially when process multiple birds. Having 2 or more kill cones allow you to process multiples birds at a time. A bucket can be placed under the kill cones to collect the blood to add to your compost pile (if available).
In addition to this article describing the build with pictures and diagrams, below is a YouTube video with instructions on how I built my homemade chicken kill cones.
How To Make Chicken Kill Cones
MATERIAL AND TOOLS NEEDED
THE BUILD
Unroll the galvanized (or aluminum) flashing. At the top of the flashing mark 15in (center marker) and 30in from the left. On the bottom of the flashing, mark 15in (center marker) then mark 7 inches from the left and right of the 15in (center) mark. Then draw a line from the top of the flashing to the bottom of the flashing to connect the markings.
Then from the far left side of the flashing, you want to mark 1.5 inches from the top and bottom markings, then draw a line. This area will be where the rivets go. DO NOT cut along the inside line.
 Diagram 1
With all the measurements marked, cut along the far left and far right lines. Remember, do not cut the line marking the rivet area.
 Diagram 2
The metal flashing is sharp along all the edges; therefore we want fold over the top and bottom edge to make it more blunt. To do so, align the top part of the flashing ¼ of an inch over the edge of a work bench or 2x4 piece of wood. Then take your time to fold the edge over.
 Diagram 3
 Diagram 4
Once the edge is bend 90-degrees, remove the clamps and continue hammering until it is fully folded over.
 Diagram 5
Follow the same instruction to fold over the top and bottom edge of the flashing. Make sure the folds are on the same side. The folds will be the outside of kill cone.
Next, join the rights side of the flashing so that it aligns with the inside of the rivet area.
 Diagram 6
Then clamp or tape in place to place the rivets.
 Diagram 7
Drill 3 to 4 holes between the 1.5 in line to place rivets.
 Diagram 8
 Diagram 9
Place the small end of the rivet (rivet shaft) through the hole.
 Diagram 10
The longer end of the rivet (mandrel) should be on the inside of the cone. This part will snap off from the rivet head and become flat on the inside.
 Diagram 11
Place the rivet gun over the mandrel.
 Diagram 12
Squeeze the rivet tool until the stem snaps off inside the cone.
 Diagram 13
The rivet shaft will expand on the outside of the cone, and keep the rivet in place.
 Diagram 14
Continue adding the rivets until the cone is securely fastened. But consider doing a better job at placing the rivets in a straight line
 Diagram 15
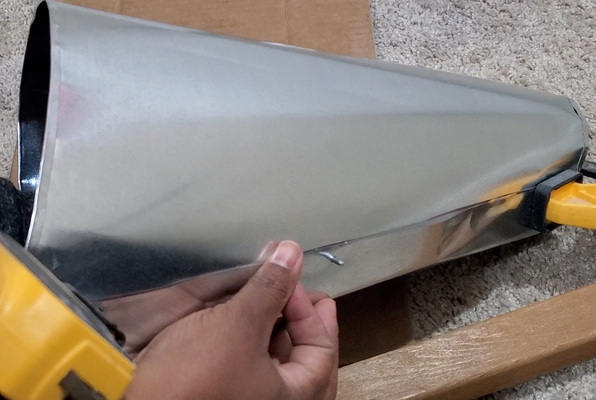
The last step of constructing the cone, is flattening the top cone where the two ends meet.
 Diagram 16
Diagram 17
 Diagram 18
Here is a look at the 2 aluminum cones we used for 3 years. We were able to process over 100 chickens in the aluminum cones. They would have lasted longer with a support 2x4 going down the spine.
 Diagram 19
OTHER DIMENSIONS
The best part about making your own kill cones is customization. For smaller birds I use 24in on top and 10in on bottom of cutouts.
Don’t be afraid of experimenting with various dimensions using old cardboard boxes.
CONCLUSION
Making your own chicken kill cones is quite easy and makes for the perfect weekend project. Better yet, the measurements can be customized for smaller or larger birds.
Also, purchasing multiple chicken kill cones can get rather expensive. It is more economical to purchase the materials to make 2 or more of your own kill cones.
 Diagram 20
 Diagram 21
 Diagram 22
YouTube Videos of Build:
How To Make Chicken Kill Cones
This document details how to make chicken kill cones used to restrain chickens calmly in place as they are being slaughtered. It makes the slaughter process simple, easy, and efficient especially when process multiple birds. Having 2 or more kill cones allow you to process multiples birds at a time. A bucket can be placed under the kill cones to collect the blood to add to your compost pile (if available).
In addition to this article describing the build with pictures and diagrams, below is a YouTube video with instructions on how I built my homemade chicken kill cones.
How To Make Chicken Kill Cones
MATERIAL AND TOOLS NEEDED
- Rivet Tool
- Galvanized flashing 16in x 10ft (or aluminum if galvanize is out of your budget)
- Clamps or tape (to hold flashing in place)
- Drill (to make holes for the rivets)
- Box cutter or metal cutters
- Ruler (to draw line and make straight cut with razor)
- Workbench or 2x4 (to form edges)
THE BUILD
Unroll the galvanized (or aluminum) flashing. At the top of the flashing mark 15in (center marker) and 30in from the left. On the bottom of the flashing, mark 15in (center marker) then mark 7 inches from the left and right of the 15in (center) mark. Then draw a line from the top of the flashing to the bottom of the flashing to connect the markings.
Then from the far left side of the flashing, you want to mark 1.5 inches from the top and bottom markings, then draw a line. This area will be where the rivets go. DO NOT cut along the inside line.
With all the measurements marked, cut along the far left and far right lines. Remember, do not cut the line marking the rivet area.
The metal flashing is sharp along all the edges; therefore we want fold over the top and bottom edge to make it more blunt. To do so, align the top part of the flashing ¼ of an inch over the edge of a work bench or 2x4 piece of wood. Then take your time to fold the edge over.
Once the edge is bend 90-degrees, remove the clamps and continue hammering until it is fully folded over.
Follow the same instruction to fold over the top and bottom edge of the flashing. Make sure the folds are on the same side. The folds will be the outside of kill cone.
Next, join the rights side of the flashing so that it aligns with the inside of the rivet area.
Then clamp or tape in place to place the rivets.
Drill 3 to 4 holes between the 1.5 in line to place rivets.
Place the small end of the rivet (rivet shaft) through the hole.
The longer end of the rivet (mandrel) should be on the inside of the cone. This part will snap off from the rivet head and become flat on the inside.
Place the rivet gun over the mandrel.
Squeeze the rivet tool until the stem snaps off inside the cone.
The rivet shaft will expand on the outside of the cone, and keep the rivet in place.
Continue adding the rivets until the cone is securely fastened. But consider doing a better job at placing the rivets in a straight line
The last step of constructing the cone, is flattening the top cone where the two ends meet.
Here is a look at the 2 aluminum cones we used for 3 years. We were able to process over 100 chickens in the aluminum cones. They would have lasted longer with a support 2x4 going down the spine.
OTHER DIMENSIONS
The best part about making your own kill cones is customization. For smaller birds I use 24in on top and 10in on bottom of cutouts.
Don’t be afraid of experimenting with various dimensions using old cardboard boxes.
CONCLUSION
Making your own chicken kill cones is quite easy and makes for the perfect weekend project. Better yet, the measurements can be customized for smaller or larger birds.
Also, purchasing multiple chicken kill cones can get rather expensive. It is more economical to purchase the materials to make 2 or more of your own kill cones.
YouTube Videos of Build:
How To Make Chicken Kill Cones


I also have a video for those who prefer visual instructions.