So I got it into my brain one night that having chickens in the backyard would be fun, entertaining, and instructive to myself and my family. Also, as my wife and I long to move out to the country where one might consider it “safer” to raise a family, I thought of this idea as a trainer course in livestock.
But where to begin… at www.backyardchickens.com of course! I found this website and devoured it. I looked at every page, every picture, every article that had to do with starting chickens in the yard, and assimilated it into my plan for the coop.
Here it is, from start to finish. It began with a trip to my local ReStore, where I found a bathroom vanity cabinet that would make a great main room to the coop/tractor. From there, it all went to the graph paper as I sketched out how this project was going to take place. One thing I’m glad I did was this, as it made it go much faster than it could have. And as it is, it took me 6 weekends to build it. Mind you, I have 4 kids to raise so time is severely limited. Next is my pile of lumber, which was almost exactly accurate. I used 2x3’s to lighten the load. Then I took off the toe kick at the bottom of the cabinet.

I used 2x4’s for the main support posts, and did a LOT of rabbeting to provide structural strength. It also eliminated a LOT of screws.
Cut some holes in the cabinet, attach posts, cut out a hole for the window I got for $6 at Goodwill and….
My daughter picked out the sky blue paint for the inside, and I installed the window. The posts would later be cut down to the correct height once I got the roof angle figured out. And then create and install the nesting box.
Time to make the yard frame, which consisted entirely of 2x2’s, all rabbeted together, glued, and screwed. The hinge for the nesting box is a pair of chest hinges that are spring-loaded to stay up or down as I need it.
My future tenants at a week old. 2 Rhode Island Reds, 2 Buff Orpingtons, and 1 Araucana (my wife insisted on the Easter Egg Chicken)
The roof is fiberglass dark-brown solid corrugated roofing. This is 2 sheets wide, with the excess used to cover the nesting box. The clean-out for the coop is top-hinged, and I’ve added a hook n eye to hold it up so my kid can clean out the bedding material. (Hey, these are HER chickens, right?) It also has a bolt lock when it’s in the closed position to keep predators out.
Inside the nesting box I added some roosting poles made out of branches I trimmed off a tree in the yard. The actual nesting boxes will be blocked off til the week I anticipate the first eggs to be laid. The chickens are little teenagers by now, curious and pecking at everything!
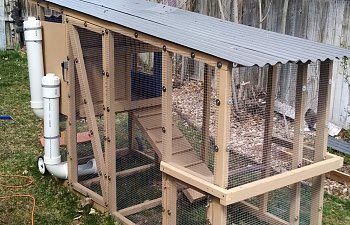
Time to start on the part of the project that everyone will be most curious about. How am I gonna feed and water my girls? With 4” PVC, that’s how! Using elbows, caps, drain adaptors, and plugs, these can hold approximately 3 gallons of water and 6 big scoops of feed. Just about perfect for daily chores for my 9 year old wanna-be farmer!
I mounted the waterer so that it was just below the coop. The girls can reach and drink at their leisure. The feeder is just above ground level, and protected from rain/sprinkler system by a scrap piece of roofing.
And the final result…… ½” netting so the girls can’t get their little heads stuck, fender washers under the screws, and then I spray painted “dots” of clear protective coating over them so it will resist weathering a little bit longer. Notice that I used small lawnmower wheels for the back under the heavy part of the tractor. WRONG!! Should have used larger wheels as the placement of the axles are too high to be able to go over roots and such. I can’t move the darn thing! I also added a “lift bar” seen on the front. RIGHT!!! Absolutely necessary! Aaand, on the feeder side, there’s a man-door (well, a kid door anyways, but I can still get in if I bend over) and a chicken door on the front corner, so that when I’m ready, I can let them out that way. Inside, the coop door was a booger to do. I didn’t have the option of a traditional vertical door, so making a sliding door was definitely a challenge. 6 months later, I’m still not happy with it and it’s the thing I hate the most about my tractor.
Filling the feeder. About 6 scoops worth is pretty good! And installing the new tenants….
So there you have it, my tractor build! My girls have been in place for about 2 months now, happily getting fat. I’m going to enclose the underside of my deck so they can’t get under there, then begin letting them loose during the day when we’re home to supervise. I expect eggs in about 3 weeks so we’re super excited! However, we’ve decided that the chickens are just too destructive to the grass to keep moving the tractor every few days, so it is now stationary where we can see them when we look out our patio door. My girls are laid back, quiet, and friendly, so if you’re wondering if this is the thing to do for you family, DO IT!
Regards, and happy chickening!
Jason McMillan
But where to begin… at www.backyardchickens.com of course! I found this website and devoured it. I looked at every page, every picture, every article that had to do with starting chickens in the yard, and assimilated it into my plan for the coop.
Here it is, from start to finish. It began with a trip to my local ReStore, where I found a bathroom vanity cabinet that would make a great main room to the coop/tractor. From there, it all went to the graph paper as I sketched out how this project was going to take place. One thing I’m glad I did was this, as it made it go much faster than it could have. And as it is, it took me 6 weekends to build it. Mind you, I have 4 kids to raise so time is severely limited. Next is my pile of lumber, which was almost exactly accurate. I used 2x3’s to lighten the load. Then I took off the toe kick at the bottom of the cabinet.
I used 2x4’s for the main support posts, and did a LOT of rabbeting to provide structural strength. It also eliminated a LOT of screws.
Cut some holes in the cabinet, attach posts, cut out a hole for the window I got for $6 at Goodwill and….
My daughter picked out the sky blue paint for the inside, and I installed the window. The posts would later be cut down to the correct height once I got the roof angle figured out. And then create and install the nesting box.
Time to make the yard frame, which consisted entirely of 2x2’s, all rabbeted together, glued, and screwed. The hinge for the nesting box is a pair of chest hinges that are spring-loaded to stay up or down as I need it.
My future tenants at a week old. 2 Rhode Island Reds, 2 Buff Orpingtons, and 1 Araucana (my wife insisted on the Easter Egg Chicken)
The roof is fiberglass dark-brown solid corrugated roofing. This is 2 sheets wide, with the excess used to cover the nesting box. The clean-out for the coop is top-hinged, and I’ve added a hook n eye to hold it up so my kid can clean out the bedding material. (Hey, these are HER chickens, right?) It also has a bolt lock when it’s in the closed position to keep predators out.
Inside the nesting box I added some roosting poles made out of branches I trimmed off a tree in the yard. The actual nesting boxes will be blocked off til the week I anticipate the first eggs to be laid. The chickens are little teenagers by now, curious and pecking at everything!
Time to start on the part of the project that everyone will be most curious about. How am I gonna feed and water my girls? With 4” PVC, that’s how! Using elbows, caps, drain adaptors, and plugs, these can hold approximately 3 gallons of water and 6 big scoops of feed. Just about perfect for daily chores for my 9 year old wanna-be farmer!
I mounted the waterer so that it was just below the coop. The girls can reach and drink at their leisure. The feeder is just above ground level, and protected from rain/sprinkler system by a scrap piece of roofing.
And the final result…… ½” netting so the girls can’t get their little heads stuck, fender washers under the screws, and then I spray painted “dots” of clear protective coating over them so it will resist weathering a little bit longer. Notice that I used small lawnmower wheels for the back under the heavy part of the tractor. WRONG!! Should have used larger wheels as the placement of the axles are too high to be able to go over roots and such. I can’t move the darn thing! I also added a “lift bar” seen on the front. RIGHT!!! Absolutely necessary! Aaand, on the feeder side, there’s a man-door (well, a kid door anyways, but I can still get in if I bend over) and a chicken door on the front corner, so that when I’m ready, I can let them out that way. Inside, the coop door was a booger to do. I didn’t have the option of a traditional vertical door, so making a sliding door was definitely a challenge. 6 months later, I’m still not happy with it and it’s the thing I hate the most about my tractor.
Filling the feeder. About 6 scoops worth is pretty good! And installing the new tenants….
So there you have it, my tractor build! My girls have been in place for about 2 months now, happily getting fat. I’m going to enclose the underside of my deck so they can’t get under there, then begin letting them loose during the day when we’re home to supervise. I expect eggs in about 3 weeks so we’re super excited! However, we’ve decided that the chickens are just too destructive to the grass to keep moving the tractor every few days, so it is now stationary where we can see them when we look out our patio door. My girls are laid back, quiet, and friendly, so if you’re wondering if this is the thing to do for you family, DO IT!
Regards, and happy chickening!
Jason McMillan