Started a couple of years ago as I watched more and more of my neighbors getting laid off.I'm 60 years old and close to retirement. I thought about what I would do every day if I didn't have to go to work. That was when I decided to start learning everything I could about becoming self sufficient and you can't become self sufficient without chickens. I make homemade wine so I decided I would grow my own blueberries as well as strawberries. Below is the raised box I built to accomplish this. The blueberries are down the middle of the box and strawberries along the side set in a concrete block retaining wall. I set the block with 18" of rebar driven into the ground, one on each inside corner, to keep it from pushing out. Then filled them with topsoil along with the box and covered them with industrial grade carpet and burned a 1 1/4" inch hole in the carpet in each hole in the block and planted the strawberries so that each plant emerges from the hole but no weeds can get started. This also keeps the berries on a bed of carpet and off the dirt. The entire area is surrounded with an old above ground pool wall laid flat on the ground as weed barrier and with industrial grade carpet over it as I grew watermelon on the corners and I didnt want the metal to burn the vines. Since the garden is finished the planters have been removed. The blueberries are mulched about 8" deep with pine straw. The bird netting is suspended over an old salvaged canopy frame And the outer fence is made from 1/2" pvc with chicken wire and leftover hardware cloth form the coop.

Then I needed a garden. My soil is heavy blue clay and I call it "grumbly" ground so the only alternative is a raised box. I had tried wooden boxes when I first moved out here 18 years ago but eventually wood rots. Yes even pressure treated wood. Stone however does not rot. I laid down 18" wide metal roofing a friend had left over from roofing his barn all around the perimiter as weed block and stacked the stone on that. I harvested the stone from local farm fields using my ATV which has a small dump box in the back. (boy has that ever come in handy around here). The farmers were happy to see me picking them up as they damage their tilling equipment. Stacked them and filled it with topsoil donated by a neighbor who had a huge pile in his back yard left from the excavation of a new home. Thirty yards of top dirt one truckload at a time (in my half ton pickup) and some serious aching muscles but it is finished. You might notice what appears to be a thin white line under the top layer of stone. That is 5x5 vinyl siding (tear offs from a construction site) laid flat. The metal fence posts are splayed outward at about a 15 degree angle and driven through the middle of the siding so no weeds can come up under the fence. The gate at the far end is 1/2" pvc with 1/2" hardware cloth covering it. That black box in the upper right is the compost bin. The garden is mulched about 4" deep with grass clippings
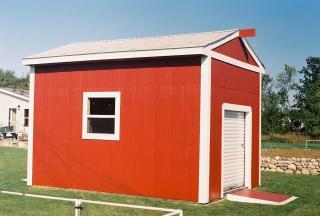
The final addition this summer was the shed 12'X16" with 10' sidewalls. Two 4'X12' lofts 6' high on each end and a 60 AMP service. Two 6' overhead doors on each end make it possible to drive my ATP (all terrain pickup) straight through with the gambrel for hanging and processing deer in the center mounted on a 1 ton chain hoist.
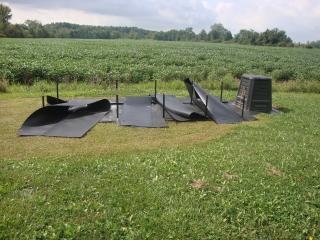
This summer I completely re-built my compost system. I had been using a black plastic bin that I purchaced at TSC but I didn't like it as it was hard to access and too small. you can see it sitting to the right of the picture below. It was fine for kitchen waste but now I have a lot of garden waste, grass clippings and the annual litter and weekly dropings from the birds so I needed something bigger. This summer a friend of mine that works at a local landfill aquired some of the heavy black plastic liner they use when building a new landfill site. I laid down a piece 14' x 6' flat on the ground. I bought 5 - 6' fence posts and cut them in half. and pounded them directly through the bottom liner leaving 8' outside of the bins as a skirt so I can drive the lawnmower over it eliminating the need to weed wack around it. I left 2' of post exposed above ground. and built the bin in four sections. The largest, on the left, is for new waste and is 4' wide the one to the right of that is 3' wide and the remaining two are 2 1/2' wide. I cut the sidewalls 2'6" high so that they slope at the bottom of the bin toward the center and double walled each bin.
I cut each interior wall to form a horseshoe shape inside the bin and zip-tied the inside and outside walls together with the posts. Obviously I used a drill to make the holes for the zip-ties. Once the walls were up I cut the floor of the bin out with a carton knife to leave the center of the bin exposed to the ground. Below is the finished product. every spring I will take all the compost from the bin on the left and turn it over into the adjacent bin on the right. Which is why I only went 2' high so I can just toss it over the sidewall to the next bin..
You will notice the rake (handle down) between the walls of the bin and a stump cut at a downward angle in the back corner of the bin. I use the stump to chop cornstalks, tomato plants and vines into smaller pieces with a machete. Believe me every time I pick up that machete I remind myself how much I need an oposable thumb on BOTH hands. I know a lot of folks have tumblers and a lot of technical advice on how to compost but I don't want to put that much time or effort into it. I just let it rot over the winter and turn it in the spring. It will be four years old before it goes in the planting boxes but I'm in no hurry as every year the majority of my grass clippings go directly into the boxes and garden as mulch.
Last winter while I was laid off from work I went to work building solar heaters for all my south facing windows. I got the idea from a link on BYC to coloradowindpower.com and I thought why not give it a try. Rather than attach the glass to the front of the heater I built it so that the unit nests directly against the window pane. I also modified the design to place the fan farther from the frame to insure better air flow through the entire heater and I shortened the design so as to only cover the lower pane. The entire unit, solar electric panel $30.00 (from harbor freight) the fan, $15.00 (from radio shack) the frame $15.00, Great stuff foam $7.50 (Used about 1+1/2 cans @ $5.00 ea.) and about forty aluminum cans ( we have a $0.10 deposit) $4.00. A one time investment of under $75.00 ea. that will save me approximately $10.00 worth of propane every day I have full sun. That should easily pay for itself in one or two years and continue to produce heat for years to come. Assuming the sun shines! In the summer I just remove the entire unit from the window.
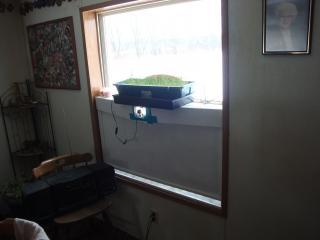
This is the heater from inside the house The planter (chives) keeps the solar panel powering the fan flush to the upper windowpane. Air inlet at the bottom (so I am heating the indoor air rather than the outdoor air) and fan at the top.
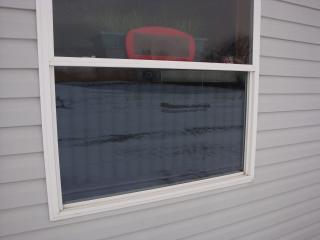
This is another view from outside.
It is difficult to see the painted cans but the unit works beautifully. I put a similar unit in every south facing window in the house. The last cloudless day with full sun and an outside temperature of 20 degrees F. I held a thermometer in front of the fan and the air temperature coming from the unit was 104 degrees. Combined these heaters will raise the temperature in the living room, dining room and kitchen about 6 degrees and the furnace will not kick on from ten in the morning till 6 at night.

Then I needed a garden. My soil is heavy blue clay and I call it "grumbly" ground so the only alternative is a raised box. I had tried wooden boxes when I first moved out here 18 years ago but eventually wood rots. Yes even pressure treated wood. Stone however does not rot. I laid down 18" wide metal roofing a friend had left over from roofing his barn all around the perimiter as weed block and stacked the stone on that. I harvested the stone from local farm fields using my ATV which has a small dump box in the back. (boy has that ever come in handy around here). The farmers were happy to see me picking them up as they damage their tilling equipment. Stacked them and filled it with topsoil donated by a neighbor who had a huge pile in his back yard left from the excavation of a new home. Thirty yards of top dirt one truckload at a time (in my half ton pickup) and some serious aching muscles but it is finished. You might notice what appears to be a thin white line under the top layer of stone. That is 5x5 vinyl siding (tear offs from a construction site) laid flat. The metal fence posts are splayed outward at about a 15 degree angle and driven through the middle of the siding so no weeds can come up under the fence. The gate at the far end is 1/2" pvc with 1/2" hardware cloth covering it. That black box in the upper right is the compost bin. The garden is mulched about 4" deep with grass clippings

The final addition this summer was the shed 12'X16" with 10' sidewalls. Two 4'X12' lofts 6' high on each end and a 60 AMP service. Two 6' overhead doors on each end make it possible to drive my ATP (all terrain pickup) straight through with the gambrel for hanging and processing deer in the center mounted on a 1 ton chain hoist.
This summer I completely re-built my compost system. I had been using a black plastic bin that I purchaced at TSC but I didn't like it as it was hard to access and too small. you can see it sitting to the right of the picture below. It was fine for kitchen waste but now I have a lot of garden waste, grass clippings and the annual litter and weekly dropings from the birds so I needed something bigger. This summer a friend of mine that works at a local landfill aquired some of the heavy black plastic liner they use when building a new landfill site. I laid down a piece 14' x 6' flat on the ground. I bought 5 - 6' fence posts and cut them in half. and pounded them directly through the bottom liner leaving 8' outside of the bins as a skirt so I can drive the lawnmower over it eliminating the need to weed wack around it. I left 2' of post exposed above ground. and built the bin in four sections. The largest, on the left, is for new waste and is 4' wide the one to the right of that is 3' wide and the remaining two are 2 1/2' wide. I cut the sidewalls 2'6" high so that they slope at the bottom of the bin toward the center and double walled each bin.
I cut each interior wall to form a horseshoe shape inside the bin and zip-tied the inside and outside walls together with the posts. Obviously I used a drill to make the holes for the zip-ties. Once the walls were up I cut the floor of the bin out with a carton knife to leave the center of the bin exposed to the ground. Below is the finished product. every spring I will take all the compost from the bin on the left and turn it over into the adjacent bin on the right. Which is why I only went 2' high so I can just toss it over the sidewall to the next bin..
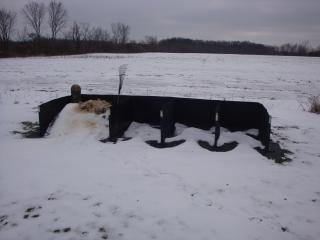
You will notice the rake (handle down) between the walls of the bin and a stump cut at a downward angle in the back corner of the bin. I use the stump to chop cornstalks, tomato plants and vines into smaller pieces with a machete. Believe me every time I pick up that machete I remind myself how much I need an oposable thumb on BOTH hands. I know a lot of folks have tumblers and a lot of technical advice on how to compost but I don't want to put that much time or effort into it. I just let it rot over the winter and turn it in the spring. It will be four years old before it goes in the planting boxes but I'm in no hurry as every year the majority of my grass clippings go directly into the boxes and garden as mulch.
Last winter while I was laid off from work I went to work building solar heaters for all my south facing windows. I got the idea from a link on BYC to coloradowindpower.com and I thought why not give it a try. Rather than attach the glass to the front of the heater I built it so that the unit nests directly against the window pane. I also modified the design to place the fan farther from the frame to insure better air flow through the entire heater and I shortened the design so as to only cover the lower pane. The entire unit, solar electric panel $30.00 (from harbor freight) the fan, $15.00 (from radio shack) the frame $15.00, Great stuff foam $7.50 (Used about 1+1/2 cans @ $5.00 ea.) and about forty aluminum cans ( we have a $0.10 deposit) $4.00. A one time investment of under $75.00 ea. that will save me approximately $10.00 worth of propane every day I have full sun. That should easily pay for itself in one or two years and continue to produce heat for years to come. Assuming the sun shines! In the summer I just remove the entire unit from the window.
This is the heater from inside the house The planter (chives) keeps the solar panel powering the fan flush to the upper windowpane. Air inlet at the bottom (so I am heating the indoor air rather than the outdoor air) and fan at the top.
This is another view from outside.
It is difficult to see the painted cans but the unit works beautifully. I put a similar unit in every south facing window in the house. The last cloudless day with full sun and an outside temperature of 20 degrees F. I held a thermometer in front of the fan and the air temperature coming from the unit was 104 degrees. Combined these heaters will raise the temperature in the living room, dining room and kitchen about 6 degrees and the furnace will not kick on from ten in the morning till 6 at night.