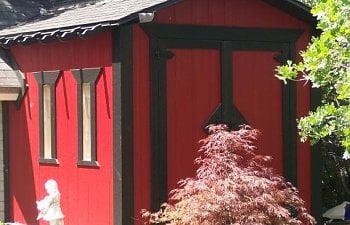
Our Japanese Pagoda Chicken House
My DH wanted a piece of art in his backyard and something that at first glance did not look as though it were a "chicken coop". He came up with the design and after tweeking it a few times designed a Japanese Pagoda Style Hen House.

The hen house attached to the storage shed. To the left of the shed are three ponds Behind the storage shed is a duck pen...the housing for the ducks is a dog house that actually sits in the chicken run. Someday the chicken run will continue to the right into the trees. The current run is 10' X 16'. The gables roof has ventilation built in and even when the outside temp is in the 100's the house has never been hotter than 94. During the day we often let the girls run the yard.
But let's start at the beginning...
We had an existing storage shed and decided to add on to that since we have limited space. The main area is 10' X 8' with a 10' X 4" overhang on the right side of the shed. We haven't decided what to do with the overhang...we though about making it a balcony for us to use or possibly adding a small isolation room or storage room for the hens. The main construction is the standard 2 X 4 every 16". The floor joists are 2X6. The run is under the house and is 2' on the left and five feet on the right.
Next we have added the sides and started the top window lookout. The is my incredible DH slaving away for me.
We added T1-11 for the sides and my husband shingled the roofs and painted the trim black. We also made french doors to ease the cleaning process.
We then added insulation to help keep the girls comfy.
This is the finished house....now let's start the run.
My DH used some metal panels for the top and sides of the run. He then added a garden box made from stone in front and topped it off with a fountain that was removed from the area used by the chicken house.
To Prevent our little ones from escaping we used chicken wire to make the opening in the fence smaller and buried it 8 inches deep flared outward.
To keep as much light as possible in the house we painted the inside a bright yellow and added nest boxes made from recycled wood. The brooder is on an old fish tank stand we no longer use. It is also storage.
The Roosts are from dead trees found in our yard. We configured them and nailed it to the building for support. From these roosts they have access to the higher roosts (trusses) where they can gaze out the corrugated plexi glass windows. The side windows are standard plexi glass. We used plexi glass because it is strong and cheaper then regualr glass.
Trusses/roosts
The door to the run under the house...and future opeing to the larger run that will run through the trees.
Looking into the run. You can see, in the background, the ramp to enter the house.
The only thing we really need now are stairs for the humans...but unfortunately my DH is helping neighbors build their houses and hasn't gotten around to finishing our stairs.
My DH wanted a piece of art in his backyard and something that at first glance did not look as though it were a "chicken coop". He came up with the design and after tweeking it a few times designed a Japanese Pagoda Style Hen House.

The hen house attached to the storage shed. To the left of the shed are three ponds Behind the storage shed is a duck pen...the housing for the ducks is a dog house that actually sits in the chicken run. Someday the chicken run will continue to the right into the trees. The current run is 10' X 16'. The gables roof has ventilation built in and even when the outside temp is in the 100's the house has never been hotter than 94. During the day we often let the girls run the yard.

But let's start at the beginning...

We had an existing storage shed and decided to add on to that since we have limited space. The main area is 10' X 8' with a 10' X 4" overhang on the right side of the shed. We haven't decided what to do with the overhang...we though about making it a balcony for us to use or possibly adding a small isolation room or storage room for the hens. The main construction is the standard 2 X 4 every 16". The floor joists are 2X6. The run is under the house and is 2' on the left and five feet on the right.
Next we have added the sides and started the top window lookout. The is my incredible DH slaving away for me.

We added T1-11 for the sides and my husband shingled the roofs and painted the trim black. We also made french doors to ease the cleaning process.

We then added insulation to help keep the girls comfy.

This is the finished house....now let's start the run.

My DH used some metal panels for the top and sides of the run. He then added a garden box made from stone in front and topped it off with a fountain that was removed from the area used by the chicken house.

To Prevent our little ones from escaping we used chicken wire to make the opening in the fence smaller and buried it 8 inches deep flared outward.
To keep as much light as possible in the house we painted the inside a bright yellow and added nest boxes made from recycled wood. The brooder is on an old fish tank stand we no longer use. It is also storage.


The Roosts are from dead trees found in our yard. We configured them and nailed it to the building for support. From these roosts they have access to the higher roosts (trusses) where they can gaze out the corrugated plexi glass windows. The side windows are standard plexi glass. We used plexi glass because it is strong and cheaper then regualr glass.

Trusses/roosts

The door to the run under the house...and future opeing to the larger run that will run through the trees.

Looking into the run. You can see, in the background, the ramp to enter the house.

The only thing we really need now are stairs for the humans...but unfortunately my DH is helping neighbors build their houses and hasn't gotten around to finishing our stairs.