My Aviary.

Design and Planning
I started planning my Aviary about two weeks ago when I first discovered the group. For the most part it has not been much more than looking around. finding out what I needed for my birds of choice (Grey Jungle Fowl) and coming up with an idea that would fit the needs and look nice in the back yard we have spent a lot of money and a lot more very hard work on.
about 4 or 5 days ago I set down with Kim and went over my final ideas and actually designed the Aviary. We then went to Home Depot to price materials and came back with a total cost at this time of $250. Not really that bad considering one of the birds that will go in it cost $150.
The overall design is a 10 foot by 11 foot box that will be 7 feet tall. it will be solid wood (2X8's) from the ground up to 2 feet. there will be 4 feet of chicken wire and the top of each wall will be two 2X6s. so basically a wood wall with a 4 foot tall window of wire all the way around. it will have a double entry to prevent any escapes. there is one living bush inside. we will paint the entire thing to match the house and shop. it only needed to have 3 sides built since it will butt up against my shop. the original plan called for a 10 by 14 but the space is smaller than I estimated. I am not sure if I will be housing a pair or a trio at this time. If I need more roaming space I can add decks at a later date. this is one trick to increase ground space that I have not seen mentioned on BYC. I have not designed a coop yet as I am still researching just what these birds need. I do know they do not need a large enclosure though. I would like to build them a roost at the top of the Aviary but some information I have seen indicates they need a shelter on the ground. at any rate it does not need to be large. I am also considering covering all or part of the top of the aviary. we do not get a lot of rain or even snow here usually but when it does the birds will need some sort of cover to stay out of it. plus it would be nice to not have to work in the mud.
Jungle Fowl are not chickens and have different needs. Some of the factors I took into account are.
Jungle Fowl are wild birds in behavior. They would rather have bushes and other foliage to hide in than a coop to go into. Coop requirements are in the line of a pet carrier rather than a small building. They require a lot more roaming and foraging space and are higher energy, they also need elevated perches to feel secure. Although chickens require only 5 or 6 sq feet of run area per bird. Jungle fowl need closer to 40 sq feet. My design has 110 sq feet on the ground alone and this can be increased by adding a deck that will serve both as additional roaming space and as shelter. I also needed the design to be attractive. this contributed a fair amount to the final cost but we have invested thousands of dollars in landscaping our back yard over the past 5 years. I am not going to compromise that effort.
One added advantage to the location is that it shelters the birds from prevailing winds. the shop is on the west side and the photos below are with the camera facing northish. prevailing winds are from the North west and on occasion we get winds from the south west. on a Rare occasion we will get winds from the South East but not real strong ones.
The entire Aviary is screwed together and can be completely dismantled if needed. it is set in the ground 12 inches and concrete has been added to the bottom of the posts. this concrete would be the only materials lost if it needed to be taken down or moved. The fourth wall could be added with the addition of 3 12 foot 2X8s 2 12 foot 2X6s 1 12 foot 2X4 and a 12 foot by 4 foot piece of chicken wire and some 1x 2 firring strips.
Materials list
75 feet of 48" wide chicken wire
9- 4X4X8' Doug fir for posts
6- 2x8x10' Doug fir
5 -2X6X10' Doug fir (1 2x6 is used as a rafter at center of the Aviary)
3-2X8X 14' Doug fir
2 2X6X14' Doug fir
2-2X4X10' Doug fir
1-2X4X14' Doug fir
3-2X4X8' for making 2 doors. (Double entry design)
16- 1x2x8' firing strips
5 bags of ready mix concrete (1 bag will fill holes for 2 posts.)
3 1/2 inch long deck screws approx 5 lbs
Hinges and hardware as needed for your specific door design.
1 1/2 inch long or longer Finishing nails for nailing firing strips
Primer and paint. (please don't try to paint raw wood without primer and expect it to look good)
All materials bought new at Home Depot cost me Approx $250
I am able to use Doug Fir in our climate since it is very dry here. you may want to use Redwood or Cedar.
Construction
here is a list of the basic requirement to construct the parts. I will start by saying this design is very very simple.
all posts are set in the ground 12 inches and set with concrete. remember to build the concrete up around each post so that water is shed away from the wood. one of the hardest parts of this or any construction is assuring that you walls are square or 90 degrees to each other and still straight with other buildings etc. Pay careful attention to these details. They can make a lot of difference in whether your finished work looks like it belongs there and is attractive or if it looks like an accident waiting to happen. Plumb, Level and Square are details you want to take the time to get right.
there will be 3 posts on each side and two additional posts for the door. locate and set all posts plumb level and square to each other. You may need to get a little creative in how to hold all the posts in place so they do not move as you fill holes with concrete. but taking great care in this regard pays huge benefits. I will suggest one method that would work well for this project. lay all the post on flat ground spaced exactly as you will need them for them to all fit in the holes you have dug. screw a 2x8 to them with just one screw (pre drill a hole through 2X8 slightly large than the threads on the screw). Make sure the bottom edge of this 2X8 is exactly 7 feet from the top of the post. this makes the 2x8 act as both a depth gauge and a spacer for the posts. now stand the posts and the 2X8 up and place all the posts in their holes. you will need the help of at least one other person and two would be even better. now you can adjust and brace each post for plumb (straight up and down) and the 2X8 for level. I suggest you brace the post very securely. my prefered method is to nail a 2x4 to the post and then run it at an angle to the ground I hold it in place with a concrete stake and 16 penny nail. I then nail a 2x4 between the posts that hold the tops in place. however you figure out how to brace them.there is no such thing as braced to well. you can then mix your concrete and fill the holes. (note make sure you have at least two posts ready to be filled for each bag of concrete you mix). allow 24 hours for the concrete to set up before removing any braces. if you placed the braces so they will not be in the way of screwing on the 2X material, and you have braced the posts very securely. you do not need to stop even though the concrete is still wet. If you have used the method I have suggested here you should have the 1st 2X8 already screwed on with at least one screw per post. you can simply place the next 2X8 on top of the first one. pre drill through the 2X and screw this board to the post. repeat for the third 2X8 as well as a 2X4 for the top piece. each 2X8 should be fastened at each post with 3 screws. the 2X4 only needs two at each post. At this point the the posts are being held level plumb and held at the correct distance from each other very securely. The idea is to construct a box that is so strong it can actually stand on its own and placing the Posts in the ground is not really necessary. putting the 2X6s at the top of the posts can be a bit tricky. But here are some tips to make it much easier. First take the first 2x6 and place it on top of the 2X4 you just got finished screwing to the posts. this then allows you to pre drill the holes at each post. in fact just go ahead and pre drill both 2X6s this way. Now no matter how careful you where in getting each post to be 7 feet tall. nothing is perfect. nobody will see it either. what they will see is the gap between the bottom boards and the top boards. measure from the top of the last 2X4 up each post 47 inches. this is where the bottom edge of the first 2X6 will be placed. you will need help from a couple of people but hold the 2X6 in place and screw it to the posts with at least 2 screws at each post. you can them set the 2nd 2X6 on top of the first and screw it not place without all the effort needed to hold it.
Keep in mind that the posts are not set in the ground deep enough to support a single wall DO NOT REMOVE YOUR BRACES until you have the adjoining walls in place the walls are held up by the other walls. it is important to remember this if you change this design. all walls must be attached to each other at the top even if it is attached by nothing but a 2X4. take special note even at the doorway there is a 2X6 that attaches the walls to each other at that corner. this is very important. The walls can and will fall over without this support at the top. this is also one of the reason so many boards are used in making the walls. they will not wrack even in high winds.
As for the doors. simply place a post at the distance you want for the width of your door. the 2Xs will not cover the lower part of the wall at this opening but the top 2X6 will. you can have the 2nd 2X6 bridge this gap as well if you prefer. you will then build a door with a 1X2 or 2X4 frame and cover it with chicken wire. add hinges and handle as needed and attach it to the 4X4 Post. I suggest you make the door self closing with a spring or some other mechanism to avoid accidently leaving it open . it is not necessary but I made a double entry to my Aviary by simply making an second door frame 2 feet from the first and adding a second door. this prevents spooky flighty wild birds from making a dash for daylight. wild birds learn fast just when to bolt and they are fast.
The 48 inch wide chicken wire should now be bale to overlap 1/2 inch in the gap between top and bottom boards. staple it in place at the top and bottom just to hold it in place. then use firring strips to nail or screw it down securly. keep in mind you want this firring strip to be held down tight so the chicken wire cannot slip out from behind it.
add one 2X6X10 board at the center line of the Aviary as a rafter to help support the top . cover the top with chicken wire or netting of your preference. you may also want to cover the tip with something solid to protect from rain and snow. keep in mind that adding a solid roof will create lift in high winds. This design is very very heavy but get enough wind and it could pull the posts out of the ground. you can fix this problem by using 10 foot posts and setting them in the ground 2 or even 3 feet. another fix is to make the top from material that will tear off before it can lift the weight of the Aviary. have chicken wire under it in case this ever happens.
Ad any support hardware you need for your birds such as feeders, water bowls and cover material as needed and let your birds have at it.
I have not yet decided what to use as ground cover but am thinking at this time of gravel and possible sand mixed with it.
Predators. Due to the locations on my Aviary, it is already sunk down in the ground as mush as two feet. On the side that is not sunk into the ground it has a Keystone block wall preventing animals from digging their way in. the only place that is vulnerable to tunneling is at the gate and burying some wire or a piece of board there will fix that. I do recommend that you take some measures to prevent tunneling at least 12 inches into the ground.
(note having to dig out a hill side added considerably to the time required to build my Aviary. this project on level ground could easily be completed in one to two days)
Yesterday 2-12-2010 I started a four day weekend. We got up early for the members of this family and went and got all the materials except for the chicken wire. we worked all day and everyone is tired and even a bit sore. I did get a few pictures as we progressed but forgot to get a before picture. there is a lot of digging involved but I believe the design will come out looking very nice. We set two of nine posts in concrete yesterday and I will be going out to see how they are setting in an hour or so. it is only 6:30 a.m and still dark. the cold was keeping the concrete to a slow set as of last night. This is fine with me as slow setting concrete is strong concrete. I hope to get at least 4 more set today.
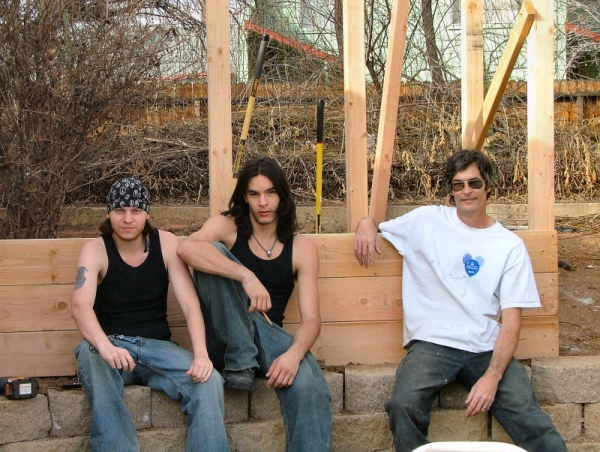
Location of Aviary and my Crew. Digging the ground Level is the lions share of the work. I am expecting it to take 4 days to make this spot flat. Our soil is very hard clay. sometimes harder than concrete to get out. the white thing laying in the grass is the very heavy cast Iron gate that will become the outer door.
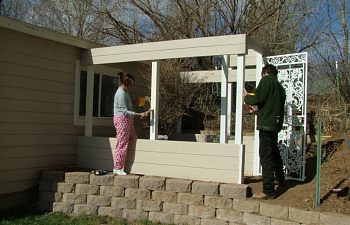
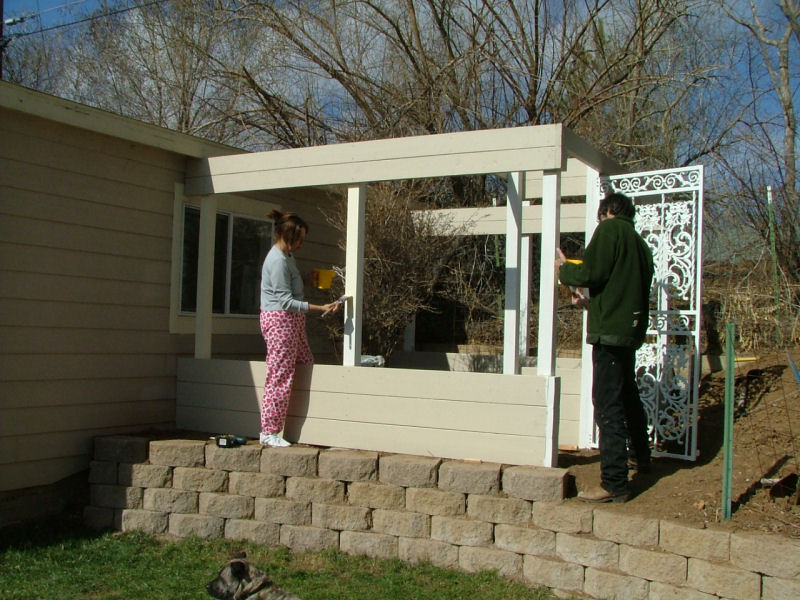
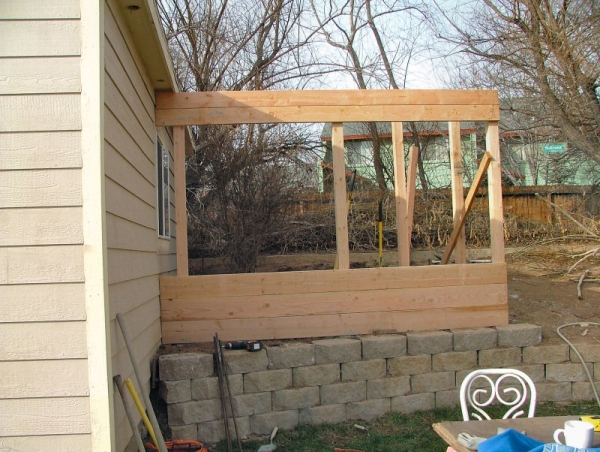
Evening of 2-13. We had another productive day on the construction. the south side is complete except for painting. we now have 4 posts set in concrete and two more that have the holes dug for them. I also have the posts set where the gate will go. The gate is an ornamental Cast Iron thing that was being thrown out at work I hope it works since finding hinges for it that are also strong has been hard to do. We also got a lot of the hard digging done today but I expect at least two more days to get it even close to complete. So far I think the finished wall is looking really good, it has a wild west look to it and is at least as nice at I had intended it to be. Joel cut a large branch off of a willow tree that I plan to use as a perch and some sort of cover for the birds to get under. The branches on it are not dense but I am hoping it will afford at least some space the fowl can go and feel like things cannot get to them. these branches in combination with the bush should actually create a nice hide away. I plan to place this branch near the ground and want to find another one to make a high perch with. I usually like to have a non entry space for even my tame hand fed birds. basically a place that they can go that nobody will mess with them. i am not sure I can do the same sort of thing for these birds but am going to give it at least some attempt. a corner that is covered in some way that they can go when people enter the Aviary. hopefully they will develop a since of security that if they are in there corner people will not threaten them. I believe this goes a long way in reducing stress on the birds and helps them be secure enough to breed.
Progress after two days and a tired team at the end of the day. Actually we ran to the store for hinges and stuff for the boys to make smoors over our fire pit. They where both still ready to get more done at this point. I needed some Dinner.
2-14-2010. Happy Valentines Day everyone. Sorry but no it will not stop me from working on the Aviary. My sweetheart is used to that though. Well I place two hinges on the gate last night before it finally got to dark to work. I have two more to put on today and have to get the East wall complete before I can hang it. I estimate the weight of this gate to be at least 70 lbs. it is really really heavy but will look nice if I can get it to work. Kim was going to paint all the parts including posts and boards before I put it all together. but she moves way slower than I do and that idea is quickly vanishing. I will probably take the Aviary apart board by board so she can get a good solid coat of paint on everything. By the way this whole thing can be taken apart piece by piece and stacked up to be stored if needed.
2-15-2010
The best news is that all the digging is done so that we can get all the walls to fit in place. The bad news is that from all of this digging we have hands that are so sore we can barely use them. We started yesterday by getting two more posts set and put the gate up. I had to use pretty small hinges so i am praying that the weight of the gate does not just rip the hinges apart. so far it looks like it will hold up just fine. I used 4 hinges just to help. the rest of the day was spent pretty much getting the dirt out of the way for the last three posts. I have the bottom 2X8 in place as of last night and it was at that point I called it quits. I expect to be able to complete all the walls today and still make an easy day of it. we can than start painting. I will get the chicken wire sometime this week and the Aviary will pretty much be complete.
2-17-2010
We slowed down quite a bit the last couple of days. Everyone has aching arms and backs from all the digging. As of last night all the lumber has been attached. My wife will be getting the paint either today or tomorrow. My youngest daughter has gotten sick and that has disrupted progress as well. I decided last night to switch form chicken wire to hardware cloth. I still think that with this design the chicken wire woudl be adequate. But with the birds I am going to house in here there is no room to learn the hard way. better safe than sorry. I need to get a completed picture as the only thing left to do is paint the whole thing, build the inner door. and put the wire up. I will do that much later this summer as working around it is easier to do with the sides open.
2-19-2010
The Aviary is pretty much complete except installing the wire. We have been painting it for the last two days but had to stop today due to rain. I also have to make the inner door and hang it but it iwll jsut be 2X4 and wire. I have all summer to complete it sofor now the project is prety much complete.
I have a ringneck Pheasant skin that I bought years ago for fly tying. So I started selecting feathers off of it last night and identifying them so I can get pictures to show the penturners group. They have some interesting names like Almond Heart and Church Windows. I also managed to recoup all the money I have spent on the Aviary and the male Junglefowl in the last 24 hours by running an add on the penturners group. Sure wish I could get that going on a daily basis. I woudl quit my day job.
Design and Planning
I started planning my Aviary about two weeks ago when I first discovered the group. For the most part it has not been much more than looking around. finding out what I needed for my birds of choice (Grey Jungle Fowl) and coming up with an idea that would fit the needs and look nice in the back yard we have spent a lot of money and a lot more very hard work on.
about 4 or 5 days ago I set down with Kim and went over my final ideas and actually designed the Aviary. We then went to Home Depot to price materials and came back with a total cost at this time of $250. Not really that bad considering one of the birds that will go in it cost $150.
The overall design is a 10 foot by 11 foot box that will be 7 feet tall. it will be solid wood (2X8's) from the ground up to 2 feet. there will be 4 feet of chicken wire and the top of each wall will be two 2X6s. so basically a wood wall with a 4 foot tall window of wire all the way around. it will have a double entry to prevent any escapes. there is one living bush inside. we will paint the entire thing to match the house and shop. it only needed to have 3 sides built since it will butt up against my shop. the original plan called for a 10 by 14 but the space is smaller than I estimated. I am not sure if I will be housing a pair or a trio at this time. If I need more roaming space I can add decks at a later date. this is one trick to increase ground space that I have not seen mentioned on BYC. I have not designed a coop yet as I am still researching just what these birds need. I do know they do not need a large enclosure though. I would like to build them a roost at the top of the Aviary but some information I have seen indicates they need a shelter on the ground. at any rate it does not need to be large. I am also considering covering all or part of the top of the aviary. we do not get a lot of rain or even snow here usually but when it does the birds will need some sort of cover to stay out of it. plus it would be nice to not have to work in the mud.
Jungle Fowl are not chickens and have different needs. Some of the factors I took into account are.
Jungle Fowl are wild birds in behavior. They would rather have bushes and other foliage to hide in than a coop to go into. Coop requirements are in the line of a pet carrier rather than a small building. They require a lot more roaming and foraging space and are higher energy, they also need elevated perches to feel secure. Although chickens require only 5 or 6 sq feet of run area per bird. Jungle fowl need closer to 40 sq feet. My design has 110 sq feet on the ground alone and this can be increased by adding a deck that will serve both as additional roaming space and as shelter. I also needed the design to be attractive. this contributed a fair amount to the final cost but we have invested thousands of dollars in landscaping our back yard over the past 5 years. I am not going to compromise that effort.
One added advantage to the location is that it shelters the birds from prevailing winds. the shop is on the west side and the photos below are with the camera facing northish. prevailing winds are from the North west and on occasion we get winds from the south west. on a Rare occasion we will get winds from the South East but not real strong ones.
The entire Aviary is screwed together and can be completely dismantled if needed. it is set in the ground 12 inches and concrete has been added to the bottom of the posts. this concrete would be the only materials lost if it needed to be taken down or moved. The fourth wall could be added with the addition of 3 12 foot 2X8s 2 12 foot 2X6s 1 12 foot 2X4 and a 12 foot by 4 foot piece of chicken wire and some 1x 2 firring strips.
Materials list
75 feet of 48" wide chicken wire
9- 4X4X8' Doug fir for posts
6- 2x8x10' Doug fir
5 -2X6X10' Doug fir (1 2x6 is used as a rafter at center of the Aviary)
3-2X8X 14' Doug fir
2 2X6X14' Doug fir
2-2X4X10' Doug fir
1-2X4X14' Doug fir
3-2X4X8' for making 2 doors. (Double entry design)
16- 1x2x8' firing strips
5 bags of ready mix concrete (1 bag will fill holes for 2 posts.)
3 1/2 inch long deck screws approx 5 lbs
Hinges and hardware as needed for your specific door design.
1 1/2 inch long or longer Finishing nails for nailing firing strips
Primer and paint. (please don't try to paint raw wood without primer and expect it to look good)
All materials bought new at Home Depot cost me Approx $250
I am able to use Doug Fir in our climate since it is very dry here. you may want to use Redwood or Cedar.
Construction
here is a list of the basic requirement to construct the parts. I will start by saying this design is very very simple.
all posts are set in the ground 12 inches and set with concrete. remember to build the concrete up around each post so that water is shed away from the wood. one of the hardest parts of this or any construction is assuring that you walls are square or 90 degrees to each other and still straight with other buildings etc. Pay careful attention to these details. They can make a lot of difference in whether your finished work looks like it belongs there and is attractive or if it looks like an accident waiting to happen. Plumb, Level and Square are details you want to take the time to get right.
there will be 3 posts on each side and two additional posts for the door. locate and set all posts plumb level and square to each other. You may need to get a little creative in how to hold all the posts in place so they do not move as you fill holes with concrete. but taking great care in this regard pays huge benefits. I will suggest one method that would work well for this project. lay all the post on flat ground spaced exactly as you will need them for them to all fit in the holes you have dug. screw a 2x8 to them with just one screw (pre drill a hole through 2X8 slightly large than the threads on the screw). Make sure the bottom edge of this 2X8 is exactly 7 feet from the top of the post. this makes the 2x8 act as both a depth gauge and a spacer for the posts. now stand the posts and the 2X8 up and place all the posts in their holes. you will need the help of at least one other person and two would be even better. now you can adjust and brace each post for plumb (straight up and down) and the 2X8 for level. I suggest you brace the post very securely. my prefered method is to nail a 2x4 to the post and then run it at an angle to the ground I hold it in place with a concrete stake and 16 penny nail. I then nail a 2x4 between the posts that hold the tops in place. however you figure out how to brace them.there is no such thing as braced to well. you can then mix your concrete and fill the holes. (note make sure you have at least two posts ready to be filled for each bag of concrete you mix). allow 24 hours for the concrete to set up before removing any braces. if you placed the braces so they will not be in the way of screwing on the 2X material, and you have braced the posts very securely. you do not need to stop even though the concrete is still wet. If you have used the method I have suggested here you should have the 1st 2X8 already screwed on with at least one screw per post. you can simply place the next 2X8 on top of the first one. pre drill through the 2X and screw this board to the post. repeat for the third 2X8 as well as a 2X4 for the top piece. each 2X8 should be fastened at each post with 3 screws. the 2X4 only needs two at each post. At this point the the posts are being held level plumb and held at the correct distance from each other very securely. The idea is to construct a box that is so strong it can actually stand on its own and placing the Posts in the ground is not really necessary. putting the 2X6s at the top of the posts can be a bit tricky. But here are some tips to make it much easier. First take the first 2x6 and place it on top of the 2X4 you just got finished screwing to the posts. this then allows you to pre drill the holes at each post. in fact just go ahead and pre drill both 2X6s this way. Now no matter how careful you where in getting each post to be 7 feet tall. nothing is perfect. nobody will see it either. what they will see is the gap between the bottom boards and the top boards. measure from the top of the last 2X4 up each post 47 inches. this is where the bottom edge of the first 2X6 will be placed. you will need help from a couple of people but hold the 2X6 in place and screw it to the posts with at least 2 screws at each post. you can them set the 2nd 2X6 on top of the first and screw it not place without all the effort needed to hold it.
Keep in mind that the posts are not set in the ground deep enough to support a single wall DO NOT REMOVE YOUR BRACES until you have the adjoining walls in place the walls are held up by the other walls. it is important to remember this if you change this design. all walls must be attached to each other at the top even if it is attached by nothing but a 2X4. take special note even at the doorway there is a 2X6 that attaches the walls to each other at that corner. this is very important. The walls can and will fall over without this support at the top. this is also one of the reason so many boards are used in making the walls. they will not wrack even in high winds.
As for the doors. simply place a post at the distance you want for the width of your door. the 2Xs will not cover the lower part of the wall at this opening but the top 2X6 will. you can have the 2nd 2X6 bridge this gap as well if you prefer. you will then build a door with a 1X2 or 2X4 frame and cover it with chicken wire. add hinges and handle as needed and attach it to the 4X4 Post. I suggest you make the door self closing with a spring or some other mechanism to avoid accidently leaving it open . it is not necessary but I made a double entry to my Aviary by simply making an second door frame 2 feet from the first and adding a second door. this prevents spooky flighty wild birds from making a dash for daylight. wild birds learn fast just when to bolt and they are fast.
The 48 inch wide chicken wire should now be bale to overlap 1/2 inch in the gap between top and bottom boards. staple it in place at the top and bottom just to hold it in place. then use firring strips to nail or screw it down securly. keep in mind you want this firring strip to be held down tight so the chicken wire cannot slip out from behind it.
add one 2X6X10 board at the center line of the Aviary as a rafter to help support the top . cover the top with chicken wire or netting of your preference. you may also want to cover the tip with something solid to protect from rain and snow. keep in mind that adding a solid roof will create lift in high winds. This design is very very heavy but get enough wind and it could pull the posts out of the ground. you can fix this problem by using 10 foot posts and setting them in the ground 2 or even 3 feet. another fix is to make the top from material that will tear off before it can lift the weight of the Aviary. have chicken wire under it in case this ever happens.
Ad any support hardware you need for your birds such as feeders, water bowls and cover material as needed and let your birds have at it.
I have not yet decided what to use as ground cover but am thinking at this time of gravel and possible sand mixed with it.
Predators. Due to the locations on my Aviary, it is already sunk down in the ground as mush as two feet. On the side that is not sunk into the ground it has a Keystone block wall preventing animals from digging their way in. the only place that is vulnerable to tunneling is at the gate and burying some wire or a piece of board there will fix that. I do recommend that you take some measures to prevent tunneling at least 12 inches into the ground.
(note having to dig out a hill side added considerably to the time required to build my Aviary. this project on level ground could easily be completed in one to two days)
Yesterday 2-12-2010 I started a four day weekend. We got up early for the members of this family and went and got all the materials except for the chicken wire. we worked all day and everyone is tired and even a bit sore. I did get a few pictures as we progressed but forgot to get a before picture. there is a lot of digging involved but I believe the design will come out looking very nice. We set two of nine posts in concrete yesterday and I will be going out to see how they are setting in an hour or so. it is only 6:30 a.m and still dark. the cold was keeping the concrete to a slow set as of last night. This is fine with me as slow setting concrete is strong concrete. I hope to get at least 4 more set today.
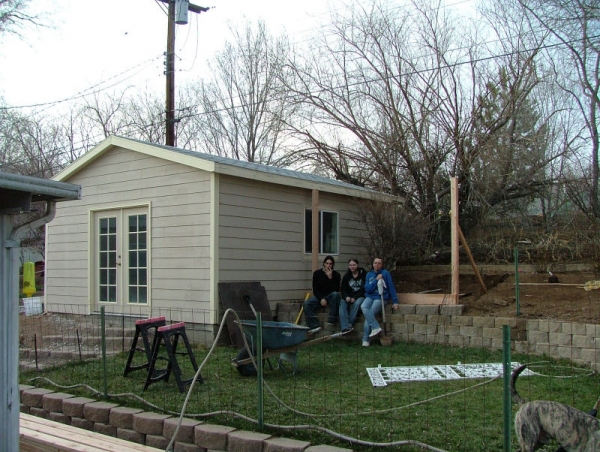

Location of Aviary and my Crew. Digging the ground Level is the lions share of the work. I am expecting it to take 4 days to make this spot flat. Our soil is very hard clay. sometimes harder than concrete to get out. the white thing laying in the grass is the very heavy cast Iron gate that will become the outer door.
Evening of 2-13. We had another productive day on the construction. the south side is complete except for painting. we now have 4 posts set in concrete and two more that have the holes dug for them. I also have the posts set where the gate will go. The gate is an ornamental Cast Iron thing that was being thrown out at work I hope it works since finding hinges for it that are also strong has been hard to do. We also got a lot of the hard digging done today but I expect at least two more days to get it even close to complete. So far I think the finished wall is looking really good, it has a wild west look to it and is at least as nice at I had intended it to be. Joel cut a large branch off of a willow tree that I plan to use as a perch and some sort of cover for the birds to get under. The branches on it are not dense but I am hoping it will afford at least some space the fowl can go and feel like things cannot get to them. these branches in combination with the bush should actually create a nice hide away. I plan to place this branch near the ground and want to find another one to make a high perch with. I usually like to have a non entry space for even my tame hand fed birds. basically a place that they can go that nobody will mess with them. i am not sure I can do the same sort of thing for these birds but am going to give it at least some attempt. a corner that is covered in some way that they can go when people enter the Aviary. hopefully they will develop a since of security that if they are in there corner people will not threaten them. I believe this goes a long way in reducing stress on the birds and helps them be secure enough to breed.
Progress after two days and a tired team at the end of the day. Actually we ran to the store for hinges and stuff for the boys to make smoors over our fire pit. They where both still ready to get more done at this point. I needed some Dinner.
2-14-2010. Happy Valentines Day everyone. Sorry but no it will not stop me from working on the Aviary. My sweetheart is used to that though. Well I place two hinges on the gate last night before it finally got to dark to work. I have two more to put on today and have to get the East wall complete before I can hang it. I estimate the weight of this gate to be at least 70 lbs. it is really really heavy but will look nice if I can get it to work. Kim was going to paint all the parts including posts and boards before I put it all together. but she moves way slower than I do and that idea is quickly vanishing. I will probably take the Aviary apart board by board so she can get a good solid coat of paint on everything. By the way this whole thing can be taken apart piece by piece and stacked up to be stored if needed.
2-15-2010
The best news is that all the digging is done so that we can get all the walls to fit in place. The bad news is that from all of this digging we have hands that are so sore we can barely use them. We started yesterday by getting two more posts set and put the gate up. I had to use pretty small hinges so i am praying that the weight of the gate does not just rip the hinges apart. so far it looks like it will hold up just fine. I used 4 hinges just to help. the rest of the day was spent pretty much getting the dirt out of the way for the last three posts. I have the bottom 2X8 in place as of last night and it was at that point I called it quits. I expect to be able to complete all the walls today and still make an easy day of it. we can than start painting. I will get the chicken wire sometime this week and the Aviary will pretty much be complete.
2-17-2010
We slowed down quite a bit the last couple of days. Everyone has aching arms and backs from all the digging. As of last night all the lumber has been attached. My wife will be getting the paint either today or tomorrow. My youngest daughter has gotten sick and that has disrupted progress as well. I decided last night to switch form chicken wire to hardware cloth. I still think that with this design the chicken wire woudl be adequate. But with the birds I am going to house in here there is no room to learn the hard way. better safe than sorry. I need to get a completed picture as the only thing left to do is paint the whole thing, build the inner door. and put the wire up. I will do that much later this summer as working around it is easier to do with the sides open.
2-19-2010
The Aviary is pretty much complete except installing the wire. We have been painting it for the last two days but had to stop today due to rain. I also have to make the inner door and hang it but it iwll jsut be 2X4 and wire. I have all summer to complete it sofor now the project is prety much complete.
I have a ringneck Pheasant skin that I bought years ago for fly tying. So I started selecting feathers off of it last night and identifying them so I can get pictures to show the penturners group. They have some interesting names like Almond Heart and Church Windows. I also managed to recoup all the money I have spent on the Aviary and the male Junglefowl in the last 24 hours by running an add on the penturners group. Sure wish I could get that going on a daily basis. I woudl quit my day job.