This coop has been a long time in planning. Well, at least it feels like a long time. After using my beautiful small coop (which you can view here) for a couple of years, I broke the news to my husband that I needed a bigger coop. One, yeah, I wanted to be able to become a victim of chicken math. My small coop could handle no more than 5 chickens, and what chicken keeper says they only want a couple of chickens but then ends up sticking to that? I'm sure it happens, but rarely! Two, I am getting far too arthritic to be crawling in and out of the smaller coop to clean it, I need one that I can just walk in. I personally think it takes a while of chicken-keeping to figure out what works and what doesn't work for you and you modify and/or upgrade as necessary. So here is my upgrade!
We have had big problems with predators since we moved to the new property. Friday, March 3, 2023, something wiped out my entire mature flock, except my last original chicken, Lizbeth. It happened during a snowstorm. The flock was living in my hoop coop at the time, I had left them out before the storm got too bad (to peck in the snow - they were having so much fun!), and by the time I got back out to lock them up, Liz was the only one left. We found everyone except for the 2 blue azures, aka: "the white girls". One Lavender Orpington was found alive buried in the snow, we had her in the house all weekend but she never improved. I had her euthanized that Monday.
I was so sad to lose everyone, our rooster Phil was such a good boy and had protected the girls before. A fox had tried to take him the previous fall, but he won that round. He didn't win this one. Thank goodness we had a young flock we had inherited from a family member, including Phil's son, PJ. So we had a starter flock waiting in the wings (no pun intended). Hubby also convinced me to place a chick order when chick days started, they were on their way, so the new coop had to happen.
I'm a huge Star Wars fan, my other coop is Star Wars-themed, so I wanted to carry on that theme to my new coop, but make it unique and different from the other one. Since my other coop is named, Rebel Base, I had planned on naming this coop "Imperial Palace" but decided I wanted to change it up and make it Mandalorian-themed, hence the name "The Covert". The Covert is the Mandalorian hideout on Nevarro from Season 1 of The Mandalorian. Ok, so we have a name, now we need a coop.
This coop went through many changes in the design phase. I was hesitant to ask my husband to build too big of a coop and be met with pushback. Turns out my hesitance wasn't necessary, he took care of the big coop part all on his own. This started out as an 8x8 coop, I told him one of my requirements was storage in the coop. I'm tired of some chicken supplies being in the shed, some in the house, and some in the hoop coop we build for our meat birds. I want it all in one spot. He then changed it to 8x10, then I think in discussion it went to 10x10, over the course of more talks the final size of the coop ended at 10x14. 10x4 for storage and 10x10 for the coop. He told me he was going to make the run 10x20 (wow!) and then one day he said to me he was thinking about the run and "how would I like it if next summer we extend the run out an additional 10 feet and run it all the way back to the entrance of the coop, in case that's hard for you to follow, that means one section of the run would be 10x20 and the addition would be 10x34! Who is going to say no to that? Well once we started the coop, he decided he wanted to do the whole thing this year and just have it done. These birds are going to be so spoiled.

Coop Facts:
We started this project the long weekend in May. We had a house guest that weekend so I was late getting outside with hubby, he had the party started without me. The floor form is assembled and ready for concrete.
May 22

Hubby putting anchor bolts in the cement
Floor is all poured!
May 26
Window shopping day!! Thanks Jimmy!
We had a big gap in construction, we didn't get anything done with this again until July.
July 30
Hubby had the excavator home to the grounds work around the coop. Excavation is what he does for a living, it's so handy! He also dug a trench for us to make the footing for the run and predator apron.
The weekend of August 5 & 6 we made the form for the run footing and poured the cement.
The weekend of August 12 we stripped the form and filled the run with topsoil. We have a huge pile of topsoil that was peeled off our property when we built our house.
Our brother in law owns a tractor, so we borrowed that to speed along the process.
That same weekend we were also able to complete the predator apron. First laying down the hardware mesh, then pouring the cement over it. Hubby mixed the cement, I did the job of wheeling it around and pouring it.
Once the cement had hardened, hubby backfilled around the run to cover the apron and build the turf up. Next year I may want to move my garden near the coop.
August 19th and 20th, we were able to get the first coop wall up.
We put sill gasket (the pink stuff) under each wall to help seal it off against possible drafts.
Any project usually becomes a family project. My inlaws always come out to help.
First wall is up!!!
The following weekend we got the back wall of the coop up, but I was a slacker and didn't get any photo's that weekend.
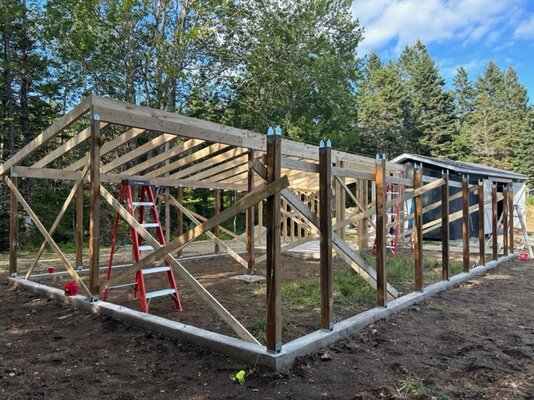
The long weekend in September we accomplished a lot. We got the uprights for the run in place and we were able to get all the roof trusses up. It's finally starting to look like something!!
We finished the weekend by putting up the staging. Getting ready to put the metal on the roof once the metal is ready.
September 24
We put hardware mesh along the eaves. Gotta keep those chickies safe!! Hubby cut the mesh in 2 foot strips with his handy dandy little tool. So much easier and faster than using snips to cut it.
We stapled it on, it will get reinforced with the facial board along the top. Along the back wall of the coop it will have the siding place along it to hold it in place and along the run, we will use strapping to hold it in place. Don't worry, we know it takes more than staples to hold it.
The weekend of September 30 we got all the facial board painted (a fun Friday night project!) and up!
Hubby also got the starter strip for the roofing up. It's looking pretty sharp!!
The next couple weekends I was really a slacker. I got no photos taken. But the black roofing went on really well and it looks amazing!! We also got the front wall framed up on the coop.
October 14 & 15
We completed the final wall in the coop. The large opening is going to be a big hardware mesh covered window that has panels we can open and close, weather pending. This wall will also have the chicken door in it.
October 20th we both had Friday off of work. It ended up being an errand day, but we took a couple of hours and got the back wall panels of the coop in place! Starting to look like something for sure now!!!
October 25
I got home from work a bit early so I decided to get the back wall painted. The color matches the siding on our house.
October 28 & 29
We got the 3 other exterior coop walls up and painted. The crunch is on to get things done so we were hustling!


November 4 & 5
My father-in-law was able to install the 2 small windows while Ryan and I worked on attaching the hardware mesh for the run. I also got the main entrance man door painted. We put them plastic over the hardware mesh the following weekend.
There was a lot going on over the next couple of months. I did a very poor job of getting photos, so I apologize for dropping the ball, but there is gaps in the progress photos.
the other 2 windows got installed over this time, hubby was able to get the nest boxes and poop boards built, and during the nights after work I went out and painted everything.
He was able to complete the poop boards and get the doors on the nest boxes the weekend of November 25. Now we (hubby) just needed to get the electrical done. He did this in the evenings from December 27-29, he also installed the exhaust fan and automatic chicken door during these evenings. It was basically done at this point and I was on vacation from work this week and chomping at the bit to get the girls moved in and settled. Move-in day ended up being Thursday, November 30th.
November 30
The girls (and PJ!) checking out their new coop. I have Fresh Coop in the poop board was not able to find enough for move-in day, and I completely forgot to source it before they moved in so I special ordered it from Peavey Mart, and it happened to be on sale when I ordered it, yay! The link for it is here.
The kitty litter scoop I use for both the chicken's and cat's litter scooping needs is from Amazon. I scoop a lot of poop and this is honestly the best scooper I have ever used. I went through many cheap plastic scoopers before ordering my first one of these. We have 2 in the house for the cats and one in the coop. The Amazon link is here.
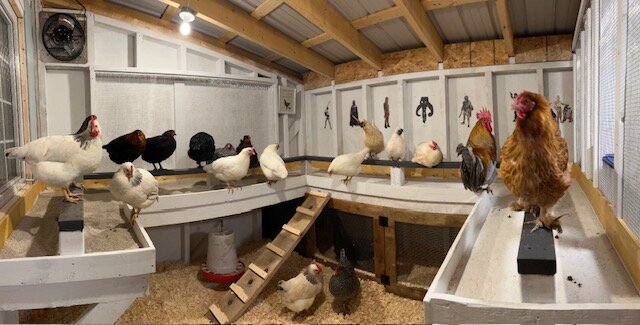
The ramp to the roost bar is on hooks so it can easily be removed for cleaning things.

We have 6 nest boxes, although they all favor the bottom 3. Rarely does anyone jump up and use one of the top 3. I use chopped straw in my nest boxes. Each nest box is 12"x12"x12". We bought 2 3ft piano hinges for the doors and hubby just made some turnbuckles to keep them closed. Easy access.
One feature I really wanted in the new coop is a brooder area built right in. That way the chicks and mama hen can still be with the flock, but safe and protected until they are big enough to come out and explore. It runs underneath the poop board and is a space about 10ft long and 2ft wide. They will be protected by 1/2" hardware cloth. This door has a turnbuckle on it as well. I can also use this to separate a grown chicken for any reason. It's a great space to have.
The exhaust fan we installed is pictured here. It plugs in, hubby put a plug on the ceiling for it and connected the plug to a switch, so when we want to turn it on, we just have to flick the switch. It seems to move a lot of air.
I ended up spreading 3 bails of hay around the run. The girls had pooped all over them and when I attempted to pick them up (to remove them) the final time they busted open so I said heck with it and spread it around. I have since removed it. I don't like using straw with them. I find the poop just sticks to it and it gets heavy and gross and I've seen it go moldy. I also was paranoid one night that my senior girl, Lizabeth had an impacted crop, which I convinced myself she had eaten the straw and that's what did it so I removed it all and am going to get some shavings to use.
In my other coop whenever I cleaned it out, I always threw the old shavings in the run. I usually add more dirt along the way as well. We have gotten some beautiful compost this way. I wil post some updated photos of the run now, I also have since moved the feeder around. Originally I had them both hanging off the center beam, but now I have one on the center beam and 2 hanging from the run ceiling in opposite corners. There is a feeder in the coop as well. That way the girls have options of where to eat, and who to eat with. So if bulling is happening - it's good to have options!
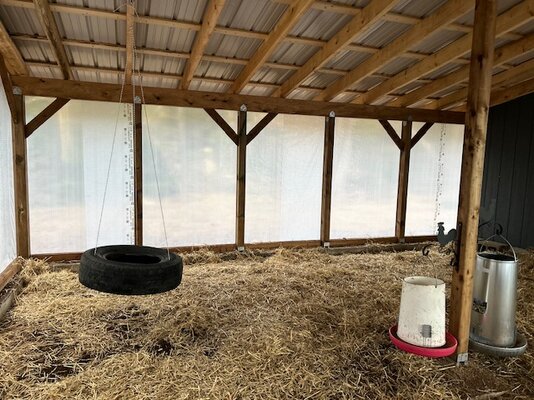
I also made them a tire swing which I have yet to see the ungrateful little wretches use! lol


My hooks for the feeders and waterers, how perfect are they??!! Dollarstore find!
In the picture below is our second rooster, Steven (PJ's son) in the dog crate. We tried to integrate him but he wanted to be top bird. He would not leave PJ alone. He is now living in the old Rebel Base Coop and I put a couple of girls in with him that were bullying and terrorizing the other girls.
I bought some broom clips on Amazon to hold my rakes. The link is here. They screw to the wall and came in a 4pk.

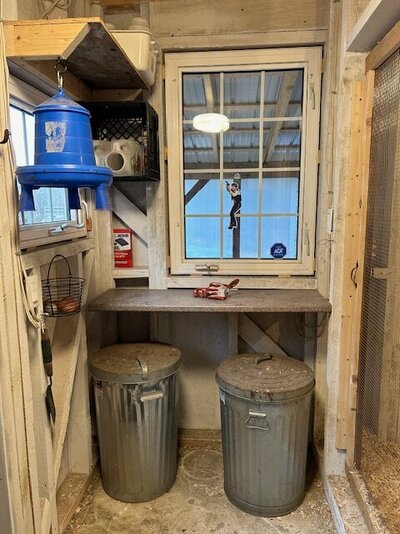
Having storage in this coop was one of the most important features for me. Previously I had some of their stuff in their coop, in our shed, and in the house. Now it's all in one spot and easily accessible. The only thing I don't have stored right in here but is just outside the coop is the dog crate I use for broody jail. I even made myself some shelves one day by screwing some milk crates on the walls. I have a countertop work bench, compliments of my father-in-law. The storage area is 4 feet wide, but honestly, my husband and I both agreed it could even be a little bit wider, I love it as is nonetheless. I even have a little stereo in there for them so they can have some music playing.
The thing I would love to have in this coop that I don't currently is a video monitoring system. I had one for the little coop at the old house, but the wifi will not reach the old coop or new coop at our new property. So someday I would like to have a system that works.
Honestly, so far, that is all I have discovered so far that I would like to add and I haven't discovered anything yet that I would do differently. I love my coop so much and the birds are so happy in there.
We have had big problems with predators since we moved to the new property. Friday, March 3, 2023, something wiped out my entire mature flock, except my last original chicken, Lizbeth. It happened during a snowstorm. The flock was living in my hoop coop at the time, I had left them out before the storm got too bad (to peck in the snow - they were having so much fun!), and by the time I got back out to lock them up, Liz was the only one left. We found everyone except for the 2 blue azures, aka: "the white girls". One Lavender Orpington was found alive buried in the snow, we had her in the house all weekend but she never improved. I had her euthanized that Monday.
I was so sad to lose everyone, our rooster Phil was such a good boy and had protected the girls before. A fox had tried to take him the previous fall, but he won that round. He didn't win this one. Thank goodness we had a young flock we had inherited from a family member, including Phil's son, PJ. So we had a starter flock waiting in the wings (no pun intended). Hubby also convinced me to place a chick order when chick days started, they were on their way, so the new coop had to happen.
I'm a huge Star Wars fan, my other coop is Star Wars-themed, so I wanted to carry on that theme to my new coop, but make it unique and different from the other one. Since my other coop is named, Rebel Base, I had planned on naming this coop "Imperial Palace" but decided I wanted to change it up and make it Mandalorian-themed, hence the name "The Covert". The Covert is the Mandalorian hideout on Nevarro from Season 1 of The Mandalorian. Ok, so we have a name, now we need a coop.
This coop went through many changes in the design phase. I was hesitant to ask my husband to build too big of a coop and be met with pushback. Turns out my hesitance wasn't necessary, he took care of the big coop part all on his own. This started out as an 8x8 coop, I told him one of my requirements was storage in the coop. I'm tired of some chicken supplies being in the shed, some in the house, and some in the hoop coop we build for our meat birds. I want it all in one spot. He then changed it to 8x10, then I think in discussion it went to 10x10, over the course of more talks the final size of the coop ended at 10x14. 10x4 for storage and 10x10 for the coop. He told me he was going to make the run 10x20 (wow!) and then one day he said to me he was thinking about the run and "how would I like it if next summer we extend the run out an additional 10 feet and run it all the way back to the entrance of the coop, in case that's hard for you to follow, that means one section of the run would be 10x20 and the addition would be 10x34! Who is going to say no to that? Well once we started the coop, he decided he wanted to do the whole thing this year and just have it done. These birds are going to be so spoiled.
Coop Facts:
- Floor footprint: 10' x 14' (10x4 storage, 10x10 coop)
- Cement floor
- The center of the roof measures 7'8" and 6ft on the low sides.
- 4 Windows (I was able to get these second hand from a local guy in construction who replaced them in a house he did work on. $100)
- One large built-in window covered in hardware cloth. Can be closed when with weather is too windy but will provide great additional ventilation.
- 6 Nest Boxes. Access for me to these done from the storage area. Yes, I have to enter the coop to collect eggs. This seems to be an issue for some people, not for me.
- Man door entrance into the storage area. We got this door free from my inlaws. I just had to remove old paint and repaint it.
- Man door (storm door) we got for free that someone had out for garbage collection.
- 1/2" Hardware cloth covers all the vents and the large window that opens. I got 10 rolls for $50/ea from Princess Auto last year.
- 12" exhaust fan we got from Amazon.
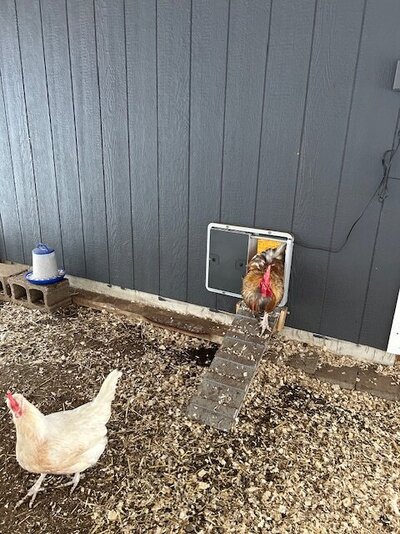
- Automatic coop door, the Omlet. I am located in Canada, I purchased it here, from 4 Legs or Wings.
- Metal roofing (covering both coop and run)
- 540sq ft
- Completely enclosed in hardware cloth.
- Cement foundation 12" high, buried in the ground about 8"
- Hardware mesh predator apron encased in cement, 2 ft wide.
- Windows - $100
- Siding 12 panels - $695
- Hardware cloth 10 rolls x $50/ea - $500
- Metal roofing - $2574
- 13 Bags of Portland Cement - $271.57
- 6 Wire Mesh - $110.34
- 10 Rebar - $164
- 23 4x4 - $292.33
- 2 2x8x10 - $33.12
- 2 2x8x14 - $46
- 10 2x8x16 - $270.30
- 10 1x4x12 - $55
- Chicken door - $382
- Exhaust fan - $154
- Plus various expenses for screws, nails, paint, door hinges, etc. - I have no idea what these would all add up to. I will try to update this cost list once I go through all our invoices.
- Exterior Man Door - Free from my inlaws
- Storm Door (from coop to run) - Free in Kijiji (like Craig's List)
- Run Door - Free from inlaws
We started this project the long weekend in May. We had a house guest that weekend so I was late getting outside with hubby, he had the party started without me. The floor form is assembled and ready for concrete.
May 22
Hubby putting anchor bolts in the cement
Floor is all poured!
May 26
Window shopping day!! Thanks Jimmy!
We had a big gap in construction, we didn't get anything done with this again until July.
July 30
Hubby had the excavator home to the grounds work around the coop. Excavation is what he does for a living, it's so handy! He also dug a trench for us to make the footing for the run and predator apron.
The weekend of August 5 & 6 we made the form for the run footing and poured the cement.
The weekend of August 12 we stripped the form and filled the run with topsoil. We have a huge pile of topsoil that was peeled off our property when we built our house.
Our brother in law owns a tractor, so we borrowed that to speed along the process.
That same weekend we were also able to complete the predator apron. First laying down the hardware mesh, then pouring the cement over it. Hubby mixed the cement, I did the job of wheeling it around and pouring it.
Once the cement had hardened, hubby backfilled around the run to cover the apron and build the turf up. Next year I may want to move my garden near the coop.
August 19th and 20th, we were able to get the first coop wall up.
We put sill gasket (the pink stuff) under each wall to help seal it off against possible drafts.
Any project usually becomes a family project. My inlaws always come out to help.
First wall is up!!!
The following weekend we got the back wall of the coop up, but I was a slacker and didn't get any photo's that weekend.
The long weekend in September we accomplished a lot. We got the uprights for the run in place and we were able to get all the roof trusses up. It's finally starting to look like something!!
We finished the weekend by putting up the staging. Getting ready to put the metal on the roof once the metal is ready.
September 24
We put hardware mesh along the eaves. Gotta keep those chickies safe!! Hubby cut the mesh in 2 foot strips with his handy dandy little tool. So much easier and faster than using snips to cut it.
We stapled it on, it will get reinforced with the facial board along the top. Along the back wall of the coop it will have the siding place along it to hold it in place and along the run, we will use strapping to hold it in place. Don't worry, we know it takes more than staples to hold it.
The weekend of September 30 we got all the facial board painted (a fun Friday night project!) and up!
Hubby also got the starter strip for the roofing up. It's looking pretty sharp!!
The next couple weekends I was really a slacker. I got no photos taken. But the black roofing went on really well and it looks amazing!! We also got the front wall framed up on the coop.
October 14 & 15
We completed the final wall in the coop. The large opening is going to be a big hardware mesh covered window that has panels we can open and close, weather pending. This wall will also have the chicken door in it.
October 20th we both had Friday off of work. It ended up being an errand day, but we took a couple of hours and got the back wall panels of the coop in place! Starting to look like something for sure now!!!
October 25
I got home from work a bit early so I decided to get the back wall painted. The color matches the siding on our house.
October 28 & 29
We got the 3 other exterior coop walls up and painted. The crunch is on to get things done so we were hustling!
November 4 & 5
My father-in-law was able to install the 2 small windows while Ryan and I worked on attaching the hardware mesh for the run. I also got the main entrance man door painted. We put them plastic over the hardware mesh the following weekend.
There was a lot going on over the next couple of months. I did a very poor job of getting photos, so I apologize for dropping the ball, but there is gaps in the progress photos.
the other 2 windows got installed over this time, hubby was able to get the nest boxes and poop boards built, and during the nights after work I went out and painted everything.
He was able to complete the poop boards and get the doors on the nest boxes the weekend of November 25. Now we (hubby) just needed to get the electrical done. He did this in the evenings from December 27-29, he also installed the exhaust fan and automatic chicken door during these evenings. It was basically done at this point and I was on vacation from work this week and chomping at the bit to get the girls moved in and settled. Move-in day ended up being Thursday, November 30th.
November 30
The girls (and PJ!) checking out their new coop. I have Fresh Coop in the poop board was not able to find enough for move-in day, and I completely forgot to source it before they moved in so I special ordered it from Peavey Mart, and it happened to be on sale when I ordered it, yay! The link for it is here.
The kitty litter scoop I use for both the chicken's and cat's litter scooping needs is from Amazon. I scoop a lot of poop and this is honestly the best scooper I have ever used. I went through many cheap plastic scoopers before ordering my first one of these. We have 2 in the house for the cats and one in the coop. The Amazon link is here.
The ramp to the roost bar is on hooks so it can easily be removed for cleaning things.
We have 6 nest boxes, although they all favor the bottom 3. Rarely does anyone jump up and use one of the top 3. I use chopped straw in my nest boxes. Each nest box is 12"x12"x12". We bought 2 3ft piano hinges for the doors and hubby just made some turnbuckles to keep them closed. Easy access.
One feature I really wanted in the new coop is a brooder area built right in. That way the chicks and mama hen can still be with the flock, but safe and protected until they are big enough to come out and explore. It runs underneath the poop board and is a space about 10ft long and 2ft wide. They will be protected by 1/2" hardware cloth. This door has a turnbuckle on it as well. I can also use this to separate a grown chicken for any reason. It's a great space to have.
The exhaust fan we installed is pictured here. It plugs in, hubby put a plug on the ceiling for it and connected the plug to a switch, so when we want to turn it on, we just have to flick the switch. It seems to move a lot of air.
I ended up spreading 3 bails of hay around the run. The girls had pooped all over them and when I attempted to pick them up (to remove them) the final time they busted open so I said heck with it and spread it around. I have since removed it. I don't like using straw with them. I find the poop just sticks to it and it gets heavy and gross and I've seen it go moldy. I also was paranoid one night that my senior girl, Lizabeth had an impacted crop, which I convinced myself she had eaten the straw and that's what did it so I removed it all and am going to get some shavings to use.
In my other coop whenever I cleaned it out, I always threw the old shavings in the run. I usually add more dirt along the way as well. We have gotten some beautiful compost this way. I wil post some updated photos of the run now, I also have since moved the feeder around. Originally I had them both hanging off the center beam, but now I have one on the center beam and 2 hanging from the run ceiling in opposite corners. There is a feeder in the coop as well. That way the girls have options of where to eat, and who to eat with. So if bulling is happening - it's good to have options!
I also made them a tire swing which I have yet to see the ungrateful little wretches use! lol
My hooks for the feeders and waterers, how perfect are they??!! Dollarstore find!
In the picture below is our second rooster, Steven (PJ's son) in the dog crate. We tried to integrate him but he wanted to be top bird. He would not leave PJ alone. He is now living in the old Rebel Base Coop and I put a couple of girls in with him that were bullying and terrorizing the other girls.
I bought some broom clips on Amazon to hold my rakes. The link is here. They screw to the wall and came in a 4pk.
Having storage in this coop was one of the most important features for me. Previously I had some of their stuff in their coop, in our shed, and in the house. Now it's all in one spot and easily accessible. The only thing I don't have stored right in here but is just outside the coop is the dog crate I use for broody jail. I even made myself some shelves one day by screwing some milk crates on the walls. I have a countertop work bench, compliments of my father-in-law. The storage area is 4 feet wide, but honestly, my husband and I both agreed it could even be a little bit wider, I love it as is nonetheless. I even have a little stereo in there for them so they can have some music playing.
The thing I would love to have in this coop that I don't currently is a video monitoring system. I had one for the little coop at the old house, but the wifi will not reach the old coop or new coop at our new property. So someday I would like to have a system that works.
Honestly, so far, that is all I have discovered so far that I would like to add and I haven't discovered anything yet that I would do differently. I love my coop so much and the birds are so happy in there.