My shed/coop build progress. Most of the pics are thumbnails, just to keep the page from getting to big.
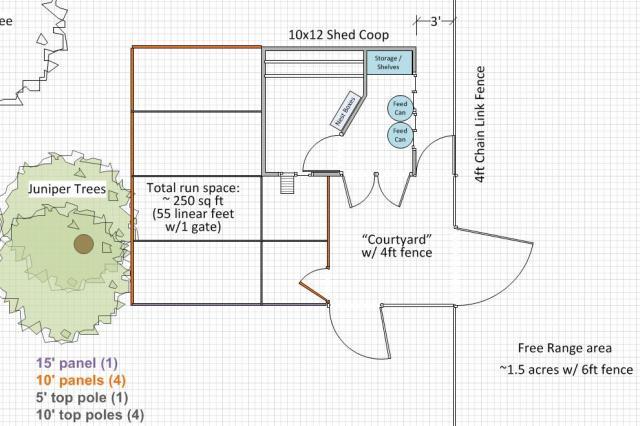
Here's what I hope the final product will look like! The coop will face south, and have windows on the east and south sides. Might also put a window on the west side, haven't figured out the logistics re where it would be wrt the top of the run. The tree on the west side will provide afternoon shade during the summer months. Unfortunately, it's an evergreen, so it will also shade during the winter, but that's pretty much the only type of trees I have!

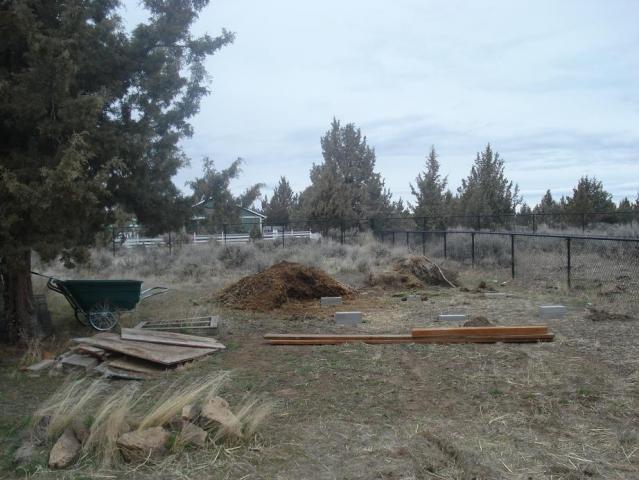
My building site with the blocks in and leveled and part of the existing compost heap moved to my raised garden beds. I'll have to move more of the heap back once I start on the run, but one thing at a time and I want to get this coop built. I'm trying to use up a bunch of materials I have lying around the property so a decking block got in the mix. But still one block short, back to Lowe's!
Floor joists assembled and flooring laid down. Since it's OSB, I primed all the edges with Kilz, including the uncut edges, just to be safe. I know there's strong plywood vs OSB opinions, but this is what I had on hand! One mistake I made, I laid the larger sheets parallel to the floor joists instead of perpendicular. But the floor joists are 2x8s and the shed will house chickens, not heavy equipment, so I think the floor will be strong enought!!
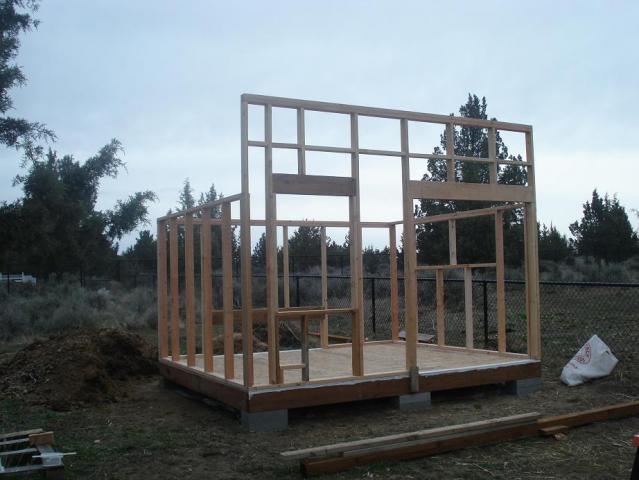
Front wall is framed and ready to raise. Gotta get DH to help me lift this thing, it's heavy!! 9' tall, with framed openings for the front window, double man doors, and pop door (under the window).
Walls framed and rafters on. The back wall is 6' and has a 6'x18" framed opening for a cleanout door. This will be directly under the roosts and conveniently located in relation to my existing compost pile. With the difference in front/back wall heights, I have enough rise:run to use asphalt shingles for the roofing. Have a bunch of bundles left over from when the house was built and want to get them used up. The rafters are 2x8 and have birds mouths cut into them, plus I used hurricane ties. Probably overkill, but again, the ties were in a box, so now they're on the shed. East wall has framing for two hinged windows, Craigslist - $5 for both!
Roof sheathing is on and some of the siding is up. Those sheets are heavy!!! I originally started installing the roof sheathing and we were having some pretty strong winds gusts. It was kinda creepy to be up that high and feel the structure sway, even if it was just a little. So I installed some of the siding and some temporary interior "walls" as well, that really stiffened things up nicely.
The front and back overhangs are 18", I'm going to leave those open and cover them with hardware cloth for ventilation. I'll also leave the upper openings in the center 8' of the front wall open for additional ventilation. Hoping to find some plexi (maybe poster frames?) on Craigslist sometime this summer so I can make hinged windows to close in the winter and still let in light. Worst case, I have extra siding I can use.
The roost will be on the north (6') wall, but no higher than 4', so hoping any winter winds will just go over their heads and not be an issue. But I'll also hinge some boards on that overhang so I can close those eaves if necessary. Haven't quite figured out what I'll do with the little triangles on the east/west walls. I have siding I can put in there, but I might leave it open for the higher cross winds.
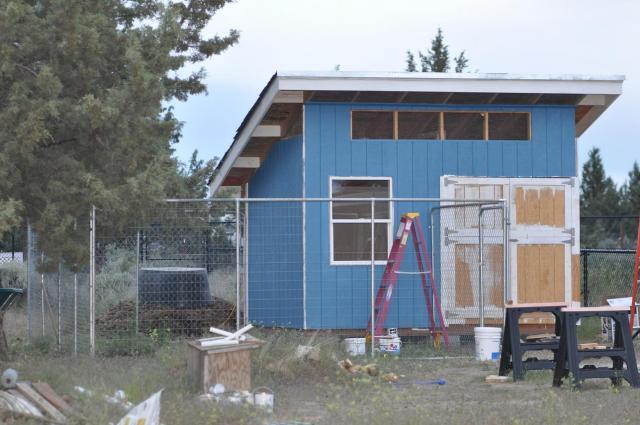
The front window is in (Craigslist, $5!) and the front siding is on. Starting to really see the final shape.
Doors are up and hardware cloth is over all the openings. I made dutch doors to account for future chicken math. If I have to take down the interior dividing wall at some point and give them the entire shed, I want to be able to open the top and peek in first without worrying about runaways! The east wall is framed for two hindged windows, I'll cut out the openings after I've painted that side, so I don't have to worry about overspray.
The interior floors and walls are also painted. Had to buy the primer at Lowes, but the other paint came from the Restore. Used Kilz oil-based primer, 2 thin coats, then a mix of light yellow and pink porch paints for the floor and kitchen/bath paint in a color called camel for the walls. Funny thing, it ended up looking like the same color!
Still have to run hardware cloth around the bottom of the shed, I'm going to enclose the entire bottom and run a skirt out so nothing can get under there (predator or chicken!). I can just imagine trying to coax a chicken out from under there.
The girls are moved in and enjoying the sunshine through their front window. Put up a temporarly barrier until I can get the real wall built, but going to have to get that done as my EE is already flying up to sit on the long clamp arm! But I had to get them out of the bathroom, the dust was really getting bad! They are about 3 1/2-4 weeks old now, and our nights are still getting into the mid 30's, with daytime highs in the upper 50's/low 60's, so they have two heat lamps, one with an 80 (85?) watt bulb for the daytime and a 250 on a timer for after dark. I'll start weaning them off the lamps as our weather warms up and they get a little older.
Finished the interior wall before anyone "flew the copp", at least that I'm aware of and started painting the coop exterior. The shed paint is a mix of a dark blue Lowe's oops and some leftover exterior gray from our house. I love the resulting color, may even duplicate it in my sons room!
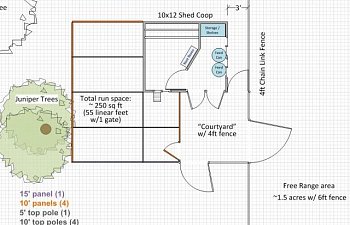
After painting the west and part of the south wall, I was able to get started on the run. The run is 4 10'x6' kennel panels off craigslist and a 15'x6' panel I'm building using top rails. I scored 17 top rails for $5 (total, not each) at a garage sale! I'm using leftover 2x4 welded wire from an old garden enclosure to build the extra panel, then I'll run hardware cloth around the bottom perimeter of the entire run and out as a skirting. Additional top rails will be used to support a wire top, the main predators we have around here are of the flying variety, so I want to make sure nothing can swoop in and take one of my birds. I've thought about roofing part of the run, but since we do get really strong winds, I'm a little concerned about creating a wind sail that will end up damaging the run. Contrary to Oregon weather stereotypes, central Oregon gets 300+ days of sunshine a year, so I'll probably wait and see how they do this winter before I make a decision about roofing the run.
I'm going to add white trim boards on the corners and around the windows to finish the look once I'm done painting the exterior blue. But I have to get the painting and trim done in the run area before I can enclose the top, so that section is the priority. I have all summer to finish the rest of the painting. Gotta get this run functional so the girls can come outside to play!
Still need to cut out the pop door. Originally, I was going to put it on the west wall - if I ever decide to roof part of the run, that would be the easiest section. But I didn't want the west winter winds blowing into the coop and freezing the girls on their roosts, so I scrapped that idea and it's framed to be on the south wall under the window instead.
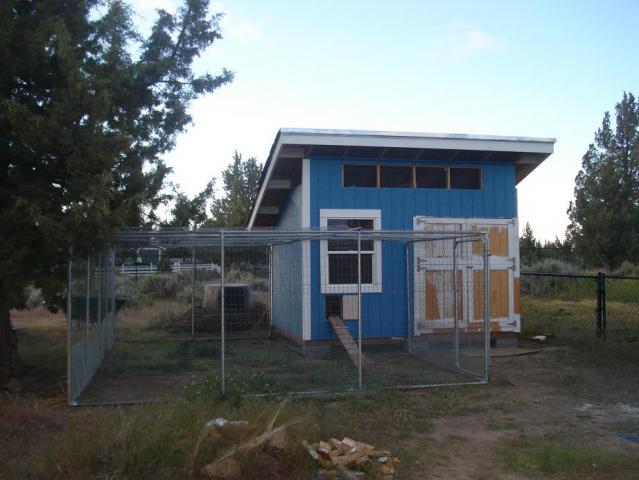
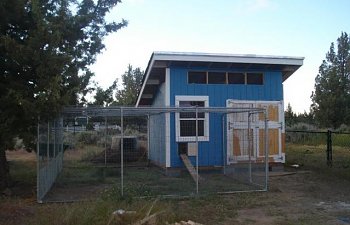
Yay, after about 2 months of working when DS is napping or we're both outside and power tools aren't involved, the run is finished and the coop is fully functional. Some of the girls even enjoyed the afternoon sun, although about half of the flock decided it was safer to just watch from the pop door. My three ring leaders were the first ones out, as expected - Sage (black sex-link girl), Dina (EE girl) and Pip (Gold Campine roo). It didn't hurt that I "baited" the ramp with chick feed.
Here's what I hope the final product will look like! The coop will face south, and have windows on the east and south sides. Might also put a window on the west side, haven't figured out the logistics re where it would be wrt the top of the run. The tree on the west side will provide afternoon shade during the summer months. Unfortunately, it's an evergreen, so it will also shade during the winter, but that's pretty much the only type of trees I have!
My building site with the blocks in and leveled and part of the existing compost heap moved to my raised garden beds. I'll have to move more of the heap back once I start on the run, but one thing at a time and I want to get this coop built. I'm trying to use up a bunch of materials I have lying around the property so a decking block got in the mix. But still one block short, back to Lowe's!
Floor joists assembled and flooring laid down. Since it's OSB, I primed all the edges with Kilz, including the uncut edges, just to be safe. I know there's strong plywood vs OSB opinions, but this is what I had on hand! One mistake I made, I laid the larger sheets parallel to the floor joists instead of perpendicular. But the floor joists are 2x8s and the shed will house chickens, not heavy equipment, so I think the floor will be strong enought!!

Front wall is framed and ready to raise. Gotta get DH to help me lift this thing, it's heavy!! 9' tall, with framed openings for the front window, double man doors, and pop door (under the window).

Walls framed and rafters on. The back wall is 6' and has a 6'x18" framed opening for a cleanout door. This will be directly under the roosts and conveniently located in relation to my existing compost pile. With the difference in front/back wall heights, I have enough rise:run to use asphalt shingles for the roofing. Have a bunch of bundles left over from when the house was built and want to get them used up. The rafters are 2x8 and have birds mouths cut into them, plus I used hurricane ties. Probably overkill, but again, the ties were in a box, so now they're on the shed. East wall has framing for two hinged windows, Craigslist - $5 for both!

Roof sheathing is on and some of the siding is up. Those sheets are heavy!!! I originally started installing the roof sheathing and we were having some pretty strong winds gusts. It was kinda creepy to be up that high and feel the structure sway, even if it was just a little. So I installed some of the siding and some temporary interior "walls" as well, that really stiffened things up nicely.
The front and back overhangs are 18", I'm going to leave those open and cover them with hardware cloth for ventilation. I'll also leave the upper openings in the center 8' of the front wall open for additional ventilation. Hoping to find some plexi (maybe poster frames?) on Craigslist sometime this summer so I can make hinged windows to close in the winter and still let in light. Worst case, I have extra siding I can use.
The roost will be on the north (6') wall, but no higher than 4', so hoping any winter winds will just go over their heads and not be an issue. But I'll also hinge some boards on that overhang so I can close those eaves if necessary. Haven't quite figured out what I'll do with the little triangles on the east/west walls. I have siding I can put in there, but I might leave it open for the higher cross winds.

The front window is in (Craigslist, $5!) and the front siding is on. Starting to really see the final shape.

Doors are up and hardware cloth is over all the openings. I made dutch doors to account for future chicken math. If I have to take down the interior dividing wall at some point and give them the entire shed, I want to be able to open the top and peek in first without worrying about runaways! The east wall is framed for two hindged windows, I'll cut out the openings after I've painted that side, so I don't have to worry about overspray.
The interior floors and walls are also painted. Had to buy the primer at Lowes, but the other paint came from the Restore. Used Kilz oil-based primer, 2 thin coats, then a mix of light yellow and pink porch paints for the floor and kitchen/bath paint in a color called camel for the walls. Funny thing, it ended up looking like the same color!
Still have to run hardware cloth around the bottom of the shed, I'm going to enclose the entire bottom and run a skirt out so nothing can get under there (predator or chicken!). I can just imagine trying to coax a chicken out from under there.


The girls are moved in and enjoying the sunshine through their front window. Put up a temporarly barrier until I can get the real wall built, but going to have to get that done as my EE is already flying up to sit on the long clamp arm! But I had to get them out of the bathroom, the dust was really getting bad! They are about 3 1/2-4 weeks old now, and our nights are still getting into the mid 30's, with daytime highs in the upper 50's/low 60's, so they have two heat lamps, one with an 80 (85?) watt bulb for the daytime and a 250 on a timer for after dark. I'll start weaning them off the lamps as our weather warms up and they get a little older.

Finished the interior wall before anyone "flew the copp", at least that I'm aware of and started painting the coop exterior. The shed paint is a mix of a dark blue Lowe's oops and some leftover exterior gray from our house. I love the resulting color, may even duplicate it in my sons room!

After painting the west and part of the south wall, I was able to get started on the run. The run is 4 10'x6' kennel panels off craigslist and a 15'x6' panel I'm building using top rails. I scored 17 top rails for $5 (total, not each) at a garage sale! I'm using leftover 2x4 welded wire from an old garden enclosure to build the extra panel, then I'll run hardware cloth around the bottom perimeter of the entire run and out as a skirting. Additional top rails will be used to support a wire top, the main predators we have around here are of the flying variety, so I want to make sure nothing can swoop in and take one of my birds. I've thought about roofing part of the run, but since we do get really strong winds, I'm a little concerned about creating a wind sail that will end up damaging the run. Contrary to Oregon weather stereotypes, central Oregon gets 300+ days of sunshine a year, so I'll probably wait and see how they do this winter before I make a decision about roofing the run.
I'm going to add white trim boards on the corners and around the windows to finish the look once I'm done painting the exterior blue. But I have to get the painting and trim done in the run area before I can enclose the top, so that section is the priority. I have all summer to finish the rest of the painting. Gotta get this run functional so the girls can come outside to play!
Still need to cut out the pop door. Originally, I was going to put it on the west wall - if I ever decide to roof part of the run, that would be the easiest section. But I didn't want the west winter winds blowing into the coop and freezing the girls on their roosts, so I scrapped that idea and it's framed to be on the south wall under the window instead.
Yay, after about 2 months of working when DS is napping or we're both outside and power tools aren't involved, the run is finished and the coop is fully functional. Some of the girls even enjoyed the afternoon sun, although about half of the flock decided it was safer to just watch from the pop door. My three ring leaders were the first ones out, as expected - Sage (black sex-link girl), Dina (EE girl) and Pip (Gold Campine roo). It didn't hurt that I "baited" the ramp with chick feed.