I've been trying to get around to this little chore since I first signed on back in July of 2009. But, as we all know, there are so many interesting threads to read, that it leaves one very little time to tend to important things such as one's personal page. Well, no time like the present. I'll get as much down as any of us can stomach for now, and updates will follow when the notion strikes me!
Our household, such as it is at this time, (and I'll address those "conditions" later) consists of myself, (a frumpy little farm wife type of lady) my husband Denny (USCG retired after 25 years of dedicated service to our country, and yes, I'm darn proud of him for it!) our grand daughter Annie (who for reasons beyond any one's control has been with us since birth) one cat named DeeDaa, one old dog named Jasper and now 27 chickens all told. 9 are adult at the time of writing this and 18 are rapidly nearing the one month mark. Life is good!!
Denny and I moved from Olympia, Washington to the opposite side of the state (30 miles west of Spokane) in the late summer of 2005. And we've never looked back nor regretted it! Life here in the high desert country of Eastern Washington is our idea of paradise. Our plan had been to begin construction of our dream log home the following spring, but life sometimes throws you a curve ball, and you either learn how to swing for the fences or wait for the next pitch. We kind of split the difference and held off starting construction on the house for the following spring. And when March of 2007 rolled around, that's just what we did!
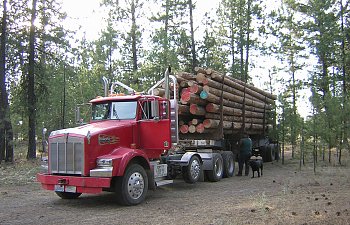
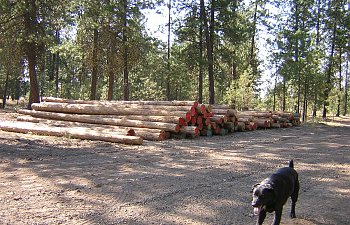
The logs for our home came from a forest of dead standing timber approximately 150 miles (give or take) from our property, and were acquired for us by our friends and neighbors of Turley Logging Company. If you live in Eastern Washington State and find yourself in need of the services of a top notch logger, Tom Turley is your man!! He's painfully honest, conscientious, and courteous beyond measure! Just an all around great guy, and his wife Kelly is a little living doll. But, I digress. Here's a shot of the first of two loads of logs being delivered.

We've had a very long row to hoe with this house. We've done every bit of it ourselves, from design to all phases of construction, without any help from anyone. There are three exceptions to this and we had some awfully good reasons to hire a subcontractor for the respective stages of construction. The first exception was that of the foundation. For as anyone who has ever built a house knows: If you mess up the foundation, you've just messed up the entire house! And since we had neither the equipment nor knowledge to pour such a huge foundation on our own, we hired this part out.
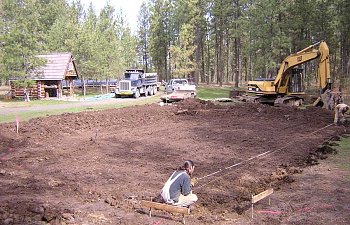
In this picture, you can see not only the crew working to do the set up part for laying out the concrete foundation, but in the upper left hand quadrant of the photo, you can also see our little log cabin (also built by us) which started this whole insane odyssey more than ten years ago. It was our test for ourselves to see if we were actually cut out for this log home building business. Our theory was that if we could build that by ourselves, surely we could build a much larger version of it. Some may argue that there's a fundamental flaw in that kind of logic..................

Now for those who have never built a house, let me say here and now, it's nothing like what you see on HGTV! Nope! Not even remotely like what you see on television. These things take a great deal of time. Especially when it's just the two of you! The curing time for the foundation alone took 28 days! So, what does one do in the mean time? Why, build a chicken coop and get some chicks, of course! (and there began my personal adventure and love of keeping chickens!) This is a baby picture or our original 12 pullets, purchased in late March/early April of 2006. Yes, I know that's a whole year before we started work on the house, but I thought it made for a cute intermission while we wait for the concrete to cure. Don't you?

We had originally purchased six of each of Buff Orpingtons and Golden Sex Links (a.k.a. Red Stars or Red Comets in other parts of the country) Of that original 12, I have but five left. That's how life goes sometimes. Sadly, these little goobers don't live as long as we do, much as we'd like them to. I've loved every one of them and some I still keenly miss, even a year and more after their departure from this world. RIP: Gimpy Girl, Lacey, Alice, Molly, Mildred, and Katie, of the original flock. Others as well, whom I still miss...but, oh hey! Look at that! The concrete has cured!
  Let's get back to working on the house, shall we?

Gee, maybe this isn't so different than HGTV after all! Well, there she is! Our 1,500 square foot "footprint" foundation of the house. I'm going to skip past the whole framing of the floor episode as it's about as exciting as watching grass grow. In this next shot, you can see three large log posts sticking up out of the floor. These do indeed serve a purpose. The two tallest are called "King Post's" and they hold up the ridge beam of the roof. The shorter one is for the future spiral stair case.

And here is where I'm going to leave us for the time being. It's getting late tonight and I need to get to bed. We'll pick this up again in the morning (hopefully) when you'll see some rather interesting progress, once logs come into the picture. Thanks for stopping by and taking a look.
8-14-10
OK, it's been awhile since I set out to tell this story, and it's high time I added a bit more to it. So, just for you Kathy [kathyinmo] here we go! Oh, the rest of you are invited to tag along too!
After we finished getting the main floor framed and sheeted, the next obvious step was to start adding logs. One thing I would like everyone to keep in mind with this house is just this: This is a hand crafted house!! There are no precut pieces for anything. It is not a kit that comes precut and all but pre-assembled for us. Every single log had to be peeled of any remaining bark. It then had to be power washed, allowed to dry (most days that was at least 3-5 hours) and then have a grinder taken to it to fix any blemishes or protruding tree branch remnants. And believe me, there were a lot of these! In other words, my job was to make each and every log look as pretty as it could be, before Denny went about placing the logs into the walls of the home.
So, slowly, ever so slowly, this:

became this:

Yes, that's Denny standing on the outside of the house. No, he's not really short. There's about a three foot drop from the level of the floor to the ground.
What you are seeing in that last shot represents approximately 3 weeks of work. I know, crazy, huh? But it takes time! That's the one aspect of building this house that seems to be lost on most folks. Friends and family alike are always asking us "Ain't you guys done building that house yet!?!?! Like it should have been finished in its first year or something. Going on just a slight rant here folks: A log home is painfully labor intensive. Which is why most people build one themselves, because they're just too dang expensive to pay someone else to build it for them...unless of course you happen to be rich! Neither Denny nor I are rich, so we had to do all of this ourselves. And when it's just the two of you......well....it just takes a whole butt load of time!
Over the course of the summer of 2007, we managed to get the first five of what would ultimately be nine courses of logs up and secured in place. These next few pictures might give you a little better appreciation of what each log has to go through before it is completely fitted into the wall and secured.
The very first logs to go in were actually half logs, as this is how one starts a log home. So, choosing one of the longest and fattest of the logs from the pile, we set to it with an Alaskan Saw Mill. This is a handy dandy device that is used in conjuction with a chainsaw to create rough sawn planks. Or, as in our case, starter half logs!
Here's a picture of Denny running the ASM. Usually I was holding on to the other side of this beast, but for this picture I had to let him run it alone. Not a great idea, but it was only for a moment!

Just the cutting of this one log took the better part of an hour and a half actual working time. We had to stop periodically to sharpen the chain, as well as refill all fluids [mixed gas and bar oil] It never paid to try to force this thing to go any faster than we did. We learned that much in the first ten minutes of attempting to cut this log in half down the length. Broke the dang chain! There went the rest of the day while we ran all over the place trying to find a chain that was the right size as well as being a "ripping" chain.
All chainsaw chains are NOT created equally. The kind that most folks have on their chain saw is for cutting down trees and cutting up firewood. These chains are meant to go across the grain. You need a special chain to go with the grain. And when you're talking about a chain for a 36 inch bar [if memory serves me, that's how big this one is] the quest to find one on a Saturday afternoon becomes nearly impossible. After running around for several hours, it occured to us that our neighbor across the street [the same one who got us the logs in the first place and who owns Turley Logging and Timberland Management] might just have what we needed. Well, duh! So, with ripping chain in hand and the recently acquired knowledge of why one does not force this kind of cutting, we got back to work.
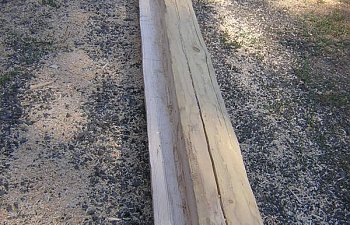
Once the starter half logs were done and in place, we needed to rip down the length of the logs for the connecting walls. The reason for this is one of stability. One does not want to place ones home on a round object you see. So, the next logs had to be flattened down to about 6 inches wide on the bottom. Back to the Alaskan Saw Mill for this job.

In that shot you can see the roller benches we picked up at auction. OH! MY! GOSH! Those things were worth their weight in gold to both of us! It meant that I could work on a log all by myself and easily roll it over to work on all sides without having to pester Denny, who was busy with work of his own. Like saddle notching!
And here comes the real time consuming aspect of the home. Saddle notching. Now, there are a number of different kinds of notches that one can use in the construction of a log home. There's the full Swedish Cope method that is ridiculously labor intensive, time consuming and probably best left to artisans as they are so precise. There's the butt and pass method of laying up logs but we've always felt that they're horrible to look at, don't have the strength of a true notch, and frankly, are a lazy persons way out of the job. There's the Apalacian Dovetail notch. Those are positively a work of art, much like the Swedish Cope. And unless you're well versed at skills similar to those used in cabinet making [which we presently are not!] this is another notch probably best left to the pros. So, what's a happy middle ground for folks like us? Why, the Saddle Notch of course!
This is a time honored and very stout method of notching logs for any structure. If properly scribed and cut, it will be so tight that you can't even slide a piece of paper between them. OK, so we don't have quite that level of mad, crazy skills, but I think we did pretty darn good, all things considered. And besides, chinking hides a multitude of sins! hahahaha!
Here are the steps to making a saddle notch:
Step #1: Scribe the log, both sides, for what needs to be removed.

Sorry, but I seem to have misplaced my pictures of me actually marking out the scribe lines. The whole procedure employs the use of a tool called a dual level log scribe. Pricey little tool it was too! Just shy of $100. But after I pooched 3 logs and all the work that went into getting them ready, believe me, $100 was cheap at twice the price!
Step #2 Cut slices into the log, stopping before you reach the line. This, believe it or not, takes two people to do right. The one running the chainsaw, standing on one side of the log and another person standing on the opposite side to be able to tell the person running the chainsaw when to stop before hitting the scribe line. There's just no way to see both sides at the same time.

Step #3, remove the slices by snapping them out. Usually a hammer or a chisel works pretty good for this.

And sometimes just hitting them with the heel of your hand works too! LOL
After the slices are removed, you have something that looks like this:

But you're not done yet! Ohhh no! Not by a long shot! Next comes several hours [at times] of grinding, test fitting, grinding some more, test fitting some more......Until the inside of your notch looks something like this:

And if you've done everything right, this is what it will look like when properly fitted to the log below it:

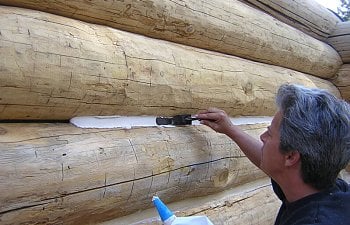
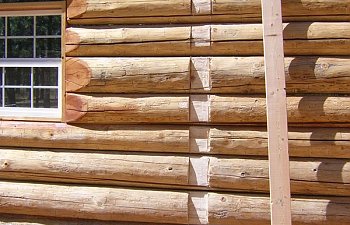
The next phase is chinking. This has actually been one of my more favorite parts of building the house. It has elements of masonry work and cake decorating skills if you can believe it. Here I am piping in chinking compound at the end of the first summer. I use the same kind of bag for this that stone masons use for mortaring in stone or brick work. It's a lot like a giant pastry bag on steroids! LOL

You'll notice that part of the chinking has already been smoothed out. This is called "Striking" the chinking. I have a variety of masonry knives for just this purpose.
And here I am performing that little task:

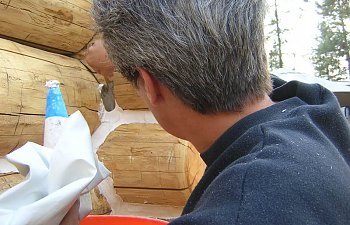
The corners really take up some time and a whole heck of a lot of material!!

There are a number of very good, but very expensive chinking materials out there. This happens to be common, garden variety "Fix-it-All" patching compound. The little cabin that we built over 10 years ago has this in it. After more than 10 years, I can count on one hand the number of small places where the chinking has failed and I need to do some minor repairs.
The commerically available compounds are, as I said, ridiculously expensive. Remember, this has to be done both inside and outside of the home. If we had done the entire house in something like Perma Chink, just for example, it would have cost us in the neighborhood of $4,800 just for the materials! Don't feel bad, I fainted too when I calculated that one out. I had to run the figures five times just to be sure I wasn't screwing it up!
A less expensive alternative is a product called Log Jam, and I've been very happy with the performance of that in the cracks in the logs. Fix-It-All is completely inapropriate for that kind of application as the log cracks are constantly expanding and contracting with the weather. You need something extremely pliable in both extreme hot and cold conditions, as well as having superior adhesion to the logs. You don't want water getting down into those cracks! That's where rot starts! If that happens, well, the next thing you know, the house you built to last generations is suddenly falling down around your ears! Not a pretty thought!
OK, so back to the house. Sorry...I digress so easily, especially when it's late at night as it is now. **Glances over at the clock** Yup, 1:00 AM.
I'm just about done for tonight, but I thought we'd go to the end of the 2007 building season. Not very long after these next pictures were taken, winter set in with a vengence. We spent nearly every waking hour in shaking snow off of the tarp tent we had built over the house to keep the floors dry. It was an adventure to say the least. And when we weren't shaking snow off of the tarps, we were shoveling it out of the driveways! The winter of 2007-2008 was to go down in the record books as the third worst on record. Exceeded only by the winter of 1952-1953 and 2008-2009.
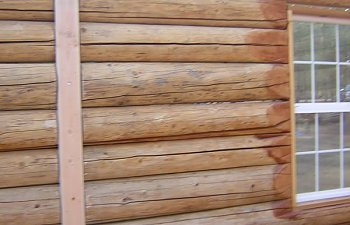
Here's a nice shot of Denny applying the log stain to those logs we already had up at that point. We did it more to protect the logs through the rough winter ahead than for any asthetic reasons. But it sure was nice to look at through the winter.

After Denny stained the logs, I came along behind him and painted the chinking back to a lovely white as it should be. Gray is also acceptable, or even a light tan, but I've always liked the white the best. It reminds me of a holiday gingerbread house!

You can also see the beginnings of the tarp tent we built over the top of everything. Those King Posts came in handy long before they were put to their ultimate purpose of holding up the ridge beam!
And less than two months after that tranquil sceen of the house, this is what we were dealing with!

Thank heavens for Tom and Kelly across the street. Our poor little 1950 Ford 8N suffered a fatal wheel failure half way through that winter. The closest replacement rim was 3,000 miles and nearly two weeks away. So Tom, wonderful man that he is, loaned us his backhoe for the duration. What a guy!!
This shot gives you some idea of the literal mountains of snow we had to deal with!

Believe it or not, this was only the third worst winter on record for snowfall. The worst one was still another year away! You can use your imagination, I'm sure! LOL
So, this is where we will leave things for awhile. Untill I get another wild hair up my you know what. But keep checking back. I'll get around to it eventually. Especially if Kathy keeps buggingme about it!!! LOL
In our next installment, we'll see the rest of the walls go up, a tent come down and a roof go on. And then there's the windows and the doors!! Ooooh! Wait till y'all see that!! Till then, take care and enjoy your chickens. I know mine have been my sanity anchor throughout this entire project. When it gets too wide and too deep and I need a break, I seek the company of my chickens. They always have a kind and gentle word for me!
Welcome back for the latest installment of the Eberhardt's Log Home Building Project!
[11-08-10]
So as you have probably already figured out, we did indeed survive the winter of 2007-08, but only by the skin of our teeth. But that's the past and we need to keep moving forward or you and I dear reader are going to be old before our time and still not finished with this story!! LOL!
I'm going to be posting a few photos here this time, so make sure you're all settled in with something good to drink, and maybe even something to nibble on. OK? OK! So here we go! I'm just going to dive right into the middle of the 2008 building season. We had left off at the end of the 2007 building season with the 5th course of logs in place and tented over to protect them for the winter. In the interests of keeping the story moving right along, I'm going to fast forward to near completion of the logs walls. I mean seriously: How many times do you really want to look at the procedure of erecting the log walls and corners? Get's kind of boring if you ask me!
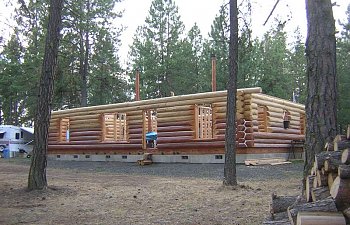
In this first picture, you might notice that even though the walls aren't all the way up at that point, we do have two windows installed. This was just a temporary installation simply because we were starting to drag our butts on this and seeing two windows in the wall gave us inspiration to keep going! LOL

As you can see, if you look near the top of the walls, that the blue tarp tent was still up. That was just in case of the odd and infrequent rain storms that we would have from time to time during the summer. Even though the floor sheeting is supposed to be able to handle a fair amount of rain or moisture, we didn't want to take any chances. We're talking about well over $4,000 worth of floor framing and sheeting here. And we did NOT budget for a replacement of that!
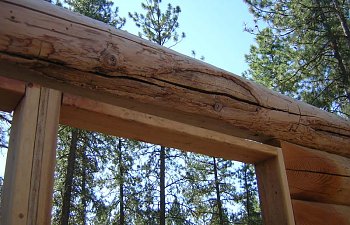
This next picture is a close up of just one of the myriad of logs we used in the house. This interesting detail is natural and called, of all things, a "Cat Face" in the log. It's caused by a wound to the tree when it was young and what you're seeing is the result of the healing process. You've probably seen plenty of trees that have one of these "cat faces" in them and didn't even know it. Look for a serious irregularity in the bark of the tree. If you were to cut that tree down, allow it to age for about a year or two and then removed the bark, you'd see something like this. Pretty, ain't it?

Here's another close up of one of those cat faces. This one resides over the pair of big living room windows. The previous cat face is in the corner of our master bed room. Of course I had to have one of those in our room!!

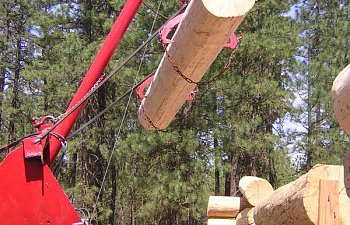
And wouldn't you all just love to know how we got these big hurking logs that high up off the ground and set into place on the top of the wall? Oh come on! You know you wanna know!!! Shall I give you a hint? OK, what do you get when you cross 400+ pound logs, one 1950 Ford 8N tractor with front end loader bucket, and two very determined people with the need to carefully place said logs on top of a wall that starts at 2.5 feet above grade? You come up with the mother of all inventions, that's what! Or in other words, you come up with this!

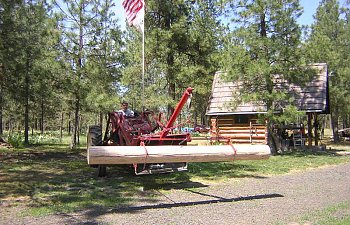
And this:

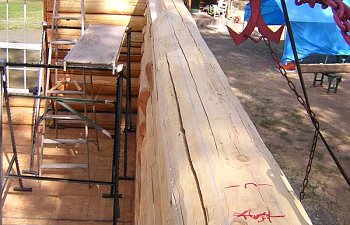
And after each one is securely in place, you have this:

This was absolutely a two person job. Denny ran the tractor as she's a bit on the old side. No power steering or any such ammenities like that. You really have to have some good arm muscles to drive that little puppy around, and there just isn't enough lead in my pencil to do it. Even without the loader on the front end, I have a heck of a time driving Francis. With the loader on her, she becomes an unmanageable beast! So, the best way for us was to have Denny running Francis while I guided him with hand signals and brought each log into position. As soon as the log was resting relatively stable on the log wall, I would unhook the log tongs and wave Denny off, at which time he'd go line up to grab another log if one was ready to go up.
You'll notice that the second log in the preceeding shot has a large notch running the length of the log. This was to accommodate the placement of the floor joists for the second story lofts. The log in the foreground was placed up there just long enough to mark out where the notch needed to be cut and then it too was lowered back down to the ground for the cutting work. Much safer that way you know.
Here's a better look at one of those end wall logs before it was placed for the final fitting into the log wall.

It was critical that all four of these logs [two on each gable end] were precisely cut and precisely placed at the top of the gable end walls. If these were even so much as a half inch out of alignment, or weren't cut square to the walls and floors below, then the whole upstairs floor would be messed up! We got all four of these logs to within a 16th of an inch of each other by the time it was all said and done! Are you impressed? You should be! LOL
So that brings us to the point of the last course of logs to go up, which were on the east and west long axis walls. One of the happiest days of my life was in the placement of the cap logs! And when it was all said and done, the west wall was just 1/4 of an inch out of sync with the east wall. Of the two gable end walls, as I stated earlier, they were a mere 16th of an inch out from each other, and from north end to south end there was a difference of just shy of an 8th of an inch. I'd like to see one of those log home manufacturer's do better! HA! Here's what it looked like after the last logs went into place and were secured!

The next phase of the project was the errection of the interior partition walls. Now, some folks like having all of the walls be made of logs. I'm not one of those people, and neither is Denny. We like having framed and drywalled walls to break up all of that log. Not to mention the fact that running electrical in all of that is a heck of a lot easier than running it through logs! We still had to wire the log walls for the requisite electrical outlets, as well as the outside porch lights but that was relatively easy.
So, how does one frame up the interior partition walls of a log house? Well, I don't know if there is an approved or standard way of doing it, but this is how Denny and I did it.
In this first picture you can see the channel we cut in the log walls to accommodate the first 2 x 6 stud that served as the anchor for all of the subsequent studs to follow. The purpose of the channel is due to the difference in diameters of the wall logs. Some stick out further than others, and in order to achieve a plumb and square set to the stud, we had to first make the wall surface that way. This is what it looks like when that part is done:

And once you have it all plumb and square, you then install the stud.

We then lag bolted each starting stud into place. This, after all, is a load bearing wall. It will carry the full weight of one of the two lofts, plus the catwalk that joins the two lofts.

You'll notice about a half inch gap between the stud and the edge of the log? That's there to accommodate the drywall later on. But you'll have to wait to see that!
We actually double stacked these starting studs to make them just that much more substantial. Since they are a key anchor point of the bearing walls, we felt they needed to be extra stout. Our building inspector thought we were a little off of our nut, but I just told him "It's in the genes Mark. Daddy built things to withstand a nuclear blast. I just build as I think he would too" LOL
And here's a look at those load bearing walls, once they were all up and done. This first shot is of the north load bearing wall:

And from the opposite angle: you can also see the first of many of the floor joists for the upstairs lofts. Why we didn't load these up there with the tractor, I'll never know!

The south load bearing wall looks nearly identical to the north, so we'll just skip on past that....you get the idea by now I'm sure. And since putting up floor joists is about as exciting as watching snail races, let's skip ahead to the roof ridge beam shall we? Cuz that was a nail biter!
First, a bit of background about this ridge beam. Picture a huge chunk of wood that measures 60 feet long, 5.5 inches thick and 21 inches tall. We're talking HUGE! If I remember correctly, the total weight of this beast was somewhere in the neighborhood of 1,300 pounds. Yeah, big! REAL BIG!! At least it seemed that way to me. Boise Cascade built it, but we still had to make arangements to have it delivered and set. There just weren't no way our little 18 foot flat bed was gonna haul that! LOL!
I really lucked out on my third call to line up both a delivery truck and a crane truck to hoist it into possition, as the company I contacted had both delivery trucks that could handle the load, and a suitable crane truck that could be dispatched together with the delivery truck. That saved me a ton of fretting about one being late, or one getting there too early and have them sitting around, on the clock, at $200 an hour.....long story short....this is what the delivery of the beam looked like:

Off of the truck and into the air with the greatest of ease!

And gently, oh so gently, lowered it into place....dayum! these guys just made it all look way too easy!

Now here's a little something to keep in mind as you're looking at this beam: when Denny and I had placed the king posts that support the ridge beam, we had done so with very primative methods. To back track just a bit, I'll take you back to the previous year when we were just starting this insanity. This is a picture of the top of one of the king posts after I had finished working it to accept the top steele bracket that would hold the future beam

And here's a shot of our primative methods of placing and securing those king posts

We errected both of the king posts with nothing more than the tractor [Francis], some stout ropes, a block and tackle and a lot of sweat and chewed fingernails. The reason I back tracked right here to show you these shots is just this: Until the beam was delivered and set, we had no way of truly knowing if all of our measurements, all of our adjustments, all of our aligning and realigning the darn things was going to work. Not until the beam actually settled down into the brackets and everything lined up near perfectly! Whew! Yeah, we were sweating that one. We sweated that for over a year. Would the beam go in the way it was intended to go? Would it sit square to the walls?
Well, as you can see here...it's all in. Resting perfectly in it's brackets, the crane truck and delivery truck were long since gone, and Denny and I finally breathed our first big sigh of relief!

The long 2 x 4's that you see attached to the king posts were just our way of adding lateral support to the posts while the beam was being placed. Just in case, you know. And yes, that's the north loft floor you see as well, all framed and sheeted.
So let's step back and look at our handiwork, shall we?

Looking more and more like an honest to goodness house now, isn't it? Still a LONG way to go yet. I know I had promised a roof going up with this installment, and believe me [Kathy] I'd love to go that far on this go-round. But the truth of the matter is, I'm POOPED! And you gotta admit it...that's a lot of pictures for y'all to muse over and a lot of descriptive narative to muddle through. I'll be out of town for about a week starting 11-10-10. With any luck, I'll have a spare hour or two when I get home to do another update.
Until the next time, enjoy this latest installment folks. And don't forget to hug your chickens!!!
Welcome back for the next chapter in the Eberhardt Log Home project!!
Posted 11-21-10
As promised, I’m ready to give y’all another update, since, obviously, I‘m back from my trip to Tacoma! So, grab some munchies and something good to drink, get settled in and comfy and we’ll get this ball rolling! J
Shortly after that last picture was taken, [late August 2008] we had family from out of state visit for a week. That in itself wasn’t a problem. The two visits from other family members from in state was a bit more troublesome as by the time the last of them left, we were getting very short on time before the winter winds and snow would be returning.
It was now the first week of October. The autumn rains had started to fall, and in an effort to protect all of the flooring, we placed plastic tarps over everything. We had all of six pairs of roof rafters in place and secured to the ridge beam when disaster struck.
On October 2, we were about to run to Spokane, 30 miles one way, for some much needed materials from Lowe’s. I needed a quick measurement of the span between the top tips of the rafters so, without even thinking about it or even giving the situation a second glance, I shimmied up the ladder to the second story lofts to get said measurement. Everything was going smoothly until I proceeded to come back down to the main floor. This is when a conspiracy of events struck me down!
The ladder to the lofts, a 16 foot aluminum extension type, had not been tied off after we had spread the plastic tarps on all of the floors. And I didn’t even see this fact until it was too late by half!
I put my right foot on the ladder without any problems. The ladder didn’t even give a warning lurch. But when I fully committed to the act by putting my left foot on the dang thing, it went flying out from under me and me and my little tape measure went with it. From a height of NINE feet! Yes, NINE FREAKING FEET!……WHAM!
My butt landed on the side rails of the ladder a split second after it hit the floor. I missed crushing my tail bone by a mere fraction of an inch. About a half inch further to the left and I would have probably been crippled for life. As luck would have it, I missed it, but it was a very close thing. But don’t think for a second that I just walked away from that.
I had messed up my ankle pretty bad, but the worst of it was my back. Unbeknown to us at the time, I had pretty much fractured the living daylights out of two of my vertebra. T-11 and T-12 to be exact.
It’s been over two years and I still fight with my back every day. Sometimes I sit and marvel at all of the changes life can bring in two short years. But, we’re not going to dwell on this any further tonight. It’s not worth it. Suffice it to say, the injury has slowed me down considerably. What once took me a few hours to accomplish, now takes a day or more. This is in no way a plea for sympathy, rather a partial explanation as to why this house has taken us so long to build. It was slow going enough with two healthy people. Take one of us out of the picture and things slow down to a snails pace.
I was completely worthless to Denny for the first two weeks following my fall. Which makes this first picture I’m going to post with this update all that much more impressive. Keep in mind that Denny did all but the first six pairs of rafters all by himself! He’s such a clever man! He managed to come up with a system that allowed him to install the remaining 42 pairs without any help from me! Yeah, I’m pretty proud of him for that! So, keep that all in mind as you examine this picture.

The length of the rafters is 22 feet long and were framed at a 9.5/12 pitch. This means that for every foot of run of the rafters there is a 9.5 inch raise in the height. In layman’s terms….One VERY steep roof!! It also makes for a very stout roof as well. And it has to be in this country. Even though our snow is typically very light and fluffy, when it hits 8+ feet in depth, it’s heavy, no matter how you cut it! This roof can take that kind of a pounding without even so much as a groan. I know because that’s what we went through in the winter of 08-09!
We’re very near the end of the 2008 building season here folks. Just a few more pictures to go.
The day after Denny got the last of the rafters up, my dear and marvelous family [sister Fawn, BIL Jerry, and mom Kathleen] came all the way over from Tacoma [a 5+ hour drive] to give us a hand in getting that huge roof sheeted in so that we could get the dang thing roofed before the snow started to fly. By this time, we were rapidly nearing the end of October.
Here’s how Denny and Jerry got all of the sheets up and secured:
Oooops! I almost forgot something here….gotta back up and give y’all a bit of detail on how these things all go together.
Let me say, here and now, that there are times I’ve wanted to pull every hair out of my head over what the “Uniform Building Code” requires these days for framing requirements. I DO NOT live in an area that is prone to hurricane force winds! In light of that, why do I have to have hurricane clips to hold my rafters in place? Why can’t we just nail the dang things into place??? Picture me with a very irked expression on my face every time I think about things like this.
But alas, it’s better to over build than to under build one’s home. And we do get some pretty nasty winds around here from time to time.
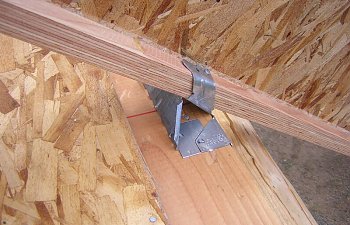
I wouldn’t have an ounce of butt hurt over the whole thing if the flippin’ brackets weren’t so dad gum expensive. The small VPA35 brackets, believe it or not, were in excess of $8 EACH!!! Oh, and there are 96 of those little buggers up there. You do the math. What’s a VPA35 you ask? This is a VPA35!

And this is a VPA35 with a roof rafter in place and secured!

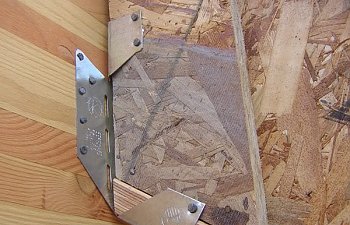
And this here is a LSUI35. Another pricey little chunk of metal, chiming in at the ridiculous price of around $6 each. There are 96 of these as well!

The last bracket in all of this mess is a simple galvanized aluminum strap that goes on the top of the rafters, joining the rafter on one side to its counterpart on the other side of the beam. I’d have gotten a picture of those too, but I had pretty much sworn off of ladders for all but the most necessary of reasons. At least those were a reasonable price, coming in at just under a dollar a piece. There are 46 of those. Again, you do the math! LOL
I will say this: Houses are just like sailboats, in that the rigging costs much more than the hull! The total package of materials for just the framing of the roof [consisting of engineered rafters, VPA35, LSUI35, and Galvanized Aluminum straps, Ridge Beam and sheeting] came in at a bank account busting total of just shy of $6,000. In case any of you are contemplating building one of these monsters yourself!
Ooooh! I almost forgot the catwalk beams! These arrived at the same time as all of our engineered rafters, brackets, sheeting and all that other happy crap. The catwalk joins the two lofts, north and south, over the area that will later become the kitchen. These are Glu-Lam, just like the ridge beam, but much, MUCH smaller in size all the way around.
The catwalk itself is about 4 feet wide and nearly 20 feet long. Ultimately it will have railings for safety and esthetics, but that’s still a long way down the road. This picture was taken from the floor of the south loft, looking north. No deck on it at that point, but you’ll see that progress too at a later date.

Oh yeah! And there's that offending extension ladder, just lurking in the top left corner of the picture! Grrrrrrrr!! *shaking my fist at the image!**
Here's a shot of the catwalk again, taken this time from the downstairs looking up.

And here's a look at all of those silly VPA35's in place along the cap logs. I did manage to help Denny get all of those placed and set. I took care of the areas in both lofts and he took care of the ones that went over the great room since that involved ladders. And we all know how I feel about ladders these days!

The length of the rafters is 22 feet long and were framed at a 9.5/12 pitch. This means that for every foot of run of the rafters there is a 9.5 inch raise in the height. In layman’s terms….One VERY steep roof!! It also makes for a very stout roof as well. And it has to be in this country. Even though our snow is typically very light and fluffy, when it hits 8+ feet in depth, it’s heavy, no matter how you cut it! This roof can take that kind of a pounding without even so much as a groan. I know because that’s what we went through in the winter of 08-09!
We’re very near the end of the 2008 building season here folks. Just a few more pictures to go.
The day after Denny got the last of the rafters up, my dear and marvelous family [sister Fawn, BIL Jerry, and mom Kathleen] came all the way over from Tacoma [a 5+ hour drive] to give us a hand in getting that huge roof sheeted in so that we could get the dang thing roofed before the snow started to fly. By this time, we were rapidly nearing the end of October.
Here's how Denny and Jerry got all of the sheeting in place and secured:

Denny ran Francis the tractor while our brother in law Jerry would ride the loader bucket up with a load of five or six sheets of plywood at a time. Once Jerry and tractor were in position, Denny would climb up to give him a hand installing them. It took nearly three days for our men folk to do the job, and what a marvelous job they did!!!
Here you can tell that the west side of the roof is sheeted, while the east side was yet to be tackled. And dang if that rotten ladder didn't manage to get in another picture!!

Here's a better view of the west side of the roof sheeting:

You may have noticed the fact that the cap logs on both east and west walls runs out further than the rafters do? This was so that we knew we'd get them long enough to give ourselves a nice amount of gable end soffit area.
And here's the East side sheeted in:

And here's a picture of the happy crew that done it all in less than three days! Mom, sis, the dogs and I just made sure that the boys had plenty of sandwiches and fresh hot coffe to keep going. Outside of that, we pretty much just stepped back and stayed out from under foot as much as we could! And yes, yours truly managed to keep the camera in her hot little hands. There would be no pictures of moi while I was in such a decrepit state, thank you very much!!! LOL!
 Suffice it to say, I look an awful lot like my mother! Hint, hint.
Less than two weeks later, on election day as a matter of fact, we had Mike from The Roofing Company and his crew out to roof our home. This was only the second time we had hired a contractor to touch our home. Between my back and ankle being so messed up, and winter breathing down our collars, we pretty much had to do it that way.
But I have no complaints! Mike and his crew were awesome! Not only did they get it all done in one day, but Mike got us the materials for far less than we could have gotten them on our own. Funny how that works sometimes. The weather was positively miserable, which is why I didn’t get pictures of the process. That poor crew! The had to have frozen their butts off. It was raining cats and dogs from sun up to sun down, and even spit a bit of snow at them at various points during the day.
Try as I might to get those boys to come inside the house, out of the rain, to have their lunch, they wouldn’t hear of it. Two at a time they’d break for about 20 minutes and then were back up on that roof, working their hearts out. I think they did a marvelous job. Take a look and decide for yourself!
This is the west side of the house as seen from the north gable end.

And here's a look at the marvelous job they did from the east side, south gable end:

These pictures were taken less than 24 hours after Mike and his crew finished the roofing. How typical is that weather? For here, pretty dang typical! How do you like our plastic windows? Pretty tacky, huh? Well, they served their purpose through the winter.
And this is where we’re pretty much going to be leaving off for this chapter. There’s still much to tell, but the hour grows late and I’m having trouble keeping my eyes open.
In the next chapter, we’ll walk through the interior progress that was made during the 2008-09 winter, the worst ever recorded for our area. Progress was slow as we spent more time shoveling snow than we did anything else.
I hope y’all will return in a few days [maybe weeks] and catch the next chapter of our story. In the mean time, don’t forget to hug your chickens!
Our household, such as it is at this time, (and I'll address those "conditions" later) consists of myself, (a frumpy little farm wife type of lady) my husband Denny (USCG retired after 25 years of dedicated service to our country, and yes, I'm darn proud of him for it!) our grand daughter Annie (who for reasons beyond any one's control has been with us since birth) one cat named DeeDaa, one old dog named Jasper and now 27 chickens all told. 9 are adult at the time of writing this and 18 are rapidly nearing the one month mark. Life is good!!
Denny and I moved from Olympia, Washington to the opposite side of the state (30 miles west of Spokane) in the late summer of 2005. And we've never looked back nor regretted it! Life here in the high desert country of Eastern Washington is our idea of paradise. Our plan had been to begin construction of our dream log home the following spring, but life sometimes throws you a curve ball, and you either learn how to swing for the fences or wait for the next pitch. We kind of split the difference and held off starting construction on the house for the following spring. And when March of 2007 rolled around, that's just what we did!
The logs for our home came from a forest of dead standing timber approximately 150 miles (give or take) from our property, and were acquired for us by our friends and neighbors of Turley Logging Company. If you live in Eastern Washington State and find yourself in need of the services of a top notch logger, Tom Turley is your man!! He's painfully honest, conscientious, and courteous beyond measure! Just an all around great guy, and his wife Kelly is a little living doll. But, I digress. Here's a shot of the first of two loads of logs being delivered.
We've had a very long row to hoe with this house. We've done every bit of it ourselves, from design to all phases of construction, without any help from anyone. There are three exceptions to this and we had some awfully good reasons to hire a subcontractor for the respective stages of construction. The first exception was that of the foundation. For as anyone who has ever built a house knows: If you mess up the foundation, you've just messed up the entire house! And since we had neither the equipment nor knowledge to pour such a huge foundation on our own, we hired this part out.
In this picture, you can see not only the crew working to do the set up part for laying out the concrete foundation, but in the upper left hand quadrant of the photo, you can also see our little log cabin (also built by us) which started this whole insane odyssey more than ten years ago. It was our test for ourselves to see if we were actually cut out for this log home building business. Our theory was that if we could build that by ourselves, surely we could build a much larger version of it.
 Some may argue that there's a fundamental flaw in that kind of logic..................
Now for those who have never built a house, let me say here and now, it's nothing like what you see on HGTV! Nope! Not even remotely like what you see on television. These things take a great deal of time. Especially when it's just the two of you! The curing time for the foundation alone took 28 days! So, what does one do in the mean time? Why, build a chicken coop and get some chicks, of course! (and there began my personal adventure and love of keeping chickens!) This is a baby picture or our original 12 pullets, purchased in late March/early April of 2006. Yes, I know that's a whole year before we started work on the house, but I thought it made for a cute intermission while we wait for the concrete to cure. Don't you?

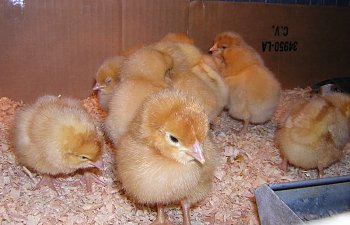
We had originally purchased six of each of Buff Orpingtons and Golden Sex Links (a.k.a. Red Stars or Red Comets in other parts of the country) Of that original 12, I have but five left.
 That's how life goes sometimes. Sadly, these little goobers don't live as long as we do, much as we'd like them to. I've loved every one of them and some I still keenly miss, even a year and more after their departure from this world. RIP: Gimpy Girl, Lacey, Alice, Molly, Mildred, and Katie, of the original flock. Others as well, whom I still miss...but, oh hey! Look at that! The concrete has cured!
  Let's get back to working on the house, shall we?
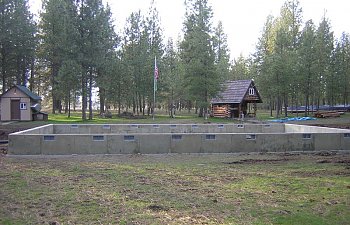
Gee, maybe this isn't so different than HGTV after all! Well, there she is! Our 1,500 square foot "footprint" foundation of the house. I'm going to skip past the whole framing of the floor episode as it's about as exciting as watching grass grow. In this next shot, you can see three large log posts sticking up out of the floor. These do indeed serve a purpose. The two tallest are called "King Post's" and they hold up the ridge beam of the roof. The shorter one is for the future spiral stair case.
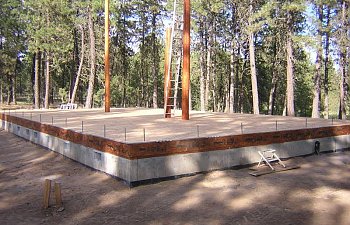
And here is where I'm going to leave us for the time being. It's getting late tonight and I need to get to bed. We'll pick this up again in the morning (hopefully) when you'll see some rather interesting progress, once logs come into the picture.
 Thanks for stopping by and taking a look.
8-14-10
OK, it's been awhile since I set out to tell this story, and it's high time I added a bit more to it. So, just for you Kathy [kathyinmo] here we go! Oh, the rest of you are invited to tag along too!
After we finished getting the main floor framed and sheeted, the next obvious step was to start adding logs. One thing I would like everyone to keep in mind with this house is just this: This is a hand crafted house!! There are no precut pieces for anything. It is not a kit that comes precut and all but pre-assembled for us. Every single log had to be peeled of any remaining bark. It then had to be power washed, allowed to dry (most days that was at least 3-5 hours) and then have a grinder taken to it to fix any blemishes or protruding tree branch remnants. And believe me, there were a lot of these! In other words, my job was to make each and every log look as pretty as it could be, before Denny went about placing the logs into the walls of the home.
So, slowly, ever so slowly, this:
became this:
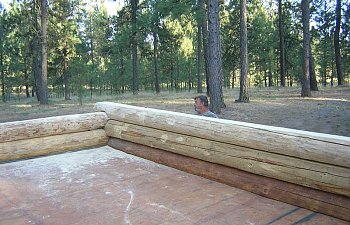
Yes, that's Denny standing on the outside of the house. No, he's not really short. There's about a three foot drop from the level of the floor to the ground.
What you are seeing in that last shot represents approximately 3 weeks of work. I know, crazy, huh? But it takes time! That's the one aspect of building this house that seems to be lost on most folks. Friends and family alike are always asking us "Ain't you guys done building that house yet!?!?! Like it should have been finished in its first year or something. Going on just a slight rant here folks: A log home is painfully labor intensive. Which is why most people build one themselves, because they're just too dang expensive to pay someone else to build it for them...unless of course you happen to be rich! Neither Denny nor I are rich, so we had to do all of this ourselves. And when it's just the two of you......well....it just takes a whole butt load of time!
Over the course of the summer of 2007, we managed to get the first five of what would ultimately be nine courses of logs up and secured in place. These next few pictures might give you a little better appreciation of what each log has to go through before it is completely fitted into the wall and secured.
The very first logs to go in were actually half logs, as this is how one starts a log home. So, choosing one of the longest and fattest of the logs from the pile, we set to it with an Alaskan Saw Mill. This is a handy dandy device that is used in conjuction with a chainsaw to create rough sawn planks. Or, as in our case, starter half logs!
Here's a picture of Denny running the ASM. Usually I was holding on to the other side of this beast, but for this picture I had to let him run it alone. Not a great idea, but it was only for a moment!
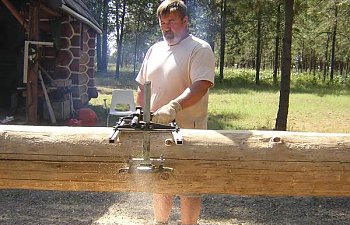
Just the cutting of this one log took the better part of an hour and a half actual working time. We had to stop periodically to sharpen the chain, as well as refill all fluids [mixed gas and bar oil] It never paid to try to force this thing to go any faster than we did. We learned that much in the first ten minutes of attempting to cut this log in half down the length. Broke the dang chain! There went the rest of the day while we ran all over the place trying to find a chain that was the right size as well as being a "ripping" chain.
All chainsaw chains are NOT created equally. The kind that most folks have on their chain saw is for cutting down trees and cutting up firewood. These chains are meant to go across the grain. You need a special chain to go with the grain. And when you're talking about a chain for a 36 inch bar [if memory serves me, that's how big this one is] the quest to find one on a Saturday afternoon becomes nearly impossible. After running around for several hours, it occured to us that our neighbor across the street [the same one who got us the logs in the first place and who owns Turley Logging and Timberland Management] might just have what we needed. Well, duh! So, with ripping chain in hand and the recently acquired knowledge of why one does not force this kind of cutting, we got back to work.
Once the starter half logs were done and in place, we needed to rip down the length of the logs for the connecting walls. The reason for this is one of stability. One does not want to place ones home on a round object you see. So, the next logs had to be flattened down to about 6 inches wide on the bottom. Back to the Alaskan Saw Mill for this job.
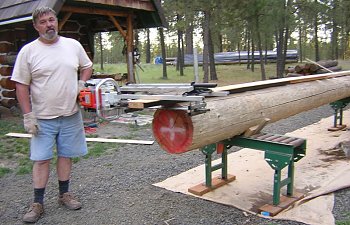
In that shot you can see the roller benches we picked up at auction. OH! MY! GOSH! Those things were worth their weight in gold to both of us! It meant that I could work on a log all by myself and easily roll it over to work on all sides without having to pester Denny, who was busy with work of his own. Like saddle notching!
And here comes the real time consuming aspect of the home. Saddle notching. Now, there are a number of different kinds of notches that one can use in the construction of a log home. There's the full Swedish Cope method that is ridiculously labor intensive, time consuming and probably best left to artisans as they are so precise. There's the butt and pass method of laying up logs but we've always felt that they're horrible to look at, don't have the strength of a true notch, and frankly, are a lazy persons way out of the job. There's the Apalacian Dovetail notch. Those are positively a work of art, much like the Swedish Cope. And unless you're well versed at skills similar to those used in cabinet making [which we presently are not!] this is another notch probably best left to the pros. So, what's a happy middle ground for folks like us? Why, the Saddle Notch of course!
This is a time honored and very stout method of notching logs for any structure. If properly scribed and cut, it will be so tight that you can't even slide a piece of paper between them. OK, so we don't have quite that level of mad, crazy skills, but I think we did pretty darn good, all things considered. And besides, chinking hides a multitude of sins! hahahaha!
Here are the steps to making a saddle notch:
Step #1: Scribe the log, both sides, for what needs to be removed.
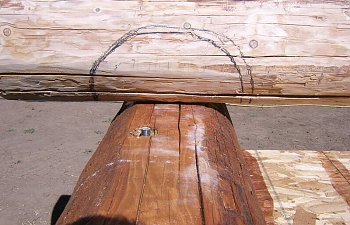
Sorry, but I seem to have misplaced my pictures of me actually marking out the scribe lines. The whole procedure employs the use of a tool called a dual level log scribe. Pricey little tool it was too! Just shy of $100. But after I pooched 3 logs and all the work that went into getting them ready, believe me, $100 was cheap at twice the price!
Step #2 Cut slices into the log, stopping before you reach the line. This, believe it or not, takes two people to do right. The one running the chainsaw, standing on one side of the log and another person standing on the opposite side to be able to tell the person running the chainsaw when to stop before hitting the scribe line. There's just no way to see both sides at the same time.
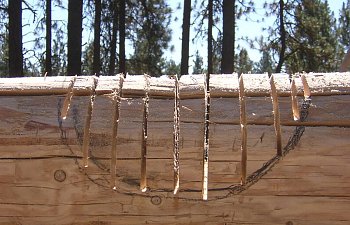
Step #3, remove the slices by snapping them out. Usually a hammer or a chisel works pretty good for this.
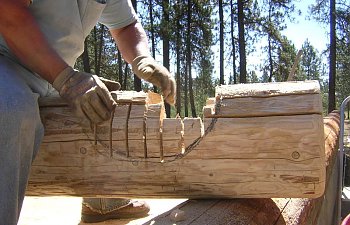
And sometimes just hitting them with the heel of your hand works too! LOL
After the slices are removed, you have something that looks like this:
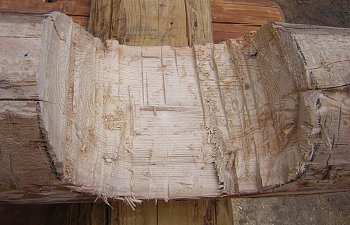
But you're not done yet! Ohhh no! Not by a long shot! Next comes several hours [at times] of grinding, test fitting, grinding some more, test fitting some more......Until the inside of your notch looks something like this:
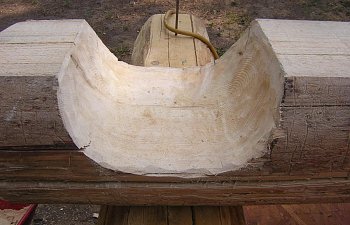
And if you've done everything right, this is what it will look like when properly fitted to the log below it:
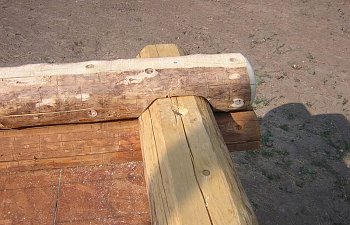
The next phase is chinking. This has actually been one of my more favorite parts of building the house. It has elements of masonry work and cake decorating skills if you can believe it. Here I am piping in chinking compound at the end of the first summer. I use the same kind of bag for this that stone masons use for mortaring in stone or brick work. It's a lot like a giant pastry bag on steroids! LOL
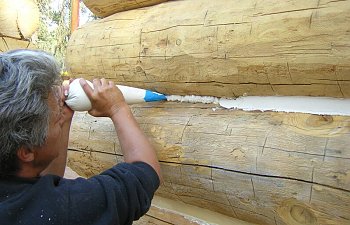
You'll notice that part of the chinking has already been smoothed out. This is called "Striking" the chinking. I have a variety of masonry knives for just this purpose.
And here I am performing that little task:
The corners really take up some time and a whole heck of a lot of material!!
There are a number of very good, but very expensive chinking materials out there. This happens to be common, garden variety "Fix-it-All" patching compound. The little cabin that we built over 10 years ago has this in it. After more than 10 years, I can count on one hand the number of small places where the chinking has failed and I need to do some minor repairs.
The commerically available compounds are, as I said, ridiculously expensive. Remember, this has to be done both inside and outside of the home. If we had done the entire house in something like Perma Chink, just for example, it would have cost us in the neighborhood of $4,800 just for the materials! Don't feel bad, I fainted too when I calculated that one out. I had to run the figures five times just to be sure I wasn't screwing it up!
A less expensive alternative is a product called Log Jam, and I've been very happy with the performance of that in the cracks in the logs. Fix-It-All is completely inapropriate for that kind of application as the log cracks are constantly expanding and contracting with the weather. You need something extremely pliable in both extreme hot and cold conditions, as well as having superior adhesion to the logs. You don't want water getting down into those cracks! That's where rot starts! If that happens, well, the next thing you know, the house you built to last generations is suddenly falling down around your ears! Not a pretty thought!
OK, so back to the house. Sorry...I digress so easily, especially when it's late at night as it is now. **Glances over at the clock** Yup, 1:00 AM.
I'm just about done for tonight, but I thought we'd go to the end of the 2007 building season. Not very long after these next pictures were taken, winter set in with a vengence. We spent nearly every waking hour in shaking snow off of the tarp tent we had built over the house to keep the floors dry. It was an adventure to say the least. And when we weren't shaking snow off of the tarps, we were shoveling it out of the driveways! The winter of 2007-2008 was to go down in the record books as the third worst on record. Exceeded only by the winter of 1952-1953 and 2008-2009.
Here's a nice shot of Denny applying the log stain to those logs we already had up at that point. We did it more to protect the logs through the rough winter ahead than for any asthetic reasons. But it sure was nice to look at through the winter.
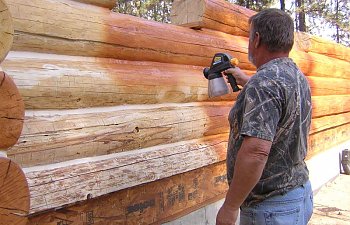
After Denny stained the logs, I came along behind him and painted the chinking back to a lovely white as it should be. Gray is also acceptable, or even a light tan, but I've always liked the white the best. It reminds me of a holiday gingerbread house!
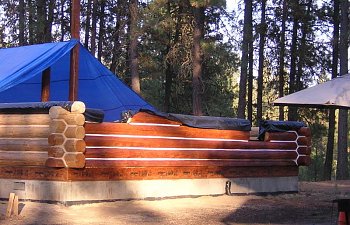
You can also see the beginnings of the tarp tent we built over the top of everything. Those King Posts came in handy long before they were put to their ultimate purpose of holding up the ridge beam!
And less than two months after that tranquil sceen of the house, this is what we were dealing with!
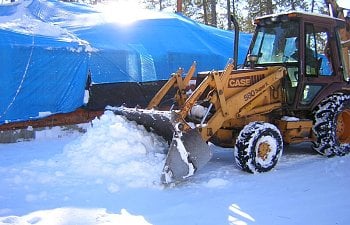
Thank heavens for Tom and Kelly across the street. Our poor little 1950 Ford 8N suffered a fatal wheel failure half way through that winter. The closest replacement rim was 3,000 miles and nearly two weeks away. So Tom, wonderful man that he is, loaned us his backhoe for the duration. What a guy!!
This shot gives you some idea of the literal mountains of snow we had to deal with!
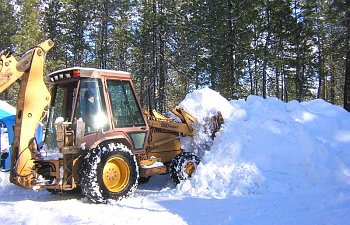
Believe it or not, this was only the third worst winter on record for snowfall. The worst one was still another year away! You can use your imagination, I'm sure! LOL
So, this is where we will leave things for awhile. Untill I get another wild hair up my you know what. But keep checking back. I'll get around to it eventually. Especially if Kathy keeps buggingme about it!!! LOL
In our next installment, we'll see the rest of the walls go up, a tent come down and a roof go on. And then there's the windows and the doors!! Ooooh! Wait till y'all see that!!
 Till then, take care and enjoy your chickens. I know mine have been my sanity anchor throughout this entire project. When it gets too wide and too deep and I need a break, I seek the company of my chickens. They always have a kind and gentle word for me!
Welcome back for the latest installment of the Eberhardt's Log Home Building Project!
[11-08-10]
So as you have probably already figured out, we did indeed survive the winter of 2007-08, but only by the skin of our teeth. But that's the past and we need to keep moving forward or you and I dear reader are going to be old before our time and still not finished with this story!! LOL!
I'm going to be posting a few photos here this time, so make sure you're all settled in with something good to drink, and maybe even something to nibble on. OK? OK! So here we go! I'm just going to dive right into the middle of the 2008 building season. We had left off at the end of the 2007 building season with the 5th course of logs in place and tented over to protect them for the winter. In the interests of keeping the story moving right along, I'm going to fast forward to near completion of the logs walls. I mean seriously: How many times do you really want to look at the procedure of erecting the log walls and corners? Get's kind of boring if you ask me!
In this first picture, you might notice that even though the walls aren't all the way up at that point, we do have two windows installed. This was just a temporary installation simply because we were starting to drag our butts on this and seeing two windows in the wall gave us inspiration to keep going! LOL
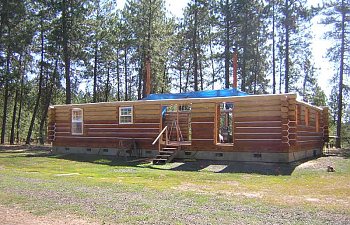
As you can see, if you look near the top of the walls, that the blue tarp tent was still up. That was just in case of the odd and infrequent rain storms that we would have from time to time during the summer. Even though the floor sheeting is supposed to be able to handle a fair amount of rain or moisture, we didn't want to take any chances. We're talking about well over $4,000 worth of floor framing and sheeting here. And we did NOT budget for a replacement of that!
This next picture is a close up of just one of the myriad of logs we used in the house. This interesting detail is natural and called, of all things, a "Cat Face" in the log. It's caused by a wound to the tree when it was young and what you're seeing is the result of the healing process. You've probably seen plenty of trees that have one of these "cat faces" in them and didn't even know it. Look for a serious irregularity in the bark of the tree. If you were to cut that tree down, allow it to age for about a year or two and then removed the bark, you'd see something like this. Pretty, ain't it?
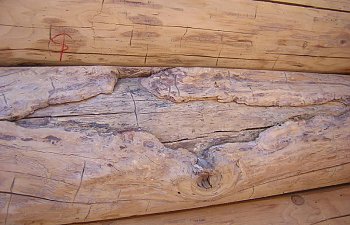
Here's another close up of one of those cat faces. This one resides over the pair of big living room windows. The previous cat face is in the corner of our master bed room. Of course I had to have one of those in our room!!

And wouldn't you all just love to know how we got these big hurking logs that high up off the ground and set into place on the top of the wall? Oh come on! You know you wanna know!!! Shall I give you a hint? OK, what do you get when you cross 400+ pound logs, one 1950 Ford 8N tractor with front end loader bucket, and two very determined people with the need to carefully place said logs on top of a wall that starts at 2.5 feet above grade? You come up with the mother of all inventions, that's what! Or in other words, you come up with this!
And this:
And after each one is securely in place, you have this:
This was absolutely a two person job. Denny ran the tractor as she's a bit on the old side. No power steering or any such ammenities like that. You really have to have some good arm muscles to drive that little puppy around, and there just isn't enough lead in my pencil to do it. Even without the loader on the front end, I have a heck of a time driving Francis. With the loader on her, she becomes an unmanageable beast! So, the best way for us was to have Denny running Francis while I guided him with hand signals and brought each log into position. As soon as the log was resting relatively stable on the log wall, I would unhook the log tongs and wave Denny off, at which time he'd go line up to grab another log if one was ready to go up.
You'll notice that the second log in the preceeding shot has a large notch running the length of the log. This was to accommodate the placement of the floor joists for the second story lofts. The log in the foreground was placed up there just long enough to mark out where the notch needed to be cut and then it too was lowered back down to the ground for the cutting work. Much safer that way you know.
Here's a better look at one of those end wall logs before it was placed for the final fitting into the log wall.
It was critical that all four of these logs [two on each gable end] were precisely cut and precisely placed at the top of the gable end walls. If these were even so much as a half inch out of alignment, or weren't cut square to the walls and floors below, then the whole upstairs floor would be messed up! We got all four of these logs to within a 16th of an inch of each other by the time it was all said and done! Are you impressed? You should be! LOL
So that brings us to the point of the last course of logs to go up, which were on the east and west long axis walls. One of the happiest days of my life was in the placement of the cap logs! And when it was all said and done, the west wall was just 1/4 of an inch out of sync with the east wall. Of the two gable end walls, as I stated earlier, they were a mere 16th of an inch out from each other, and from north end to south end there was a difference of just shy of an 8th of an inch. I'd like to see one of those log home manufacturer's do better! HA! Here's what it looked like after the last logs went into place and were secured!
The next phase of the project was the errection of the interior partition walls. Now, some folks like having all of the walls be made of logs. I'm not one of those people, and neither is Denny. We like having framed and drywalled walls to break up all of that log. Not to mention the fact that running electrical in all of that is a heck of a lot easier than running it through logs! We still had to wire the log walls for the requisite electrical outlets, as well as the outside porch lights but that was relatively easy.
So, how does one frame up the interior partition walls of a log house? Well, I don't know if there is an approved or standard way of doing it, but this is how Denny and I did it.
In this first picture you can see the channel we cut in the log walls to accommodate the first 2 x 6 stud that served as the anchor for all of the subsequent studs to follow. The purpose of the channel is due to the difference in diameters of the wall logs. Some stick out further than others, and in order to achieve a plumb and square set to the stud, we had to first make the wall surface that way. This is what it looks like when that part is done:
And once you have it all plumb and square, you then install the stud.
We then lag bolted each starting stud into place. This, after all, is a load bearing wall. It will carry the full weight of one of the two lofts, plus the catwalk that joins the two lofts.
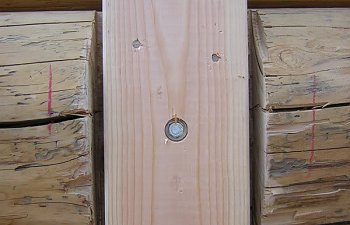
You'll notice about a half inch gap between the stud and the edge of the log? That's there to accommodate the drywall later on. But you'll have to wait to see that!

We actually double stacked these starting studs to make them just that much more substantial. Since they are a key anchor point of the bearing walls, we felt they needed to be extra stout. Our building inspector thought we were a little off of our nut, but I just told him "It's in the genes Mark. Daddy built things to withstand a nuclear blast. I just build as I think he would too" LOL
And here's a look at those load bearing walls, once they were all up and done. This first shot is of the north load bearing wall:
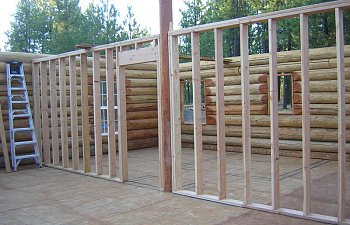
And from the opposite angle: you can also see the first of many of the floor joists for the upstairs lofts. Why we didn't load these up there with the tractor, I'll never know!
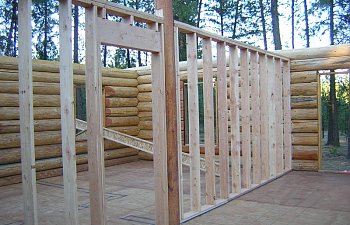
The south load bearing wall looks nearly identical to the north, so we'll just skip on past that....you get the idea by now I'm sure. And since putting up floor joists is about as exciting as watching snail races, let's skip ahead to the roof ridge beam shall we? Cuz that was a nail biter!
First, a bit of background about this ridge beam. Picture a huge chunk of wood that measures 60 feet long, 5.5 inches thick and 21 inches tall. We're talking HUGE! If I remember correctly, the total weight of this beast was somewhere in the neighborhood of 1,300 pounds. Yeah, big! REAL BIG!! At least it seemed that way to me. Boise Cascade built it, but we still had to make arangements to have it delivered and set. There just weren't no way our little 18 foot flat bed was gonna haul that! LOL!
I really lucked out on my third call to line up both a delivery truck and a crane truck to hoist it into possition, as the company I contacted had both delivery trucks that could handle the load, and a suitable crane truck that could be dispatched together with the delivery truck. That saved me a ton of fretting about one being late, or one getting there too early and have them sitting around, on the clock, at $200 an hour.....long story short....this is what the delivery of the beam looked like:
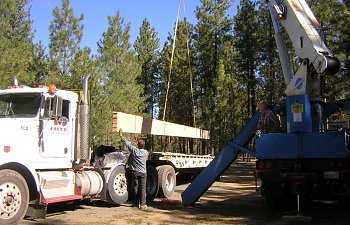
Off of the truck and into the air with the greatest of ease!
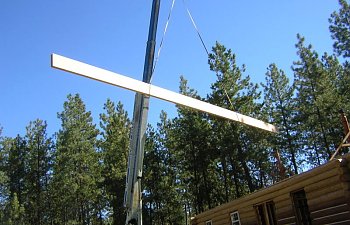
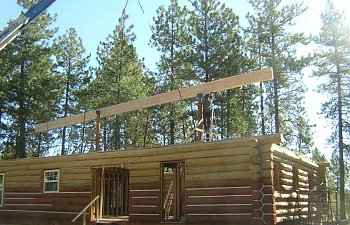
And gently, oh so gently, lowered it into place....dayum! these guys just made it all look way too easy!
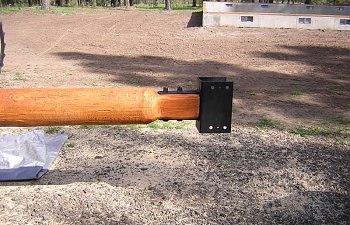
Now here's a little something to keep in mind as you're looking at this beam: when Denny and I had placed the king posts that support the ridge beam, we had done so with very primative methods. To back track just a bit, I'll take you back to the previous year when we were just starting this insanity. This is a picture of the top of one of the king posts after I had finished working it to accept the top steele bracket that would hold the future beam
And here's a shot of our primative methods of placing and securing those king posts
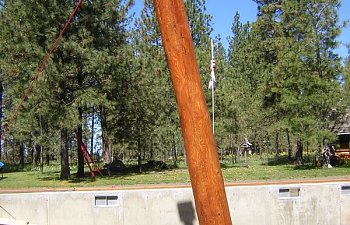
We errected both of the king posts with nothing more than the tractor [Francis], some stout ropes, a block and tackle and a lot of sweat and chewed fingernails. The reason I back tracked right here to show you these shots is just this: Until the beam was delivered and set, we had no way of truly knowing if all of our measurements, all of our adjustments, all of our aligning and realigning the darn things was going to work. Not until the beam actually settled down into the brackets and everything lined up near perfectly! Whew! Yeah, we were sweating that one. We sweated that for over a year. Would the beam go in the way it was intended to go? Would it sit square to the walls?
Well, as you can see here...it's all in. Resting perfectly in it's brackets, the crane truck and delivery truck were long since gone, and Denny and I finally breathed our first big sigh of relief!
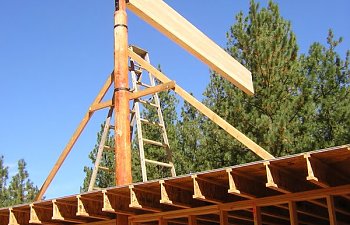
The long 2 x 4's that you see attached to the king posts were just our way of adding lateral support to the posts while the beam was being placed. Just in case, you know. And yes, that's the north loft floor you see as well, all framed and sheeted.
So let's step back and look at our handiwork, shall we?
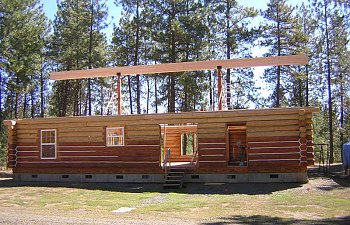
Looking more and more like an honest to goodness house now, isn't it? Still a LONG way to go yet. I know I had promised a roof going up with this installment, and believe me [Kathy] I'd love to go that far on this go-round. But the truth of the matter is, I'm POOPED! And you gotta admit it...that's a lot of pictures for y'all to muse over and a lot of descriptive narative to muddle through. I'll be out of town for about a week starting 11-10-10. With any luck, I'll have a spare hour or two when I get home to do another update.
Until the next time, enjoy this latest installment folks. And don't forget to hug your chickens!!!
Welcome back for the next chapter in the Eberhardt Log Home project!!
Posted 11-21-10
As promised, I’m ready to give y’all another update, since, obviously, I‘m back from my trip to Tacoma! So, grab some munchies and something good to drink, get settled in and comfy and we’ll get this ball rolling! J
Shortly after that last picture was taken, [late August 2008] we had family from out of state visit for a week. That in itself wasn’t a problem. The two visits from other family members from in state was a bit more troublesome as by the time the last of them left, we were getting very short on time before the winter winds and snow would be returning.
It was now the first week of October. The autumn rains had started to fall, and in an effort to protect all of the flooring, we placed plastic tarps over everything. We had all of six pairs of roof rafters in place and secured to the ridge beam when disaster struck.
On October 2, we were about to run to Spokane, 30 miles one way, for some much needed materials from Lowe’s. I needed a quick measurement of the span between the top tips of the rafters so, without even thinking about it or even giving the situation a second glance, I shimmied up the ladder to the second story lofts to get said measurement. Everything was going smoothly until I proceeded to come back down to the main floor. This is when a conspiracy of events struck me down!
The ladder to the lofts, a 16 foot aluminum extension type, had not been tied off after we had spread the plastic tarps on all of the floors. And I didn’t even see this fact until it was too late by half!
I put my right foot on the ladder without any problems. The ladder didn’t even give a warning lurch. But when I fully committed to the act by putting my left foot on the dang thing, it went flying out from under me and me and my little tape measure went with it. From a height of NINE feet! Yes, NINE FREAKING FEET!……WHAM!
My butt landed on the side rails of the ladder a split second after it hit the floor. I missed crushing my tail bone by a mere fraction of an inch. About a half inch further to the left and I would have probably been crippled for life. As luck would have it, I missed it, but it was a very close thing. But don’t think for a second that I just walked away from that.
I had messed up my ankle pretty bad, but the worst of it was my back. Unbeknown to us at the time, I had pretty much fractured the living daylights out of two of my vertebra. T-11 and T-12 to be exact.
It’s been over two years and I still fight with my back every day. Sometimes I sit and marvel at all of the changes life can bring in two short years. But, we’re not going to dwell on this any further tonight. It’s not worth it. Suffice it to say, the injury has slowed me down considerably. What once took me a few hours to accomplish, now takes a day or more. This is in no way a plea for sympathy, rather a partial explanation as to why this house has taken us so long to build. It was slow going enough with two healthy people. Take one of us out of the picture and things slow down to a snails pace.
I was completely worthless to Denny for the first two weeks following my fall. Which makes this first picture I’m going to post with this update all that much more impressive. Keep in mind that Denny did all but the first six pairs of rafters all by himself! He’s such a clever man! He managed to come up with a system that allowed him to install the remaining 42 pairs without any help from me! Yeah, I’m pretty proud of him for that! So, keep that all in mind as you examine this picture.
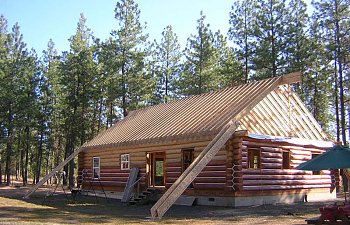
The length of the rafters is 22 feet long and were framed at a 9.5/12 pitch. This means that for every foot of run of the rafters there is a 9.5 inch raise in the height. In layman’s terms….One VERY steep roof!! It also makes for a very stout roof as well. And it has to be in this country. Even though our snow is typically very light and fluffy, when it hits 8+ feet in depth, it’s heavy, no matter how you cut it! This roof can take that kind of a pounding without even so much as a groan. I know because that’s what we went through in the winter of 08-09!
We’re very near the end of the 2008 building season here folks. Just a few more pictures to go.
The day after Denny got the last of the rafters up, my dear and marvelous family [sister Fawn, BIL Jerry, and mom Kathleen] came all the way over from Tacoma [a 5+ hour drive] to give us a hand in getting that huge roof sheeted in so that we could get the dang thing roofed before the snow started to fly. By this time, we were rapidly nearing the end of October.
Here’s how Denny and Jerry got all of the sheets up and secured:
Oooops! I almost forgot something here….gotta back up and give y’all a bit of detail on how these things all go together.
Let me say, here and now, that there are times I’ve wanted to pull every hair out of my head over what the “Uniform Building Code” requires these days for framing requirements. I DO NOT live in an area that is prone to hurricane force winds! In light of that, why do I have to have hurricane clips to hold my rafters in place? Why can’t we just nail the dang things into place??? Picture me with a very irked expression on my face every time I think about things like this.
But alas, it’s better to over build than to under build one’s home. And we do get some pretty nasty winds around here from time to time.
I wouldn’t have an ounce of butt hurt over the whole thing if the flippin’ brackets weren’t so dad gum expensive. The small VPA35 brackets, believe it or not, were in excess of $8 EACH!!! Oh, and there are 96 of those little buggers up there. You do the math. What’s a VPA35 you ask? This is a VPA35!
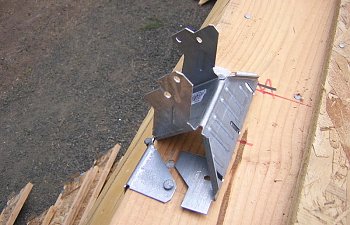
And this is a VPA35 with a roof rafter in place and secured!
And this here is a LSUI35. Another pricey little chunk of metal, chiming in at the ridiculous price of around $6 each. There are 96 of these as well!
The last bracket in all of this mess is a simple galvanized aluminum strap that goes on the top of the rafters, joining the rafter on one side to its counterpart on the other side of the beam. I’d have gotten a picture of those too, but I had pretty much sworn off of ladders for all but the most necessary of reasons. At least those were a reasonable price, coming in at just under a dollar a piece. There are 46 of those. Again, you do the math! LOL
I will say this: Houses are just like sailboats, in that the rigging costs much more than the hull! The total package of materials for just the framing of the roof [consisting of engineered rafters, VPA35, LSUI35, and Galvanized Aluminum straps, Ridge Beam and sheeting] came in at a bank account busting total of just shy of $6,000. In case any of you are contemplating building one of these monsters yourself!
Ooooh! I almost forgot the catwalk beams! These arrived at the same time as all of our engineered rafters, brackets, sheeting and all that other happy crap. The catwalk joins the two lofts, north and south, over the area that will later become the kitchen. These are Glu-Lam, just like the ridge beam, but much, MUCH smaller in size all the way around.
The catwalk itself is about 4 feet wide and nearly 20 feet long. Ultimately it will have railings for safety and esthetics, but that’s still a long way down the road. This picture was taken from the floor of the south loft, looking north. No deck on it at that point, but you’ll see that progress too at a later date.
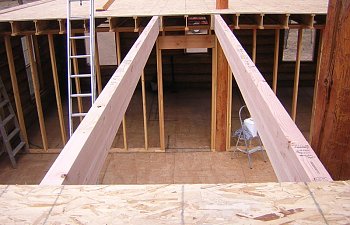
Oh yeah! And there's that offending extension ladder, just lurking in the top left corner of the picture! Grrrrrrrr!! *shaking my fist at the image!**
Here's a shot of the catwalk again, taken this time from the downstairs looking up.
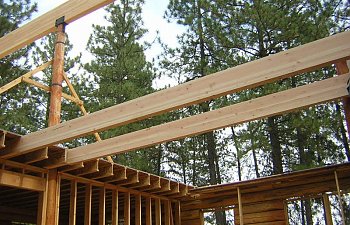
And here's a look at all of those silly VPA35's in place along the cap logs. I did manage to help Denny get all of those placed and set. I took care of the areas in both lofts and he took care of the ones that went over the great room since that involved ladders. And we all know how I feel about ladders these days!
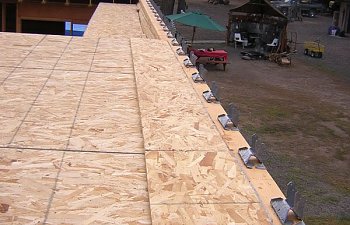
The length of the rafters is 22 feet long and were framed at a 9.5/12 pitch. This means that for every foot of run of the rafters there is a 9.5 inch raise in the height. In layman’s terms….One VERY steep roof!! It also makes for a very stout roof as well. And it has to be in this country. Even though our snow is typically very light and fluffy, when it hits 8+ feet in depth, it’s heavy, no matter how you cut it! This roof can take that kind of a pounding without even so much as a groan. I know because that’s what we went through in the winter of 08-09!
We’re very near the end of the 2008 building season here folks. Just a few more pictures to go.
The day after Denny got the last of the rafters up, my dear and marvelous family [sister Fawn, BIL Jerry, and mom Kathleen] came all the way over from Tacoma [a 5+ hour drive] to give us a hand in getting that huge roof sheeted in so that we could get the dang thing roofed before the snow started to fly. By this time, we were rapidly nearing the end of October.
Here's how Denny and Jerry got all of the sheeting in place and secured:
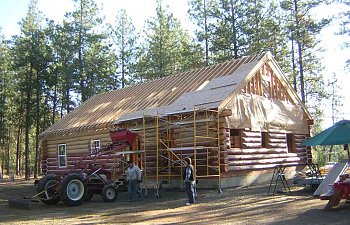
Denny ran Francis the tractor while our brother in law Jerry would ride the loader bucket up with a load of five or six sheets of plywood at a time. Once Jerry and tractor were in position, Denny would climb up to give him a hand installing them. It took nearly three days for our men folk to do the job, and what a marvelous job they did!!!
Here you can tell that the west side of the roof is sheeted, while the east side was yet to be tackled. And dang if that rotten ladder didn't manage to get in another picture!!
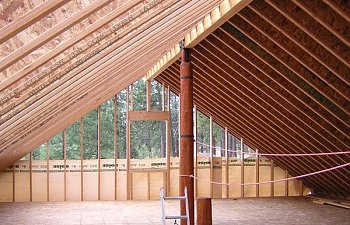
Here's a better view of the west side of the roof sheeting:
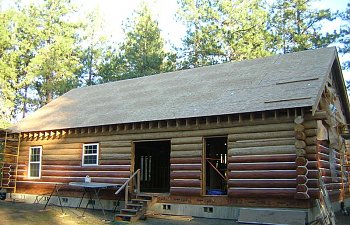
You may have noticed the fact that the cap logs on both east and west walls runs out further than the rafters do? This was so that we knew we'd get them long enough to give ourselves a nice amount of gable end soffit area.
And here's the East side sheeted in:
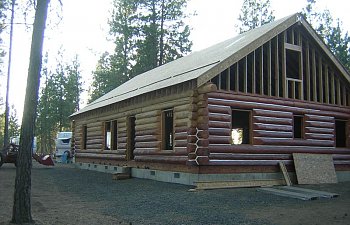
And here's a picture of the happy crew that done it all in less than three days! Mom, sis, the dogs and I just made sure that the boys had plenty of sandwiches and fresh hot coffe to keep going. Outside of that, we pretty much just stepped back and stayed out from under foot as much as we could! And yes, yours truly managed to keep the camera in her hot little hands. There would be no pictures of moi while I was in such a decrepit state, thank you very much!!! LOL!
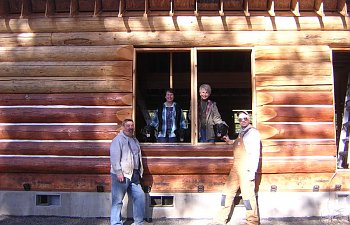 Suffice it to say, I look an awful lot like my mother! Hint, hint.
 Less than two weeks later, on election day as a matter of fact, we had Mike from The Roofing Company and his crew out to roof our home. This was only the second time we had hired a contractor to touch our home. Between my back and ankle being so messed up, and winter breathing down our collars, we pretty much had to do it that way.
But I have no complaints! Mike and his crew were awesome! Not only did they get it all done in one day, but Mike got us the materials for far less than we could have gotten them on our own. Funny how that works sometimes. The weather was positively miserable, which is why I didn’t get pictures of the process. That poor crew! The had to have frozen their butts off. It was raining cats and dogs from sun up to sun down, and even spit a bit of snow at them at various points during the day.
Try as I might to get those boys to come inside the house, out of the rain, to have their lunch, they wouldn’t hear of it. Two at a time they’d break for about 20 minutes and then were back up on that roof, working their hearts out. I think they did a marvelous job. Take a look and decide for yourself!
This is the west side of the house as seen from the north gable end.
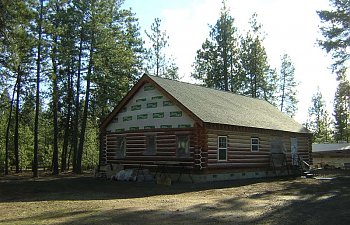
And here's a look at the marvelous job they did from the east side, south gable end:
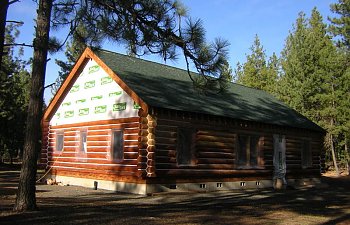
These pictures were taken less than 24 hours after Mike and his crew finished the roofing. How typical is that weather? For here, pretty dang typical! How do you like our plastic windows? Pretty tacky, huh? Well, they served their purpose through the winter.
And this is where we’re pretty much going to be leaving off for this chapter. There’s still much to tell, but the hour grows late and I’m having trouble keeping my eyes open.
In the next chapter, we’ll walk through the interior progress that was made during the 2008-09 winter, the worst ever recorded for our area. Progress was slow as we spent more time shoveling snow than we did anything else.
I hope y’all will return in a few days [maybe weeks] and catch the next chapter of our story. In the mean time, don’t forget to hug your chickens!
