Brewmiss96's Sky's the Limit Coop and Run Build
(if you have a better name I'm all ears! I fell in love with the blue color)

(if you have a better name I'm all ears! I fell in love with the blue color)

The idea of having a 'backyard homestead' has been slowly growing in my mind for some years. So, in early spring when I went the store and saw the price of eggs, I kinda freaked out a little. When I came home I was determined to get some chickens, but didn't know where to start. BYC has been such an inspiration and help, so if my coop helps you at all, it will help even the scales! Eventually I'll have a farm where I can have the 17 different varieties of chickens I want (not counting turkeys, geese, and ducks, pheasants, quail, chuckar, and grouse either!) but until that day I will have to build coops on rental property. Which is why my next one will have wheels!
Some pics of the kids!
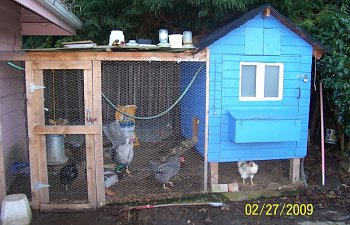
This is my first chicken coop build. Since I built this coop I had to move it, and then I had to move again for a job out of state, so I left it with a friend. I really like this coop for a stationary design and would build another like it with a few modifications I will mention. I got the majority of the 2x4s free from a grow room teardown (not mine). I saw the pile lying in someone's yard and went up and asked. The panels I got from the hardware store for discount because they were damaged. The roofing material is made out of free pallets, torn down and the flat pieces were used. I got the roll of adhesive roofing material for discount because they were closing it out. I built it so the panels were easy to take apart so it could be moved. I had chickens, ducks, and turkeys in this. My smaller rp/narr turkey continued to roost with the chickens in the coop. The BB got too big and had a nice nest outside of the coop in the run. I would let the birds out during the day usually. This is in northern California, so no need for insulation, but keeping things dry was a challenge. Before I bought the big roll of chicken wire for the run, the cost of the coop was sitting at around $100.
Features: Attached covered run, pop door, dropping pit, easy to clean, accessible nest boxes, somewhat modular to aid in moving, compact size good for backyard use, big enough for 6 chickens, slide-in brooding tray or extra square footage for more birds.Some pics of the kids!


This is my first chicken coop build. Since I built this coop I had to move it, and then I had to move again for a job out of state, so I left it with a friend. I really like this coop for a stationary design and would build another like it with a few modifications I will mention. I got the majority of the 2x4s free from a grow room teardown (not mine). I saw the pile lying in someone's yard and went up and asked. The panels I got from the hardware store for discount because they were damaged. The roofing material is made out of free pallets, torn down and the flat pieces were used. I got the roll of adhesive roofing material for discount because they were closing it out. I built it so the panels were easy to take apart so it could be moved. I had chickens, ducks, and turkeys in this. My smaller rp/narr turkey continued to roost with the chickens in the coop. The BB got too big and had a nice nest outside of the coop in the run. I would let the birds out during the day usually. This is in northern California, so no need for insulation, but keeping things dry was a challenge. Before I bought the big roll of chicken wire for the run, the cost of the coop was sitting at around $100.
Footprint size of run and coop: 12 feet x 8 feet
Footprint of the coop: elevated on stilts 18 inches, 4 foot wide x 6 foot long x 4 foot tall at sides x 5.5 foot tall at peak
Step #1: Clear area. I had a rabbit hutch and wood pile where I wanted to put the coop that I had to move. I also cleared the dirt area of any scrap wood, placed the pier blocks, and dug a trench around the footprint to put the chicken wire in once the coop was done.


Step #3: Framed the sides and back, placing 2x4 supports at the half and quarter marks on the 6ft pieces, or every 1.5 feet. The door side was changed so that the whole panel was the door, otherwise it was too small, it is shown in the photos to come. 4 6ft 2x4s, the 15 (5 on both sides, 3 on the back panel, 2 on the front panel) vertical pieces were cut so the 4ft wide siding would fit even with the bottom of the 2x4s on the floor.
Step #4: Framed in the roof. Would have liked to figure out a way to do this better so the roof was more movable. Only thing I can think of is to incorporate crossbracing and to not use ripped pallet pieces (added to the weight of the roof) Next time I will frame in with cross pieces and use a thin plywood. Also metal brackets to hold it in place because it was a pain finding the screws to unfasten the roof from the wall panels. You can see the fixed door frame in the right photo. Should have moved the coop into position at this time, but hadn't gotten the run area cleaned yet, and the camellia bush would have been in the way.
Step #5: Started the dropping pit. Please visit HERE for the dropping pit details.


Step #4: Framed in the roof. Would have liked to figure out a way to do this better so the roof was more movable. Only thing I can think of is to incorporate crossbracing and to not use ripped pallet pieces (added to the weight of the roof) Next time I will frame in with cross pieces and use a thin plywood. Also metal brackets to hold it in place because it was a pain finding the screws to unfasten the roof from the wall panels. You can see the fixed door frame in the right photo. Should have moved the coop into position at this time, but hadn't gotten the run area cleaned yet, and the camellia bush would have been in the way.


Step #5: Started the dropping pit. Please visit HERE for the dropping pit details.


Step #8: Moved the coop onto the pier blocks. It took 3 of us to push it onto the blocks using ramp 2x4s. In hindsight, would have been much easier to build in place, but the tight fit, me not getting the area cleared in time, and the camellia bush prevented it. But we are young so didn't pull anything.

Step #9: Frame in the peaks. I wanted to eventually frame in the door and window with white trim, that didn't happen, and I thought a little barn door looking vent would be cute. And it was. I stapled hardware cloth across the middle and screwed in the two panels on either side. The back panel was one piece with a 1 inch hole cut for the extension cord.


Step #10: The Details. Added a pop door, handles, roosts, ramp, painted the exterior, added the brooder shelf, and then started on the run!
Some outside pics
Things I would change: use lighter material and some cross-pieces on the roof for easier moving, use nails instead of screws when attaching the panels to one another for ease of tear down and reassembly (but I'm not a carpenter so there might be a better way for this to happen with the stability of screws), make sure all hardware is independent of other panels so can remain in place when tearing down and moving, construct run panels in pieces so they are more movable, add a gutter to direct rain away from run, space roosting ladder differently, finish with white trim.


Some outside pics


Things I would change: use lighter material and some cross-pieces on the roof for easier moving, use nails instead of screws when attaching the panels to one another for ease of tear down and reassembly (but I'm not a carpenter so there might be a better way for this to happen with the stability of screws), make sure all hardware is independent of other panels so can remain in place when tearing down and moving, construct run panels in pieces so they are more movable, add a gutter to direct rain away from run, space roosting ladder differently, finish with white trim.
Materials and tools list: Everything was cut on site with a circular saw, so measurements are approximate for what I did. Measure twice, cut once!
Used circular saw, drill with phillips screwbit and 1/8 inch drillbit for pilot holes, level, hammer, wirecutters, pliers, staple gun, extension cord, tape measure, marking pencil,
For coop
2 pier blocks and 2 pavers (my area had a slight grade, so if yours is flat, 4 of either pier blocks or pavers would work)
6 ft pressure treated 4x4, cut into 4 18 inch pieces
1 OSB panel, cut into 4ft x 6ft and 2ft x 4ft pieces
3 t-11 siding panels, 2 cut into 4ft x 6ft pieces, 1 cut in half for 2 4ft x 4ft pieces, save scraps for eaves
6 6ft 2x4s for sides
1 7ft 2x4 for peak of roof
21 3 3/4ft (45in or 3.75ft) 2x4s for sides
Linoleum
Roof material
Small window
Hardware cloth
Screws or nails
Staples for staple gun
2 large hinges for big door
8 smaller hinges for dropping pit door, next box top, and 'barn door' vents
1 big lock/latch for coop door
2 smaller locks/latches for dropping pit door and nest box lid
For dropping pit
Nest Box
Cut hole for nest box, installed bottom of nest box, sides
Original hole for nest boxes Hole cut with bottom and side Bottom screwed into place


Sides screwed in place


For optional brooder tray/extra story (measures ~3 ft x 4 ft)
Framed in supports with a 2x4 and some 2x2s, made the brooder shelf with 2x2s and a piece of plywood.


Covered shelf with linoleum, put in small feeders, and chickenwire to divide it from the rest of the coop