The Coop Within the Red Barn
~Nova Scotia, Canada~
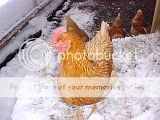
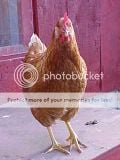
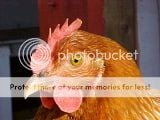
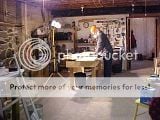
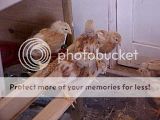
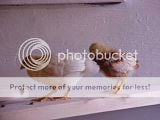
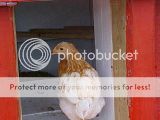
This coop is adapted for long, hard winters in the Rawdon Hills of Nova Scotia, Canada. It's insulated and set up for biosecurity and predator protection. The 12 hens in the photos are golden comets hatched May 15 2008 and obtained when less than 12 hours old. They were selected and purchased locally because of their cold-hardy features and layer qualities. The coop had to provide adequate floor and platform space in an existing barn, had to be easy to maintain, be draft-free in winter and adequately ventilated. Their first year included the most savage winter in 22 years and we're pleased at how they coped. The coop was also comfortable for us with plenty of headspace and surfaces that are easy to clean, and we were able to keep the water from freezing.

We needed to renovate a horse stall between February 2008 and 'Chick Day', which in our region means ordering for a mid-May 2008 hatch and picking them up at the local Co-Op. Everything hinged on learning enough to complete the task, so we tackled the obvious sources- poultry owners, the library and the internet.
Good thing we did our research because 16 weeks and 3 days later our little girls were producing pullet eggs.

It turned out that our electrician, who had twice worked on the barn, kept Leghorns and he had many a tale to share about his girls. The owner of the co-op is a serious poultryman and a cattleman, and shared many of his thoughts about coop maintenance. We scoured the internet and of course, in addition to other sites, we landed here, for which I am grateful.
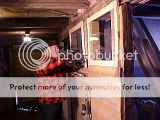
In some of the photos you will notice hefty gray beams. These were used to construct this barn in the 1970's and were part of the first church built in this district in the 1760's. You can see chisel and adz marks, and the rough lines transcribed by sawyers's instruments. Later on the beams were part of a dance hall on this property used by gold miners in the 1920's and then they were moved to construct the barn.
We knew the conversion from horse stall to hen coop would be done in two phases, indoor and out. We can't build a run yet because it's March 2008 and the ground isn't thawed after a particularly long Canadian winter. Phase A is going well though. Here's what's happening. You can see in the picture above where the outdoor run will be- 16' long and 8' wide stretching from the white door in the middle of the long end of the barn to the corner at the back.
In its original state the stall is too big at a staggering 21' x 10'. It could have held two horses but the mare liked to expand herself into it, so we gave it to her. The plan is to use the back portion for the coop, finishing up at approximately 11' x 10'. This will give us a window on the north side of the barn for the hens, and a second window on the other side of a wall which will become the new feed room. This will put the coop in the middle of the barn for warmth and give us a feed room closer to the main door. We would like to have the hens on the south side, but the remaining, horse, a 36-year old (!) elder-gelding, has that spot.
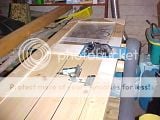
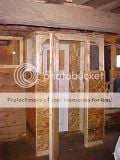
The wall went up easily and we were able to use pink fibreglass insulation, tuck tape, vapour seal, studs and fibreboard already on hand. So far the renos are costing nothing.
Nevertheless, we knew that we had to make some serious considerations for the horse to avoid breathing
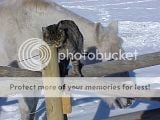
problems, and for the numerous feral cats we support.
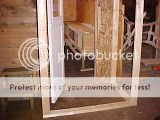
Turns out the panes of tempered glass we had been storing for twenty years would prove useful. For one thing, they could serve to keep the coop warmer in winter. For another, they would keep the dust the birds make *with* the birds. That way we could risk having the hens with the horse. We weren't keen on building a separate coop you see, because I already spend a lot of time in the barn, and splitting the chores between two buildings would substantially increase the time needed to service the animals. So hubby framed the glass and installed it on the aisleway side of the barn, that is to say on the 'horse side'.
This left the issue of the ferals, a necessary part of coop biosecurity. We wanted them to patrol the indoor coop occasionally when the hens are out in the future run, and also to scour the outdoor run when the hens were confined. We also knew that the hens would need ventilation in the warmer months and a csoy venue during the arctic blasts of our winters. We talked a lot about this, and designed a porch on the aisleway side, after we made a door for the coop out of scrap wood, old panelling and glass. Originally we had used tempered glass in this door, but when we installed the *last* screw, the pressure travelled to a corner of the glass, shattering it. So I gave in, and had a piece of plexiglass cut at the hardware store. It seemd extravagant, but we were doing well regarding cost, and the trend would continue! We primed it white in the basement workship and carted it to the barn on a bonechilling February day, and thank goodness it fit!
At this point we forged ahead with the porch, after buying some 1/2 inch hardware cloth. We also needed some studs by then, and the 8' lengths were on sale for $2.22 Cdn, which isn't bad. It means the hardware cloth will ventilate the coop when the inside door is open and the outside door is closed. A cross-breeze will flow across the coop during the day, and this is also when the horse is out of the barn. The cats are excluded and the hens can go about their business in the coop, which I hope involves copious laying.
Since we wanted the coop to be free of cats, especially tomcats, we've been keeping the porch closed so that they learn to stay out while we finish the reno.
This allowed us to focus on the inside of the coop. We had been working mostly in the basement of the house with a warm fire roaring. This meant endless trips back and forth to fit things, but in time we made huge progress. We started by making a mirror out of old medicine cabinet panels and fitting it at a right angle to the north window of the coop. I'm sure it nearly doubles the natural light. The platform under the windor and mirror is 59" long and 11" wide and is 29" above floor level. The hens will access the platfor via the ramp and will exit through a chicken door to an outdoor platform in the biosecure run.
By late February we were able to contribute about four hours daily, and the weather was not kind. We were in the middle of seven snowstorms in six weeks, so you know how we spent the rest of our time!
We also framed in a future chicken door, though we did not breach the outer wall of the barn. We'll do that in warmer weather. The chicken door has to be above the concrete foundation which is now insulated, taped and covered with reclaimed panelling
It was also time to use the workshop to design nest boxes, which are approsimately 15.5" square, each and a foot off the floor at perch level. We knew we wanted big hens, maybe Leghorns, Chanteclers or Rhode Island Reds, but the co-op owner hadn't heard from the breeder yet and he knew he wouldn't until a successful hatch was begun in the last week of April culminating in chicks by the 15th May, hopefully. So we designed for big girls and planned to use hay as bedding so we shaped the boxes to accept the flakes. We also designed a stand to take the box, creating it against the bottom of the nest boxes and it worked well, so when we eventually had the boxes in the barn they slipped into position. We have used screws rather than nails throughout the reno, so that we can redesign, replace old parts or investigate wallspace that might get infested with insects or rodents. We are hopeful that the cats, 25 in all, will keep the rodents away.
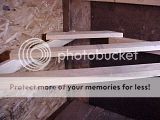
On to building a ramp, and since we had some antique barn board made of eastern cedar, we sanded two planks and crossed them with scrap strips for grip. easy stuff, and a couple of hinges later we had a ramp that could be lifted out of the way when you wanted to clean underneath. You can see a platform we built by the window, and the concrete wall under is is fully insulated. The floor is covered by 2" thick planks from the former stall.
The roost is higher than the nest boxes and the platform above the ramp so we've located them 32.5" high on one level to discourage dominance spats. When completed they'll have a droppings shelf for ease of cleaning, and we'll use DE, Stable Boy and a bit of peat moss on that shelf for odor control and so that the droppings can be scraped daily into a bucket. We also use a scraper to keep the roosts clean.
Of course they grew, and it got warmer.
~Nova Scotia, Canada~
This coop is adapted for long, hard winters in the Rawdon Hills of Nova Scotia, Canada. It's insulated and set up for biosecurity and predator protection. The 12 hens in the photos are golden comets hatched May 15 2008 and obtained when less than 12 hours old. They were selected and purchased locally because of their cold-hardy features and layer qualities. The coop had to provide adequate floor and platform space in an existing barn, had to be easy to maintain, be draft-free in winter and adequately ventilated. Their first year included the most savage winter in 22 years and we're pleased at how they coped. The coop was also comfortable for us with plenty of headspace and surfaces that are easy to clean, and we were able to keep the water from freezing.

We needed to renovate a horse stall between February 2008 and 'Chick Day', which in our region means ordering for a mid-May 2008 hatch and picking them up at the local Co-Op. Everything hinged on learning enough to complete the task, so we tackled the obvious sources- poultry owners, the library and the internet.
Good thing we did our research because 16 weeks and 3 days later our little girls were producing pullet eggs.

It turned out that our electrician, who had twice worked on the barn, kept Leghorns and he had many a tale to share about his girls. The owner of the co-op is a serious poultryman and a cattleman, and shared many of his thoughts about coop maintenance. We scoured the internet and of course, in addition to other sites, we landed here, for which I am grateful.
In some of the photos you will notice hefty gray beams. These were used to construct this barn in the 1970's and were part of the first church built in this district in the 1760's. You can see chisel and adz marks, and the rough lines transcribed by sawyers's instruments. Later on the beams were part of a dance hall on this property used by gold miners in the 1920's and then they were moved to construct the barn.
We knew the conversion from horse stall to hen coop would be done in two phases, indoor and out. We can't build a run yet because it's March 2008 and the ground isn't thawed after a particularly long Canadian winter. Phase A is going well though. Here's what's happening. You can see in the picture above where the outdoor run will be- 16' long and 8' wide stretching from the white door in the middle of the long end of the barn to the corner at the back.
In its original state the stall is too big at a staggering 21' x 10'. It could have held two horses but the mare liked to expand herself into it, so we gave it to her. The plan is to use the back portion for the coop, finishing up at approximately 11' x 10'. This will give us a window on the north side of the barn for the hens, and a second window on the other side of a wall which will become the new feed room. This will put the coop in the middle of the barn for warmth and give us a feed room closer to the main door. We would like to have the hens on the south side, but the remaining, horse, a 36-year old (!) elder-gelding, has that spot.

The wall went up easily and we were able to use pink fibreglass insulation, tuck tape, vapour seal, studs and fibreboard already on hand. So far the renos are costing nothing.

Nevertheless, we knew that we had to make some serious considerations for the horse to avoid breathing
problems, and for the numerous feral cats we support.
Turns out the panes of tempered glass we had been storing for twenty years would prove useful. For one thing, they could serve to keep the coop warmer in winter. For another, they would keep the dust the birds make *with* the birds. That way we could risk having the hens with the horse. We weren't keen on building a separate coop you see, because I already spend a lot of time in the barn, and splitting the chores between two buildings would substantially increase the time needed to service the animals. So hubby framed the glass and installed it on the aisleway side of the barn, that is to say on the 'horse side'.
This left the issue of the ferals, a necessary part of coop biosecurity. We wanted them to patrol the indoor coop occasionally when the hens are out in the future run, and also to scour the outdoor run when the hens were confined. We also knew that the hens would need ventilation in the warmer months and a csoy venue during the arctic blasts of our winters. We talked a lot about this, and designed a porch on the aisleway side, after we made a door for the coop out of scrap wood, old panelling and glass. Originally we had used tempered glass in this door, but when we installed the *last* screw, the pressure travelled to a corner of the glass, shattering it. So I gave in, and had a piece of plexiglass cut at the hardware store. It seemd extravagant, but we were doing well regarding cost, and the trend would continue! We primed it white in the basement workship and carted it to the barn on a bonechilling February day, and thank goodness it fit!
At this point we forged ahead with the porch, after buying some 1/2 inch hardware cloth. We also needed some studs by then, and the 8' lengths were on sale for $2.22 Cdn, which isn't bad. It means the hardware cloth will ventilate the coop when the inside door is open and the outside door is closed. A cross-breeze will flow across the coop during the day, and this is also when the horse is out of the barn. The cats are excluded and the hens can go about their business in the coop, which I hope involves copious laying.
Since we wanted the coop to be free of cats, especially tomcats, we've been keeping the porch closed so that they learn to stay out while we finish the reno.
This allowed us to focus on the inside of the coop. We had been working mostly in the basement of the house with a warm fire roaring. This meant endless trips back and forth to fit things, but in time we made huge progress. We started by making a mirror out of old medicine cabinet panels and fitting it at a right angle to the north window of the coop. I'm sure it nearly doubles the natural light. The platform under the windor and mirror is 59" long and 11" wide and is 29" above floor level. The hens will access the platfor via the ramp and will exit through a chicken door to an outdoor platform in the biosecure run.

By late February we were able to contribute about four hours daily, and the weather was not kind. We were in the middle of seven snowstorms in six weeks, so you know how we spent the rest of our time!

We also framed in a future chicken door, though we did not breach the outer wall of the barn. We'll do that in warmer weather. The chicken door has to be above the concrete foundation which is now insulated, taped and covered with reclaimed panelling


It was also time to use the workshop to design nest boxes, which are approsimately 15.5" square, each and a foot off the floor at perch level. We knew we wanted big hens, maybe Leghorns, Chanteclers or Rhode Island Reds, but the co-op owner hadn't heard from the breeder yet and he knew he wouldn't until a successful hatch was begun in the last week of April culminating in chicks by the 15th May, hopefully. So we designed for big girls and planned to use hay as bedding so we shaped the boxes to accept the flakes. We also designed a stand to take the box, creating it against the bottom of the nest boxes and it worked well, so when we eventually had the boxes in the barn they slipped into position. We have used screws rather than nails throughout the reno, so that we can redesign, replace old parts or investigate wallspace that might get infested with insects or rodents. We are hopeful that the cats, 25 in all, will keep the rodents away.


On to building a ramp, and since we had some antique barn board made of eastern cedar, we sanded two planks and crossed them with scrap strips for grip. easy stuff, and a couple of hinges later we had a ramp that could be lifted out of the way when you wanted to clean underneath. You can see a platform we built by the window, and the concrete wall under is is fully insulated. The floor is covered by 2" thick planks from the former stall.


The roost is higher than the nest boxes and the platform above the ramp so we've located them 32.5" high on one level to discourage dominance spats. When completed they'll have a droppings shelf for ease of cleaning, and we'll use DE, Stable Boy and a bit of peat moss on that shelf for odor control and so that the droppings can be scraped daily into a bucket. We also use a scraper to keep the roosts clean.
Of course they grew, and it got warmer.


