The Egg Carton
The one piece of advice I can give to anyone thinking about building their first coop is Plan, Plan, Plan! Look at lots of designs and really think about how your coop will be used on a day to day basis. There are lots of great ideas on this site, I've used a lot different peoples ideas and tips in our coop, it's 100% better than it would have been without the BYC coop pages. Our coop is very simple but we spent a long time working out where it would fit and how it would work before we stated cutting timber or buying materials, even then we still had a few re-designs along the way.
When I was a kid my mum and both sets of grandparents all kept chickens. Their coops were all quite similar, no frills utility coops built using available odds and ends. I loved the chickens but hated walking through poopy, often muddy runs to get to the coops, and then having to get down into dark corners, often behind roosts etc to collect eggs. My number one priority when designing this coop, was to avoid that experience again.
This coop is also our first building project, so it had to be relatively simple too.
Our Main Design Features
Cottage Coop - I like the look of many of the 'cottage' coop on this site, they were one of the things that started to get me really excited about owning chickens. Also we have a quater acre block, but with the house set a long way back from the road our "backyard" is quite small. Anything we built in the backyard was going to be very visible and close to the house.
Raised Floor - We chose a raised floor for two reasons, firstly our block has quite a slope, the area that suited a run is uphill from where the coop would fit, a raised floor prevents water running down the hill into the coop (avoiding my muddy coop phobia). Also, being quite lazy, I liked the idea of having the coop at working level, rather than having to bend down to collect eggs, fill feed containers etc.
Outside Access - As I said before, I don't like having to walk into a poopey run every day so access from the outside of the coop was a major requirement.
Flat Floor and Walls - I wanted a totally flat floor so that I could easily sweep out the coop when we changed the litter, no frames etc sticking up for stuff to get caught it. I also wanted the wall frames enclosed so that the walls could easily be hosed down and the chickens couldn't roost on the struts and poop down the walls. Putting in these internal walls meant we had a wall cavity, and since we had a cavity we decided to insulate the coop, something that probably not needed in our mild Perth climate, but I'm glad we did it anyway, I'm sure the girls will appreciate it next summer.
Extended Roof - The roof at one end is extended so that we're sheltered from the raining when collecting eggs and filling the feeders.
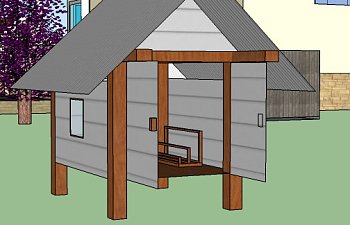
SketchUp. If your fairly computer savvy
SketchUp can be a very handy tool.

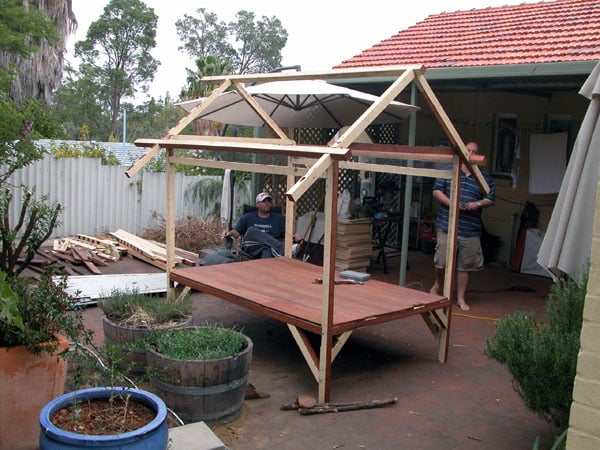
We started to build the coop on the Easter long weekend 2009. the coop is 2m x 1.5m which should be big enough for about 9 chickens.
The frame timber was free from Gumtree, and the floor boards cost $40 from the local salvage yard. You can see Hubby and his brother in the background. Also, the fence you can see behind the pile of timber is where the coop will eventually sit.
The frame in place, it's handy the paving was already there, someone who lived here before us had a paving fetish, there are odd bit's of paving all over our yard. The floor boards have been sealed with some varnish that my father-in-law had sitting in his shed.
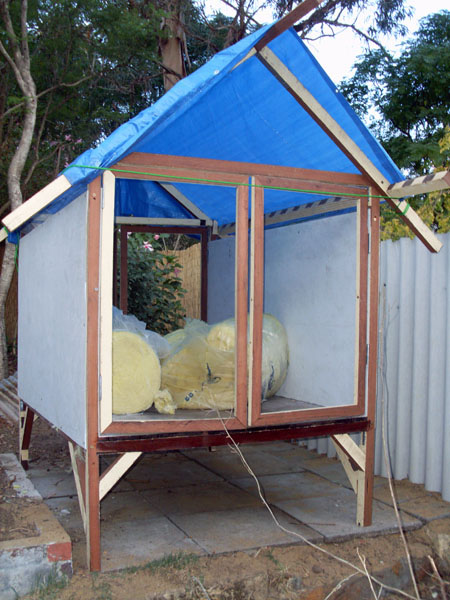
The walls and insulation start to go it. Insulation $30, Fibre Cement Board $150 both from Gumtree
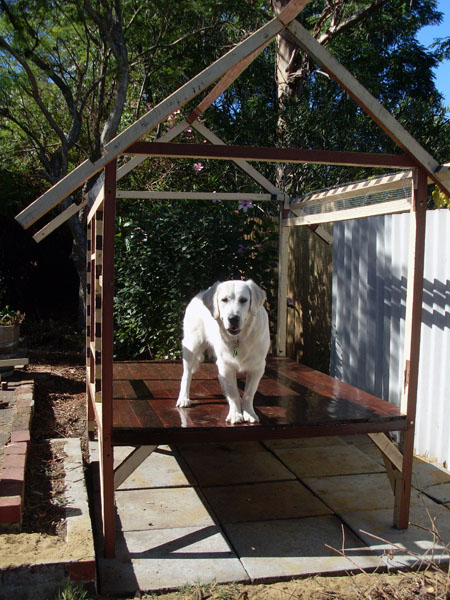
The door frames go on and the side walls are done, just need to cut the hole for the window.
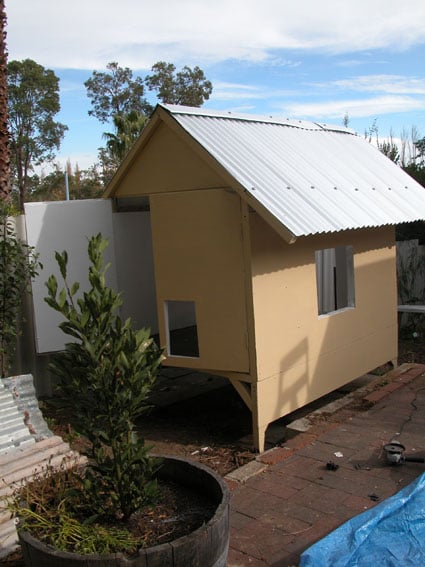
Jump Forward a bit and the roof is on (we splurged on new tin $200), there is also insulation in the ceiling cavity and the doors have been cladded.
The outside walls are painted the same colour as our house and the inside is painted from some white paint left over from painting our hallway.
Now some trim has been added, the poop door and the window (glass $16) are also fitted and the door bolts are also in place.
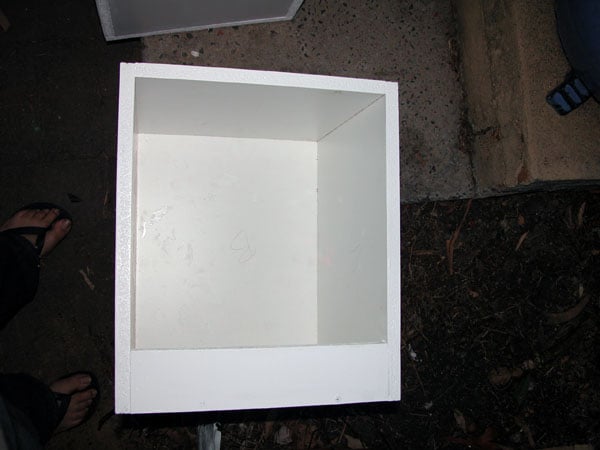
We build the nesting boxes from some ply wood squares that were free from freecycle.
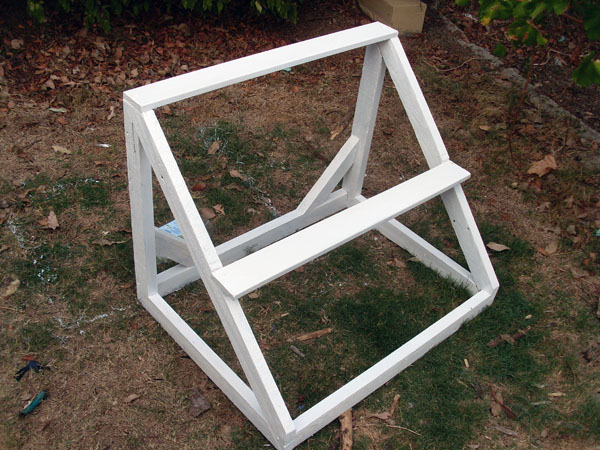
The roost made from some left over timber and old decking boards, all covered in some white paint (also left overs) to make it look ok.
Add about $300 in screws, bolts, saw blades, grinder disks, drill bits, screws, a plasterboard scoring knife, screws and more screws and a plastic waterer and feeder and the whole thing cost about $750.
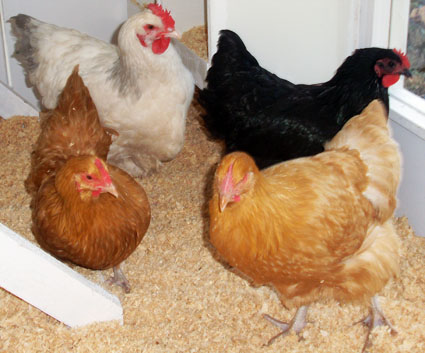
After MANY weekends work the girls arrive of the 6th of June. We have 1 x Coronation Sussex, 1 x Black Australorp and 2 x Buff Orpingtons.Purchased at a local poultry club auction.
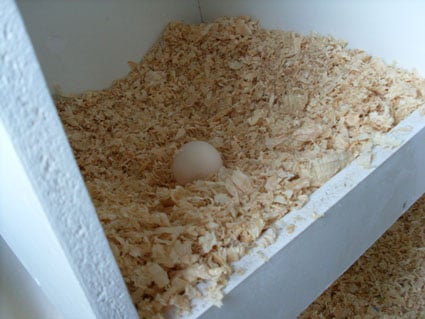
Just 3 days later
Currently we have a temporary run at one end of the coop made from some star pickets and chicken wire. Over the next few weekends we will build a run that is the same profile as the house, extending the tin roof along another 1.5 meters to protect part of it from rain and sun. We're also going to put some trim on the window and ad some shutters, a window box and a weathercock... but all in good time.
Update - Several Months Later.
We have finally added a run to the chicken house. Usually we let the girls free range in the backyard all day, but we needed to be able to close them away sometimes, Big Sister is sitting on some eggs at the moment, if we have a sucessful hatch we'll need to be able to keep them secure from Jelly Bean our resident hunting cat. Jelly shares the yard with the chickens without any problems, he also keeps any rodent problems at bay but I doubt he can be trusted with baby chicks!
nb: Aince this picture was taken we have attached a tarp to the roof for shade and rain protection.
Final Thoughts - If we were starting this project again I would prop up one end on a slight angle so that when we hose the house out the water runs out rather than sitting on the floor boards until it dries.
Also, I'd make the nesting boxes larger as 'Big Sister' my chubby Buff Orpington will not lay in them, I don't think she can fit her amble bottom into the box. I'm also planning to attached a roost directly to the wall like a shelf, this means there won't be anything in the way when I sweep out the house.
The one piece of advice I can give to anyone thinking about building their first coop is Plan, Plan, Plan! Look at lots of designs and really think about how your coop will be used on a day to day basis. There are lots of great ideas on this site, I've used a lot different peoples ideas and tips in our coop, it's 100% better than it would have been without the BYC coop pages. Our coop is very simple but we spent a long time working out where it would fit and how it would work before we stated cutting timber or buying materials, even then we still had a few re-designs along the way.
When I was a kid my mum and both sets of grandparents all kept chickens. Their coops were all quite similar, no frills utility coops built using available odds and ends. I loved the chickens but hated walking through poopy, often muddy runs to get to the coops, and then having to get down into dark corners, often behind roosts etc to collect eggs. My number one priority when designing this coop, was to avoid that experience again.
This coop is also our first building project, so it had to be relatively simple too.
Our Main Design Features
Cottage Coop - I like the look of many of the 'cottage' coop on this site, they were one of the things that started to get me really excited about owning chickens. Also we have a quater acre block, but with the house set a long way back from the road our "backyard" is quite small. Anything we built in the backyard was going to be very visible and close to the house.
Raised Floor - We chose a raised floor for two reasons, firstly our block has quite a slope, the area that suited a run is uphill from where the coop would fit, a raised floor prevents water running down the hill into the coop (avoiding my muddy coop phobia). Also, being quite lazy, I liked the idea of having the coop at working level, rather than having to bend down to collect eggs, fill feed containers etc.
Outside Access - As I said before, I don't like having to walk into a poopey run every day so access from the outside of the coop was a major requirement.
Flat Floor and Walls - I wanted a totally flat floor so that I could easily sweep out the coop when we changed the litter, no frames etc sticking up for stuff to get caught it. I also wanted the wall frames enclosed so that the walls could easily be hosed down and the chickens couldn't roost on the struts and poop down the walls. Putting in these internal walls meant we had a wall cavity, and since we had a cavity we decided to insulate the coop, something that probably not needed in our mild Perth climate, but I'm glad we did it anyway, I'm sure the girls will appreciate it next summer.
Extended Roof - The roof at one end is extended so that we're sheltered from the raining when collecting eggs and filling the feeders.
SketchUp. If your fairly computer savvy
SketchUp can be a very handy tool.

We started to build the coop on the Easter long weekend 2009. the coop is 2m x 1.5m which should be big enough for about 9 chickens.
The frame timber was free from Gumtree, and the floor boards cost $40 from the local salvage yard. You can see Hubby and his brother in the background. Also, the fence you can see behind the pile of timber is where the coop will eventually sit.
The frame in place, it's handy the paving was already there, someone who lived here before us had a paving fetish, there are odd bit's of paving all over our yard. The floor boards have been sealed with some varnish that my father-in-law had sitting in his shed.
The walls and insulation start to go it. Insulation $30, Fibre Cement Board $150 both from Gumtree

The door frames go on and the side walls are done, just need to cut the hole for the window.
Jump Forward a bit and the roof is on (we splurged on new tin $200), there is also insulation in the ceiling cavity and the doors have been cladded.
The outside walls are painted the same colour as our house and the inside is painted from some white paint left over from painting our hallway.
Now some trim has been added, the poop door and the window (glass $16) are also fitted and the door bolts are also in place.

We build the nesting boxes from some ply wood squares that were free from freecycle.
The roost made from some left over timber and old decking boards, all covered in some white paint (also left overs) to make it look ok.
Add about $300 in screws, bolts, saw blades, grinder disks, drill bits, screws, a plasterboard scoring knife, screws and more screws and a plastic waterer and feeder and the whole thing cost about $750.
After MANY weekends work the girls arrive of the 6th of June. We have 1 x Coronation Sussex, 1 x Black Australorp and 2 x Buff Orpingtons.Purchased at a local poultry club auction.
Just 3 days later
Currently we have a temporary run at one end of the coop made from some star pickets and chicken wire. Over the next few weekends we will build a run that is the same profile as the house, extending the tin roof along another 1.5 meters to protect part of it from rain and sun. We're also going to put some trim on the window and ad some shutters, a window box and a weathercock... but all in good time.
Update - Several Months Later.
We have finally added a run to the chicken house. Usually we let the girls free range in the backyard all day, but we needed to be able to close them away sometimes, Big Sister is sitting on some eggs at the moment, if we have a sucessful hatch we'll need to be able to keep them secure from Jelly Bean our resident hunting cat. Jelly shares the yard with the chickens without any problems, he also keeps any rodent problems at bay but I doubt he can be trusted with baby chicks!
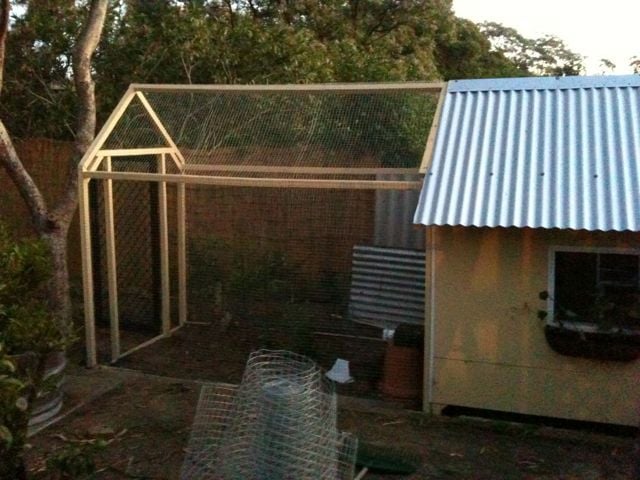
nb: Aince this picture was taken we have attached a tarp to the roof for shade and rain protection.
Final Thoughts - If we were starting this project again I would prop up one end on a slight angle so that when we hose the house out the water runs out rather than sitting on the floor boards until it dries.
Also, I'd make the nesting boxes larger as 'Big Sister' my chubby Buff Orpington will not lay in them, I don't think she can fit her amble bottom into the box. I'm also planning to attached a roost directly to the wall like a shelf, this means there won't be anything in the way when I sweep out the house.