- Apr 13, 2009
- 50
- 48
- 29
After several raid's by the raccoon's I decided that locking up the chickens every night was the best (in my case) decision.
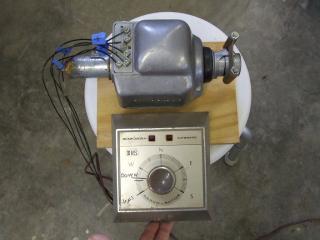
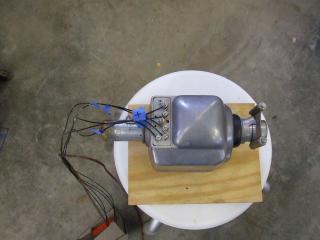
One day at a garage sale I spied an old TV antenna rotator and the light came on. Thru trial and error I figured out the minimum and maximum settings that I would need to raise and lower the door. Note the black marks on the controller in pic. #1. Picture #2 shows the actuator mounted to a piece of plywood. On the right side is the muffler clamp that secures the short piece of antenna pipe. On the left side (partly covered by the wires) is the end with the carriage bolt welded on. I used a carriage bolt because of the square part just under the head. The aluminum arm in pic. #3 was drilled and filed out to slide over this square and then secured with a lock washer and nut. Don't have to worry about it slipping.
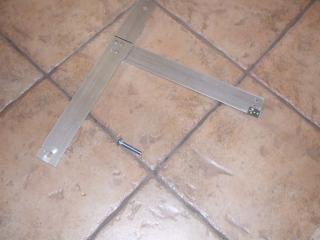
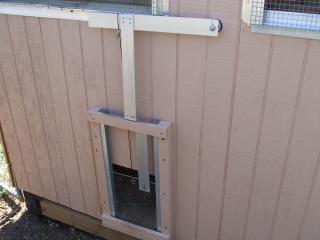
Picture #3 shows the outside arm that raised and closes the chicken door. The arm that extends downward prevents the door from being opened by those pesky varmints. Note in the lower corner of this arm is a bolt which secures a small L bracket just to make sure that it stays secure. Picture #4 shows the backside of this arm and a carriage bolt.
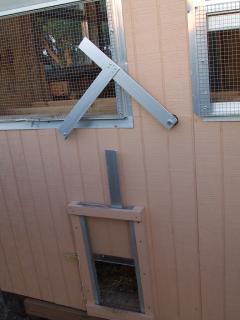
Picture #5 shows the door closed. The arm attached to it is not necessary and will be removed when I re-install the opener. Not visible is a small cable that connects the door to the upper arm.
I originally thought that I would run cable to our house and mounting the controller there but after remembering that ditches don't dig easy in Texas I'll set it up in the feed room side of the chicken house.
continued in next posting
One day at a garage sale I spied an old TV antenna rotator and the light came on. Thru trial and error I figured out the minimum and maximum settings that I would need to raise and lower the door. Note the black marks on the controller in pic. #1. Picture #2 shows the actuator mounted to a piece of plywood. On the right side is the muffler clamp that secures the short piece of antenna pipe. On the left side (partly covered by the wires) is the end with the carriage bolt welded on. I used a carriage bolt because of the square part just under the head. The aluminum arm in pic. #3 was drilled and filed out to slide over this square and then secured with a lock washer and nut. Don't have to worry about it slipping.
Picture #3 shows the outside arm that raised and closes the chicken door. The arm that extends downward prevents the door from being opened by those pesky varmints. Note in the lower corner of this arm is a bolt which secures a small L bracket just to make sure that it stays secure. Picture #4 shows the backside of this arm and a carriage bolt.
Picture #5 shows the door closed. The arm attached to it is not necessary and will be removed when I re-install the opener. Not visible is a small cable that connects the door to the upper arm.
I originally thought that I would run cable to our house and mounting the controller there but after remembering that ditches don't dig easy in Texas I'll set it up in the feed room side of the chicken house.
continued in next posting