Hi Guys,
I got a really nice wine cooler that I'm converting into a bator. I've got the project mostly finished but I'm having one problem... I placed the light bulb as far as I could from the top but it has started to melt the plastic above it anyway. I'm not sure what to do about this... I'm hoping I can figure out a barrier to put above the bulb to prevent this so I don't have to move it. The problem with this size fridge is that there aren't many places to put the bulb without interfering with the racks. Anyone know what I could use as a barrier? I found some automotive products that are designed to keep heat form the engine from burning the hood... Any car buffs out there who know if this might work for my purposes?
Anyways, here's what I did!
First I pulled it apart and it appears that there is no freon as far as I can tell... In fact there are already two built in fans that are wired up and everything so I think I can use these instead of installing a computer fan! YAY!
Here are pictures of the cooler torn apart:
On the bottom you see the circuit boards. Just above the circuit boards is a square wafer thingy... Not sure what it is but I'm pretty sure it has something to do with the cooling. I'm going to snip that off and twist on a wire-nut connector. Above that are the two fans. I reinstalled the bigger one back over the hole you can see between the two fans. Right now I just have the little one sitting in the back portion not doing anything. If I need it I think I'll cut another square in the bottom of the fridge and install the smaller fan there but the will be a little more work so I'm trying to avoid that if possible.

Here's what I removed. There are the two metal cooling grate things (I have no idea what the proper names are
). There's also a styrofoam block with another one of those metal wafer thingies in it. This one isn't wired to anything, it's just hanging out embedded in the styrofoam. This stuff I'm just going to toss, I shouldn't need it for my purposes.
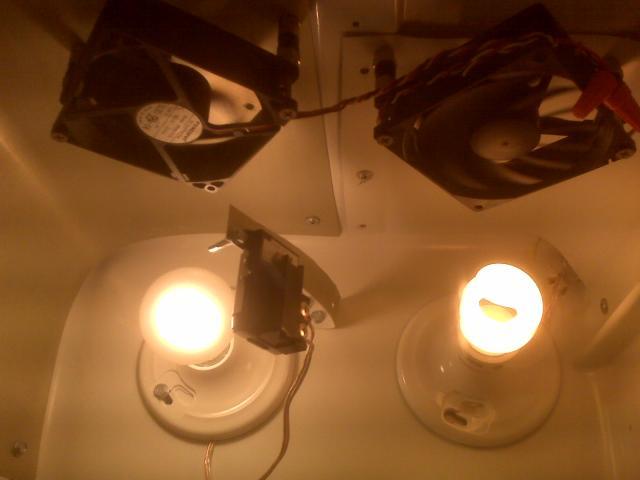
The next step was to install the light bulb kit that will act as the heating unit. I decided to place the light bulb at the top of the cooler just above the fan. Hopefully this will be enough heat and air circulation to keep the bator at the right temp without hot spots. One issue I encountered was too much ventilation. The fridge has a big vent in the back metal cover as well as on the two sides. I covered up the entire ventilation opening right behind the fan and about 3/4 of the ones on the sides with duct tape to get the temp up but still allow for some airflow.
I've got my thermometer/hygrometer in there now, it's been in for about 30 minutes and we're at 96.6 degrees and rising in the bottom of the incubator right now. Once it gets up to temp in the bottom I'm going to put the thermometer on the top shelf and see if I've got a hot spot up near the bulb. After that I'll add in some water to check it's ability to get the humidity up for normal and lock down conditions.
Here's a pic of it now:
The only things left to do are to add in water for humidity, install the thermostat, and put some hardware cloth down on the racks so the babies don't fall through. I may have to alter or build new racks if that doesn't work well but I'll use scrap material for that. For the thermostat I'm going to go with the ReptiTemp which I'll order next week. Thanks to the fact that I got the cooler for free and it already had the fans, the entire project will end up costing be about $35.00 for the ReptiTemp and the light fixture kit. In terms of time it took me about 2 hours but a lot of that was spent figuring out how everything works since this is my first time on a project like this. If I were to build this same one again I could probably whip it out in 45 minutes or so. Not too bad if I do say so myself!
I got a really nice wine cooler that I'm converting into a bator. I've got the project mostly finished but I'm having one problem... I placed the light bulb as far as I could from the top but it has started to melt the plastic above it anyway. I'm not sure what to do about this... I'm hoping I can figure out a barrier to put above the bulb to prevent this so I don't have to move it. The problem with this size fridge is that there aren't many places to put the bulb without interfering with the racks. Anyone know what I could use as a barrier? I found some automotive products that are designed to keep heat form the engine from burning the hood... Any car buffs out there who know if this might work for my purposes?
Anyways, here's what I did!
First I pulled it apart and it appears that there is no freon as far as I can tell... In fact there are already two built in fans that are wired up and everything so I think I can use these instead of installing a computer fan! YAY!
Here are pictures of the cooler torn apart:
On the bottom you see the circuit boards. Just above the circuit boards is a square wafer thingy... Not sure what it is but I'm pretty sure it has something to do with the cooling. I'm going to snip that off and twist on a wire-nut connector. Above that are the two fans. I reinstalled the bigger one back over the hole you can see between the two fans. Right now I just have the little one sitting in the back portion not doing anything. If I need it I think I'll cut another square in the bottom of the fridge and install the smaller fan there but the will be a little more work so I'm trying to avoid that if possible.

Here's what I removed. There are the two metal cooling grate things (I have no idea what the proper names are


The next step was to install the light bulb kit that will act as the heating unit. I decided to place the light bulb at the top of the cooler just above the fan. Hopefully this will be enough heat and air circulation to keep the bator at the right temp without hot spots. One issue I encountered was too much ventilation. The fridge has a big vent in the back metal cover as well as on the two sides. I covered up the entire ventilation opening right behind the fan and about 3/4 of the ones on the sides with duct tape to get the temp up but still allow for some airflow.


I've got my thermometer/hygrometer in there now, it's been in for about 30 minutes and we're at 96.6 degrees and rising in the bottom of the incubator right now. Once it gets up to temp in the bottom I'm going to put the thermometer on the top shelf and see if I've got a hot spot up near the bulb. After that I'll add in some water to check it's ability to get the humidity up for normal and lock down conditions.
Here's a pic of it now:

The only things left to do are to add in water for humidity, install the thermostat, and put some hardware cloth down on the racks so the babies don't fall through. I may have to alter or build new racks if that doesn't work well but I'll use scrap material for that. For the thermostat I'm going to go with the ReptiTemp which I'll order next week. Thanks to the fact that I got the cooler for free and it already had the fans, the entire project will end up costing be about $35.00 for the ReptiTemp and the light fixture kit. In terms of time it took me about 2 hours but a lot of that was spent figuring out how everything works since this is my first time on a project like this. If I were to build this same one again I could probably whip it out in 45 minutes or so. Not too bad if I do say so myself!
Last edited: