Past experience with an old hovabator over 15 years ago left me not wanting to try and hatch eggs myself. The thermostat was wonky and unreliable. Even replacing it with a new wafer it was a pain to get the temp set and maintained. With things changing and solid state thermostats available I thought I would give the idea another go. I cringed every time I looked at the price of incubators with all the bells and whistles. Over $200 in some cases for all the extras.
I could not and cannot see that expense for a styrofoam box!
With the posting about home made incubators I started collecting pieces and parts and figured this girl could make one, too.
This is my effort at putting together a reliable incubator. So far it is working fine. I have it running now so I can work out the adjustment on the thermostat for consistant temperature.
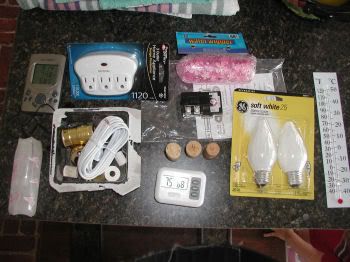
Supplies:

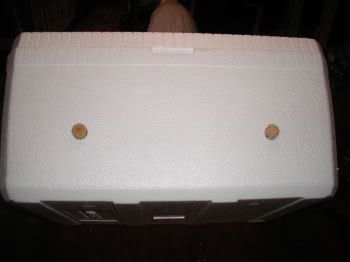
1 styrofoam ice chest or a chest that is used to ship frozen foods. I had both but chose the ice chest because it is larger.
1 hot water heater thermostat ($8, temp ranges from 90 - 150 F)
25w light bulb
1lamp kit (bottle version)
4 old wine corks
1surge protector
1water wiggler
Not pictured
hardware cloth, water dish, old pc fan, adaptor/transformer
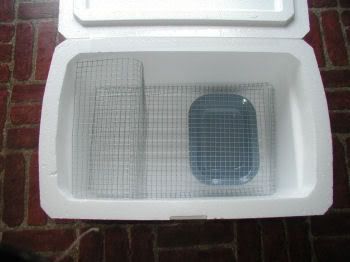
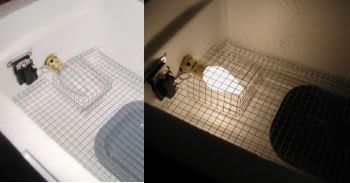
I cut and bent the hardware cloth to make a rack that fit into the ice chest. I placed an old dish in the bottom to provide more surface area for the water to help with humidity and also to rest the hardware cloth rack on. Be careful because the cloth will scratch you as you work with it. I worked with it removing pieces here and there until I got a good custom fit. I also cut out the area where the light bulb would be installed to keep the light low in the box because heat rises.
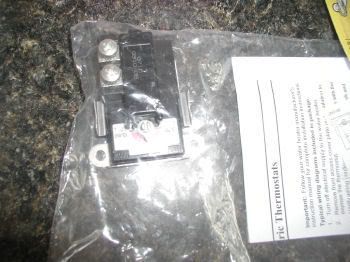
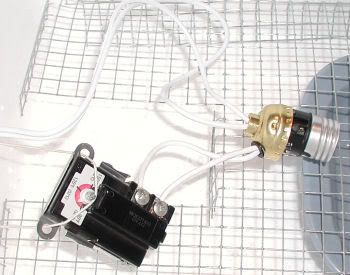
I am not an electrician and have very little expeience with wiring. I followed a diagram and wired my light and the thermostat. I did wire them wrong the first time but when the breaker tripped I knew then the right way to wire them. LOL
The thermostat is the least expensive, single pole version I could find. In a previous post Aran had gotten his from Home Depot but I could not find anything inexpensive (under $10) in my local store so I picked one up from Lowes. The temperature range on this model is 90 - 150 F. The screw at the top is numbered #1 and the lower is #2.
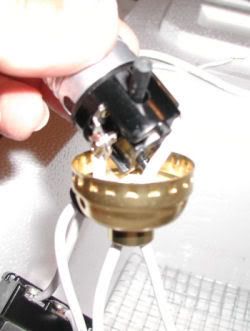
I used a bottle lamp kit because it has an opening on the side so that the kit can be wired straight from the bottom or from the side. This was perfect for this project because it allowed me to run the wires, connect them, then seal the base closed. I am terrified of exposed wires and prefer to have everything contained neatly and hidden away.
On the kit the ribbed wire was to be connected to the silver screw.
So I cut off a piece of the cord about 4 inches long to have wire to work with to connect the thermostat.
With the ribbed wire connected to the silver screw I then used a piece of the wire I cut to wire from the brass screw to the thermostat #2 screw, then used the non ribbed wire of the cord to wire it to the #1 thermostat screw. The wire is run through the base screw and then over through the side opening to that everything is sealed shut when the lamp assembly is closed.
I then carefully wittled out around the inside hole I made to insert the lamp assembly so that everything was snug and tight. The walls of the ice chest I used are rather thick -just a bit thicker than the screw/bolt that came with the light kit. I was very careful to cut away around my bolt opening to that the light assembly would screw together snug and tight so the bulb did not wiggle around and pose a fire threat by melting the styrofoam. Also I cut away a little bit to accomdate the wiring running over to the thermostat.
Assembly on the outside.
And from the inside.
I put electrical tape over the little screws on the thermostat that the wires are attatched to because I worried if a child reached in and accidentally touched the screws they might get shocked.
Make sure you thread your wires through your tiny holes before assebling them. I used an ice pick to make tiny openings to thread the wires through.
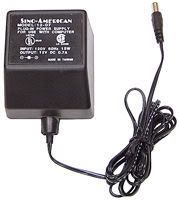
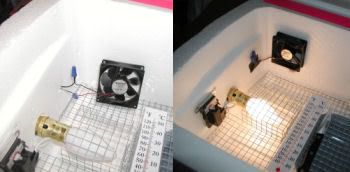
Next I used an old adaptor (some called it a transformer), 120v input 12v DC output (thanks, redneck!), from which I snipped off the end and wire it to an old pc fan.
I wired the black to the black and the red to the other mixed color wire. I secured the wiring with electrical tape and wire nuts. I used a stick coated wire to secure the fan in place.
Using a pumpkin carving tool, I cut out 4 air vent holes and used old wine corks to plug them up with.
I cut out a large rectangle in the lid and placed over it an old window glass pane.
I used duct tape to secure the glass and cover the edges of the glass.
I used pink duct tape because it is a Chick 'Bator!
Special thanks to Aran and Redneck for answering my questions.
*This post maybe be updated as I think about questions I had while making my incubator.
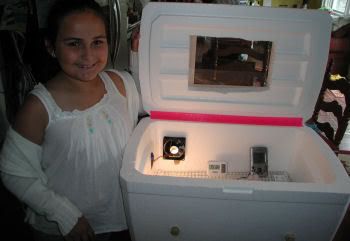
My 9 year old helper
Remember to add at least 4 holes the size of an ice pick about 1 - 2 inches up from the very bottom of the bator for fresh air exchange.
I could not and cannot see that expense for a styrofoam box!
With the posting about home made incubators I started collecting pieces and parts and figured this girl could make one, too.
This is my effort at putting together a reliable incubator. So far it is working fine. I have it running now so I can work out the adjustment on the thermostat for consistant temperature.
Supplies:

1 styrofoam ice chest or a chest that is used to ship frozen foods. I had both but chose the ice chest because it is larger.
1 hot water heater thermostat ($8, temp ranges from 90 - 150 F)
25w light bulb
1lamp kit (bottle version)
4 old wine corks
1surge protector
1water wiggler
Not pictured
hardware cloth, water dish, old pc fan, adaptor/transformer
I cut and bent the hardware cloth to make a rack that fit into the ice chest. I placed an old dish in the bottom to provide more surface area for the water to help with humidity and also to rest the hardware cloth rack on. Be careful because the cloth will scratch you as you work with it. I worked with it removing pieces here and there until I got a good custom fit. I also cut out the area where the light bulb would be installed to keep the light low in the box because heat rises.
I am not an electrician and have very little expeience with wiring. I followed a diagram and wired my light and the thermostat. I did wire them wrong the first time but when the breaker tripped I knew then the right way to wire them. LOL
The thermostat is the least expensive, single pole version I could find. In a previous post Aran had gotten his from Home Depot but I could not find anything inexpensive (under $10) in my local store so I picked one up from Lowes. The temperature range on this model is 90 - 150 F. The screw at the top is numbered #1 and the lower is #2.
I used a bottle lamp kit because it has an opening on the side so that the kit can be wired straight from the bottom or from the side. This was perfect for this project because it allowed me to run the wires, connect them, then seal the base closed. I am terrified of exposed wires and prefer to have everything contained neatly and hidden away.
On the kit the ribbed wire was to be connected to the silver screw.
So I cut off a piece of the cord about 4 inches long to have wire to work with to connect the thermostat.
With the ribbed wire connected to the silver screw I then used a piece of the wire I cut to wire from the brass screw to the thermostat #2 screw, then used the non ribbed wire of the cord to wire it to the #1 thermostat screw. The wire is run through the base screw and then over through the side opening to that everything is sealed shut when the lamp assembly is closed.
I then carefully wittled out around the inside hole I made to insert the lamp assembly so that everything was snug and tight. The walls of the ice chest I used are rather thick -just a bit thicker than the screw/bolt that came with the light kit. I was very careful to cut away around my bolt opening to that the light assembly would screw together snug and tight so the bulb did not wiggle around and pose a fire threat by melting the styrofoam. Also I cut away a little bit to accomdate the wiring running over to the thermostat.

Assembly on the outside.
And from the inside.
I put electrical tape over the little screws on the thermostat that the wires are attatched to because I worried if a child reached in and accidentally touched the screws they might get shocked.
Make sure you thread your wires through your tiny holes before assebling them. I used an ice pick to make tiny openings to thread the wires through.
Next I used an old adaptor (some called it a transformer), 120v input 12v DC output (thanks, redneck!), from which I snipped off the end and wire it to an old pc fan.
I wired the black to the black and the red to the other mixed color wire. I secured the wiring with electrical tape and wire nuts. I used a stick coated wire to secure the fan in place.
Using a pumpkin carving tool, I cut out 4 air vent holes and used old wine corks to plug them up with.
I cut out a large rectangle in the lid and placed over it an old window glass pane.
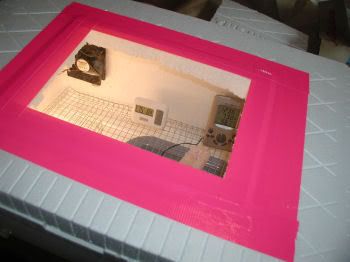
I used duct tape to secure the glass and cover the edges of the glass.
I used pink duct tape because it is a Chick 'Bator!

Special thanks to Aran and Redneck for answering my questions.


*This post maybe be updated as I think about questions I had while making my incubator.
My 9 year old helper
Remember to add at least 4 holes the size of an ice pick about 1 - 2 inches up from the very bottom of the bator for fresh air exchange.
Last edited:

