This is where I will post the notes and pics from my incubator builds.
Happy reading:
Recycled Materials:
4 sheets of Styrofoam packing material from a delivery
10 Gallon Aquarium ~20” x 12” x 10”
2 pieces 1” x 3” hemlock (siding leftovers) ~20” long
3 pieces plastic grid from florescent light fixture (larger piece cut down)
-1 bottom piece ~20” x 10”
-2 8” x 8” pieces attached with zip ties to create a barrier between “hen” and “nest”
Microwave Turner
Electrical Cords
Clothes Pins
Cut down dog cone clinic collar
Golf Balls
Computer Fan
Light fixture
100W Bulb
Sheet of Sill Foam Insulation
Plastic containers for water
New Materials:
thermometer/hygrometer ($7)
thermostat (about $30)
timer (about $12)
rubber shelf liner ($1)
mylar thermal blanket ($1)
I started with an emergent need to move some eggs out of a problem incubator. I scrapped together what I could, but it wasn't ideal. Once that terrible hatch was over I was more determined to get it right. The research I did was mixed on whether or not an aquarium would be a good incubator. The few I saw didn't seem very successful, meanwhile coolers converted to incubators were all the rage and very successful. When I rebuilt this incubator I had recently received a package that had styrofoam that was nicely sized for this project. So, that's where it begins:
I positioned the styrofoam to tightly wrap the bottom and three sides of the aquarium. I marked the styrofoam, removed the aquarium, and duck taped the styrofoam together to create a nest for the aquarium. Inside the aquarium, I lined the bottom and back side with mylar. I even wrapped mylar around the hemlock pieces and placed them on the bottom of the aquarium. They served as legs for the plastic grid. The plastic grid was found in my barn; it was there when we bought the place. It looked like the kind that was used in old florescent light fixtures in office buildings. I cut the plastic grid to fit on the hemlock legs and be easily removed for cleaning.
Microwave Turner:
I had an old microwave in my barn too. It had a cracked door and no power cord so was destined for the dump. I had seen an article once about using some microwave parts as incubator parts (see reference section- I will list all of the internet articles that inspired and aided this project), so I stripped out the turner and motor and rewired it to a power cord. I had to prop it up so I attached it to more scrap wood so that the post of the motor set barely below the plastic grid. The cord runs under the grid to a corner and comes up through. The turner usually sets on top of the triangle bracket which allows it to come off freely (for cleaning the microwave). I wanted it to be secure when turning the eggs so I placed it upside down under the bracket. This secured it well enough. My first practice with the turner and eggs showed they rolled all over the place. They needed a nest. I had a clinic collar that I no longer used for my dog and cut it down to “nest” size which was to fit very close to the turner. This allowed the eggs to turn within a better range, but the grid was too bumpy and jarring so I added the shelf liner cut to “nest” size with a hole in the center for the turner. I used another piece of the collar for an interior to the nest. This passed the golf ball test but has not been tested again with eggs yet. It is still being worked through to make sure the turner, when left on for 15 minutes 4 times a day (plugged into a timer), would not jar or harm the eggs.
My “hen” is an old light fixture (from the barn), a 100W bulb (from the barn), a computer fan that was rewired (from the barn), and a cage out of that same plastic grid. The cage is so that the nest doesn't wiggle away from the turner and when the chicks hatch they can't get to the heat source. The plan is that this will be a brooder for the hatched chicks first week or two. Some scrap pieces of sill insulation are stuck in the gap between glass and “hen.” The light is plugged in to a thermostat that will turn it on when the temperature reaches 99 F and off when it reaches 100.5 F. The fan is on constantly.
My lid is two parts. Each is scrap wood wrapped with mylar. The cords can travel through the gap, which also allows ventilation.
When starting, the glass and plastic innards will be easily disinfected. Golf balls can be placed in gaps so that the nest doesn't have to be full. The soiled mylar and shelf liner can be discarded and replaced with relatively little waste or expense. Although, a more sustainable solution should be possible. I'm not sure the re-usability of such things. The heat source is quick many times, but fluctuations in the house/room temperature definitely affect how quick. On this cooler night it seems to hold its temperature for about 10 minutes without the light. The light cycles on for 3-5 minutes and then is off again. Earlier today it was holding for 30 minutes and cycling on for 2-3 minutes.
Incubation requires:
Cleanliness
Ventilation
Constant Heat
Humidity Monitoring
Turning Eggs
I think I have all of those checked off with this. I still have to test a “lockdown” simulation where humidity needs to be at 65%. It's currently running at 30% dry.
-It got down to 25% humidity after 24 hours.
-The fan quit working and was very hot to the touch. Everything is shut down for now.
Fixed the fan. Musta been a wiring issue. Put a small glad bowl of water in center of nest. Humidity running at 53% with some condensation on glass. So far the golf balls turn nicely in the nest. Will test with an infertile egg next.
Grabbed an infertile egg to retest the turner. It seemed to dislodge the inner part of the nest so I removed the inner nest. The egg rolled well enough. I'm guessing that the 15 minutes of turning might be too much for every turn, so I have to figure out a different plan for timing. I'll search the internet for something that can turn on for 1 minute out of every 2 or 3 hours. If I do that then the inner nest might still work out.
December 12th:
Set 4 eggs
December 13th
Set 1 egg
December 17th
removed all eggs as infertile:
However, I did learn some things about the bator. The switch on the timer for the turner is easier to use than the 15 minute cycle. 10-20 seconds is plenty to get the eggs turned over. The bator holds temp and low humidity very nicely. The eggs were fine but I'm not sure how the 15 minute cycle would work with fertile eggs. The 5 eggs fit in fine. Depending on the size of the eggs it might max out at 9 eggs. I might consider a larger bator. I like the turner. I like the open glass viewing area. I like the simplicity and ease of fixing of the heat/fan.
January fertility test- all infertile
February 2016
I revised the incubator a little bit. I put the turner and floor at an angle so that I could fit more eggs that could sit upright. I can now fit 15 eggs and they stand up in the nest, but the nest sits at a 30 degree angle so every time it turns they rotate around their axis but only at a mild angle. I wrapped the entire incubator in foam and wrapped the top pieces in mylar. I am using a lunch container under the floor for water. I put in 15 eggs on 2/5. 12 of those are shipped. 1 of my hen's eggs was infertile and 1 of the shipped eggs ended up with a blood ring. The humidity drops to 16% without water, about 25% with the large section filled, and about 45% with one large and one small section filled with water. I've used the automatic timed setting on the turner and find that it works just fine. I have 2 eggs with wiggly air cells so I stopped that for the next few days to see if they firm up a bit. At lockdown I had 10 viable eggs. I dropped the floor of the incubator back to level and set the eggs in cut down cartons for hatching. Lockdown meant two extra small lunch containers with sponge and water and straw for easy refill. Humidity was good between 65% and 75%.
This incubation resulted in 6 living chicks! That means the system works.
March 2016
I'm upgrading the timer on the MacGyverBator to one that can cycle 20 times for only 1 minute. I'll also upgrade the support system for easy set up and drop down of the floor.
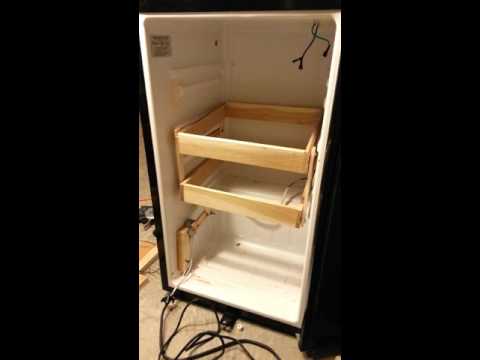
I'm starting a new incubator. I bought a mini fridge for $15 off craigslist. I built the racks but the microwave turner does not have enough torque to move them. That means I'll have two complete diy incubators when I finish this one.
The Plan: 2 Fans. 2 light sockets allowing for up to 4 bulbs. Hardwired thermostat. Automatic turner for 2 racks of 48 eggs.
The Cost: $15 Fridge, $12 Timer, $17 Thermostat (paid for with points), $3 Light bulbs, $30 New Motor, $26 Stabil Egg trays = $86 paid so far.
Long post and I still need to add pictures and references...
Happy reading:
Recycled Materials:
4 sheets of Styrofoam packing material from a delivery
10 Gallon Aquarium ~20” x 12” x 10”
2 pieces 1” x 3” hemlock (siding leftovers) ~20” long
3 pieces plastic grid from florescent light fixture (larger piece cut down)
-1 bottom piece ~20” x 10”
-2 8” x 8” pieces attached with zip ties to create a barrier between “hen” and “nest”
Microwave Turner
Electrical Cords
Clothes Pins
Cut down dog cone clinic collar
Golf Balls
Computer Fan
Light fixture
100W Bulb
Sheet of Sill Foam Insulation
Plastic containers for water
New Materials:
thermometer/hygrometer ($7)
thermostat (about $30)
timer (about $12)
rubber shelf liner ($1)
mylar thermal blanket ($1)
I started with an emergent need to move some eggs out of a problem incubator. I scrapped together what I could, but it wasn't ideal. Once that terrible hatch was over I was more determined to get it right. The research I did was mixed on whether or not an aquarium would be a good incubator. The few I saw didn't seem very successful, meanwhile coolers converted to incubators were all the rage and very successful. When I rebuilt this incubator I had recently received a package that had styrofoam that was nicely sized for this project. So, that's where it begins:
I positioned the styrofoam to tightly wrap the bottom and three sides of the aquarium. I marked the styrofoam, removed the aquarium, and duck taped the styrofoam together to create a nest for the aquarium. Inside the aquarium, I lined the bottom and back side with mylar. I even wrapped mylar around the hemlock pieces and placed them on the bottom of the aquarium. They served as legs for the plastic grid. The plastic grid was found in my barn; it was there when we bought the place. It looked like the kind that was used in old florescent light fixtures in office buildings. I cut the plastic grid to fit on the hemlock legs and be easily removed for cleaning.
Microwave Turner:
I had an old microwave in my barn too. It had a cracked door and no power cord so was destined for the dump. I had seen an article once about using some microwave parts as incubator parts (see reference section- I will list all of the internet articles that inspired and aided this project), so I stripped out the turner and motor and rewired it to a power cord. I had to prop it up so I attached it to more scrap wood so that the post of the motor set barely below the plastic grid. The cord runs under the grid to a corner and comes up through. The turner usually sets on top of the triangle bracket which allows it to come off freely (for cleaning the microwave). I wanted it to be secure when turning the eggs so I placed it upside down under the bracket. This secured it well enough. My first practice with the turner and eggs showed they rolled all over the place. They needed a nest. I had a clinic collar that I no longer used for my dog and cut it down to “nest” size which was to fit very close to the turner. This allowed the eggs to turn within a better range, but the grid was too bumpy and jarring so I added the shelf liner cut to “nest” size with a hole in the center for the turner. I used another piece of the collar for an interior to the nest. This passed the golf ball test but has not been tested again with eggs yet. It is still being worked through to make sure the turner, when left on for 15 minutes 4 times a day (plugged into a timer), would not jar or harm the eggs.
My “hen” is an old light fixture (from the barn), a 100W bulb (from the barn), a computer fan that was rewired (from the barn), and a cage out of that same plastic grid. The cage is so that the nest doesn't wiggle away from the turner and when the chicks hatch they can't get to the heat source. The plan is that this will be a brooder for the hatched chicks first week or two. Some scrap pieces of sill insulation are stuck in the gap between glass and “hen.” The light is plugged in to a thermostat that will turn it on when the temperature reaches 99 F and off when it reaches 100.5 F. The fan is on constantly.
My lid is two parts. Each is scrap wood wrapped with mylar. The cords can travel through the gap, which also allows ventilation.
When starting, the glass and plastic innards will be easily disinfected. Golf balls can be placed in gaps so that the nest doesn't have to be full. The soiled mylar and shelf liner can be discarded and replaced with relatively little waste or expense. Although, a more sustainable solution should be possible. I'm not sure the re-usability of such things. The heat source is quick many times, but fluctuations in the house/room temperature definitely affect how quick. On this cooler night it seems to hold its temperature for about 10 minutes without the light. The light cycles on for 3-5 minutes and then is off again. Earlier today it was holding for 30 minutes and cycling on for 2-3 minutes.
Incubation requires:
Cleanliness
Ventilation
Constant Heat
Humidity Monitoring
Turning Eggs
I think I have all of those checked off with this. I still have to test a “lockdown” simulation where humidity needs to be at 65%. It's currently running at 30% dry.
-It got down to 25% humidity after 24 hours.
-The fan quit working and was very hot to the touch. Everything is shut down for now.
Fixed the fan. Musta been a wiring issue. Put a small glad bowl of water in center of nest. Humidity running at 53% with some condensation on glass. So far the golf balls turn nicely in the nest. Will test with an infertile egg next.
Grabbed an infertile egg to retest the turner. It seemed to dislodge the inner part of the nest so I removed the inner nest. The egg rolled well enough. I'm guessing that the 15 minutes of turning might be too much for every turn, so I have to figure out a different plan for timing. I'll search the internet for something that can turn on for 1 minute out of every 2 or 3 hours. If I do that then the inner nest might still work out.
December 12th:
Set 4 eggs
December 13th
Set 1 egg
December 17th
removed all eggs as infertile:
However, I did learn some things about the bator. The switch on the timer for the turner is easier to use than the 15 minute cycle. 10-20 seconds is plenty to get the eggs turned over. The bator holds temp and low humidity very nicely. The eggs were fine but I'm not sure how the 15 minute cycle would work with fertile eggs. The 5 eggs fit in fine. Depending on the size of the eggs it might max out at 9 eggs. I might consider a larger bator. I like the turner. I like the open glass viewing area. I like the simplicity and ease of fixing of the heat/fan.
January fertility test- all infertile
February 2016
I revised the incubator a little bit. I put the turner and floor at an angle so that I could fit more eggs that could sit upright. I can now fit 15 eggs and they stand up in the nest, but the nest sits at a 30 degree angle so every time it turns they rotate around their axis but only at a mild angle. I wrapped the entire incubator in foam and wrapped the top pieces in mylar. I am using a lunch container under the floor for water. I put in 15 eggs on 2/5. 12 of those are shipped. 1 of my hen's eggs was infertile and 1 of the shipped eggs ended up with a blood ring. The humidity drops to 16% without water, about 25% with the large section filled, and about 45% with one large and one small section filled with water. I've used the automatic timed setting on the turner and find that it works just fine. I have 2 eggs with wiggly air cells so I stopped that for the next few days to see if they firm up a bit. At lockdown I had 10 viable eggs. I dropped the floor of the incubator back to level and set the eggs in cut down cartons for hatching. Lockdown meant two extra small lunch containers with sponge and water and straw for easy refill. Humidity was good between 65% and 75%.
This incubation resulted in 6 living chicks! That means the system works.
March 2016
I'm upgrading the timer on the MacGyverBator to one that can cycle 20 times for only 1 minute. I'll also upgrade the support system for easy set up and drop down of the floor.
I'm starting a new incubator. I bought a mini fridge for $15 off craigslist. I built the racks but the microwave turner does not have enough torque to move them. That means I'll have two complete diy incubators when I finish this one.
The Plan: 2 Fans. 2 light sockets allowing for up to 4 bulbs. Hardwired thermostat. Automatic turner for 2 racks of 48 eggs.
The Cost: $15 Fridge, $12 Timer, $17 Thermostat (paid for with points), $3 Light bulbs, $30 New Motor, $26 Stabil Egg trays = $86 paid so far.
Long post and I still need to add pictures and references...