Wendizzle
Chirping
- Mar 28, 2021
- 16
- 67
- 79
Wanted to share my summer project with everyone here. We are a military family, and on our 7th place to live finally got someplace that allowed chickens and we own our own property! Moved here in May, husband left for training in July for a few months. I decided to "save money" buying a big coop by building one on my own. With zero building experience and a significant lack of strength and endurance.
Here we go!

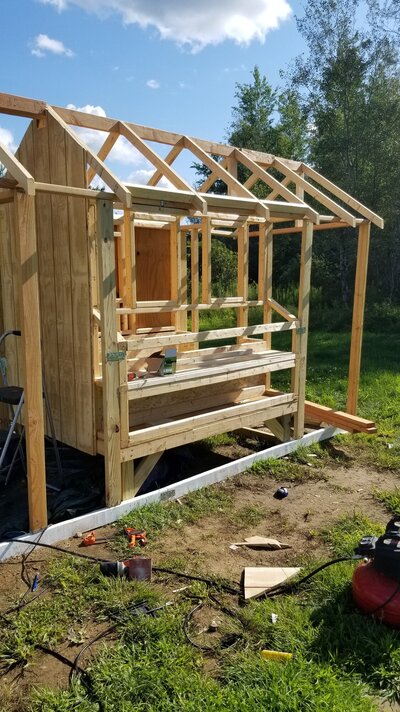
Starting with the frame. I was feeling pretty good about myself at this point. <cue ominous music>

Pressure treated floorboard and some of the frame. I was planning on using the concrete footers but gave up. Just used pressure treated 2x4s for the run's frame and painted it with latex paint for protection. I also framed a little porch on the back end so that I can get into the coop during our cold winders here.

More framing, putting up the roof. I realized at this point that I messed up the roof center because I altered the coop plans I bought so that there would be a little overhang over the nest box on this side, so one side of the rafters are longer than the other. You can't tell by looking, it's only by an inch or two, but my OCD was (and is) very annoyed by this.
I also realized that the run framing was not very stable with the 2x4s sitting on the base like this. Toe nailing them was not enough. So I used some metal roofing joist things to help with stability and made some beams going horizontally to create more support.

I forgot to mention that I do not own a nail gun. Really wish I did, especially at this point in the build. I did have a pneumatic hand nailer because there was no way I was going to be able to hand nail all of this. Loved that little guy, but a nail gun would have been so much easier and faster.

The run is 18' long. At this point of framing the roof I realized I may have bit off more than I can chew.
But too late now, and I am too stubborn to stop!

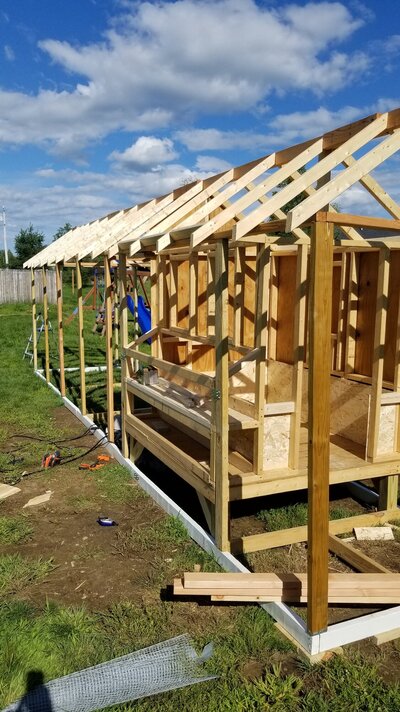
Placed 18" deep board around the bottom of the coop to allow for me to do deep bedding. I had to alter the coop plans to raise the little run door as well as the nesting boxes so that they would be above the bedding.

Placing this siding on the coops was possibly the most physically difficult for me. I had my weak self and my 12 year old daughter for muscle. You know that scene from Friends with Ross yelling "PIVOT" with the couch? Imaging that but trying to lift giant pieces of siding with two very weak people. I am sure our neighbors got a laugh out of that.

I am doing metal roofing, but placed wood over the coop portion with roofing paper on top for moisture absorption in the winter.
Also cut out the doors and windows with a jigsaw. I made my 12 year old crawl in through that window to get the guide holes for the big door at the front. We was not pleased by this, but I found it pretty funny.

Metal roofing going on. It was about 98 deg up here in Northern NY at this point and I kept having to take breaks every hour because of the heat. I also realized that I am an idiot for making this coop so big.

As much as I was regretting making the coop this big, I was hopeful that with all the physical labor and sweating that I'd lost some weight by the end of this project.
Spoiler alert. I did not.


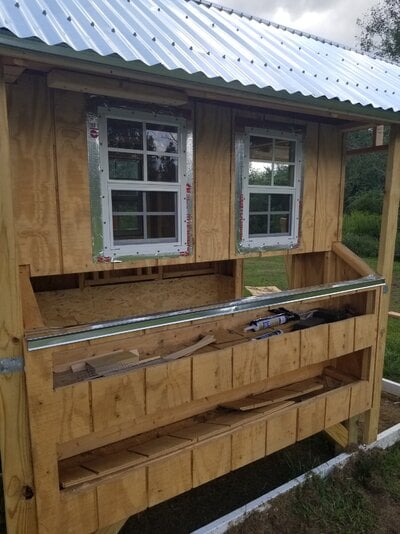
Windows going in! This was probably the most satisfying part of the project. Everything else was heavy and sucked.
I decided to make the nesting box have a side drop down like Carolina Coops recommends, so the top of the nesting box does not lift up at all. Looking back I probably should have made it lift to make it easier to clean out, but I was so tired at this point I just wanted to finish this thing and there was so much more left to do. Therefore, solid nest box top.

Putting some linoleum in for easier clean up in the future. I put some around the sides as well.


Wood stain looking pretty with the white latex paint! It was starting to feel real at this point. The light at the end of the tunnel.

Inside of the coop the other day (has been in use for a few months now). The nest box is still blocked but I will be opening it up soon. I have young English Orpingtons so they start laying late, probably not until Jan-May next year at the earliest.
The board at the door is removable for when I want to clean out the deep bedding.

The back porch area after we stained it. It is pretty muddy back there so it is not looking pretty in this pic but oh well.

The coop has vinyl hardware cloth but we wrapped it in plastic in preparation for the winter and snow this winter. This plastic ended up getting ripped off by a wind storm after this pic, and of course after I had cleaned the run out and placed fresh straw down. It is now reinforced with 1x3 beams.
The solar lights I got off Amazon and they work great. I have them set to motion sensor to help me when I check on the coop at night and to alert me from the house if something is prowling around the coop at night.

The run, I was planning on putting some siding at the triangle at the top but I was so over this project by the end that I just didn't have it in me. So it is open right now until I feel like tackling that project. Maybe next Spring.

Don't ask me how much I spent on this thing. I build it myself to save money and I am sure I did with the size of it by the end. But I don't want to think about how much it cost by the end.

Currently working on installing solar to the coop for heated water. It's slow going because I am trying to not burn down this coop with my inexperience. I plan on putting the controller in a junction box next to this door, then debating on what to do with the battery/inverter. I am debating putting the battery on a shelf on the outside in a case and the inverter in the little outdoor storage under the nesting box (with a ventilation hole(s). I worry if I put it inside the coop the chickens with mess with the wires or a spark will ignite their bedding...
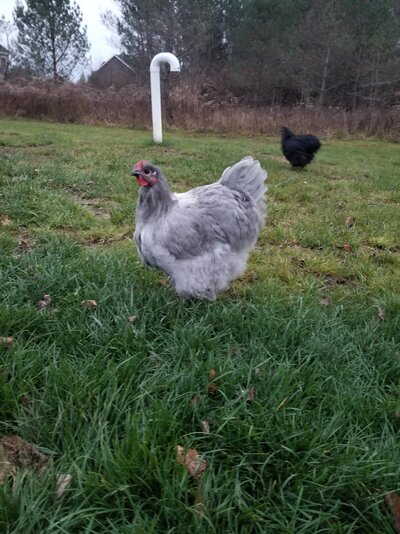
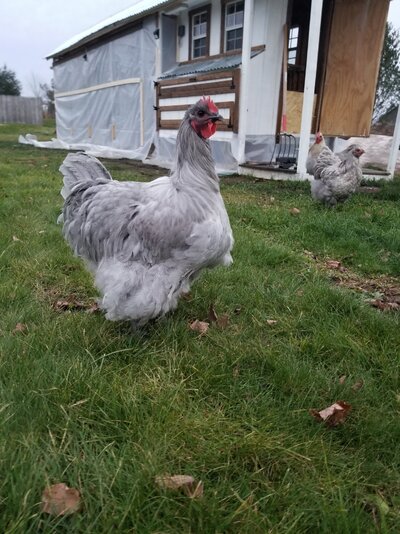
Finally, here is a picture of our flock yesterday for fun. All Harry Potter names. If anyone is interested in some English Orpington roosters in northern NY let me know! The kids want to give them to someone instead of the plans I have for them.


Fred and George, lavenders, about 18 weeks old.


Our oldest rooster (around 19 weeks) and one of the favorites, BuckBeak, with our 9 year old (who managed to disappear for the entirety of the building project, the genius). He is a lavender laced english orp hatched from Papas Poultry.
Thanks for reading!
Here we go!
Starting with the frame. I was feeling pretty good about myself at this point. <cue ominous music>
Pressure treated floorboard and some of the frame. I was planning on using the concrete footers but gave up. Just used pressure treated 2x4s for the run's frame and painted it with latex paint for protection. I also framed a little porch on the back end so that I can get into the coop during our cold winders here.
More framing, putting up the roof. I realized at this point that I messed up the roof center because I altered the coop plans I bought so that there would be a little overhang over the nest box on this side, so one side of the rafters are longer than the other. You can't tell by looking, it's only by an inch or two, but my OCD was (and is) very annoyed by this.
I also realized that the run framing was not very stable with the 2x4s sitting on the base like this. Toe nailing them was not enough. So I used some metal roofing joist things to help with stability and made some beams going horizontally to create more support.
I forgot to mention that I do not own a nail gun. Really wish I did, especially at this point in the build. I did have a pneumatic hand nailer because there was no way I was going to be able to hand nail all of this. Loved that little guy, but a nail gun would have been so much easier and faster.
The run is 18' long. At this point of framing the roof I realized I may have bit off more than I can chew.
But too late now, and I am too stubborn to stop!
Placed 18" deep board around the bottom of the coop to allow for me to do deep bedding. I had to alter the coop plans to raise the little run door as well as the nesting boxes so that they would be above the bedding.
Placing this siding on the coops was possibly the most physically difficult for me. I had my weak self and my 12 year old daughter for muscle. You know that scene from Friends with Ross yelling "PIVOT" with the couch? Imaging that but trying to lift giant pieces of siding with two very weak people. I am sure our neighbors got a laugh out of that.
I am doing metal roofing, but placed wood over the coop portion with roofing paper on top for moisture absorption in the winter.
Also cut out the doors and windows with a jigsaw. I made my 12 year old crawl in through that window to get the guide holes for the big door at the front. We was not pleased by this, but I found it pretty funny.
Metal roofing going on. It was about 98 deg up here in Northern NY at this point and I kept having to take breaks every hour because of the heat. I also realized that I am an idiot for making this coop so big.
As much as I was regretting making the coop this big, I was hopeful that with all the physical labor and sweating that I'd lost some weight by the end of this project.
Spoiler alert. I did not.
Windows going in! This was probably the most satisfying part of the project. Everything else was heavy and sucked.
I decided to make the nesting box have a side drop down like Carolina Coops recommends, so the top of the nesting box does not lift up at all. Looking back I probably should have made it lift to make it easier to clean out, but I was so tired at this point I just wanted to finish this thing and there was so much more left to do. Therefore, solid nest box top.
Putting some linoleum in for easier clean up in the future. I put some around the sides as well.
Wood stain looking pretty with the white latex paint! It was starting to feel real at this point. The light at the end of the tunnel.
Inside of the coop the other day (has been in use for a few months now). The nest box is still blocked but I will be opening it up soon. I have young English Orpingtons so they start laying late, probably not until Jan-May next year at the earliest.
The board at the door is removable for when I want to clean out the deep bedding.
The back porch area after we stained it. It is pretty muddy back there so it is not looking pretty in this pic but oh well.
The coop has vinyl hardware cloth but we wrapped it in plastic in preparation for the winter and snow this winter. This plastic ended up getting ripped off by a wind storm after this pic, and of course after I had cleaned the run out and placed fresh straw down. It is now reinforced with 1x3 beams.
The solar lights I got off Amazon and they work great. I have them set to motion sensor to help me when I check on the coop at night and to alert me from the house if something is prowling around the coop at night.
The run, I was planning on putting some siding at the triangle at the top but I was so over this project by the end that I just didn't have it in me. So it is open right now until I feel like tackling that project. Maybe next Spring.
Don't ask me how much I spent on this thing. I build it myself to save money and I am sure I did with the size of it by the end. But I don't want to think about how much it cost by the end.
Currently working on installing solar to the coop for heated water. It's slow going because I am trying to not burn down this coop with my inexperience. I plan on putting the controller in a junction box next to this door, then debating on what to do with the battery/inverter. I am debating putting the battery on a shelf on the outside in a case and the inverter in the little outdoor storage under the nesting box (with a ventilation hole(s). I worry if I put it inside the coop the chickens with mess with the wires or a spark will ignite their bedding...
Finally, here is a picture of our flock yesterday for fun. All Harry Potter names. If anyone is interested in some English Orpington roosters in northern NY let me know! The kids want to give them to someone instead of the plans I have for them.
Fred and George, lavenders, about 18 weeks old.
Our oldest rooster (around 19 weeks) and one of the favorites, BuckBeak, with our 9 year old (who managed to disappear for the entirety of the building project, the genius). He is a lavender laced english orp hatched from Papas Poultry.
Thanks for reading!


")


