Deep litter method

Pics
LacyBlues- Bee explained it well. I thought maybe pictures would help?

My doll house coop. I enclosed the run to give them more space. I left about a 2 inch gap at the bottom and at the top where side meets roof there is a 1 inch gap you cant see.

The smaller structure with the pvc pipe faces east. I only covered the top half with plastic the bottom half is open......snow just collected in front of it. Their roost was right in front of that.


My hoop coop this open end faces north (most winds come from south southeast here) If you look closely inside on the right & left towards top you can see large squares. These were the first vents I used and they let it to much rain so I covered them up with plastic.


I put these smaller ones in place of the larger ones. As you can see they are much lower. I only put 2 in across from each other. Amazingly they allow a lot of air flow. I have 2 more I can put in of they are needed.

And because I tend to overdue things I also put roof vents in. But the cooler air comes in those bottom vents and lower area not covered in tarp intentionally for air flow and hot air escapes at the top. Even when the temps were in the 90s this summer it was noticeably cooler in the coop. During the winter when the tarps are let down on the sides to keep the snow and drafts out those little vents at bottome are going to be essential to let fresh air in. I will then decide if the 2 others I have will need to be installed.


This is the tarp I am speaking about when I say roll it down for the winter. This is the south east corner/side. They have been up since April and are only put down when there was a lot of rain to stop it from blowing into the coop. They will stay up to the snow flies. Its been in the low 40s at night but the girls are plenty warm.

Hopes this helps !!!
 
Sounds like you would have decent airflow if you've left a lot of the cracks open, though I have found that the cracks, being evenly spaced throughout the coop and small, don't seem to actually pull the air in one direction like the venting does. At least, that was my experience in a coop of similar ventilation with the cracks between boards. It wasn't until I added another large vent under the roost that I finally achieved the level of ventilation I needed with the deep litter.

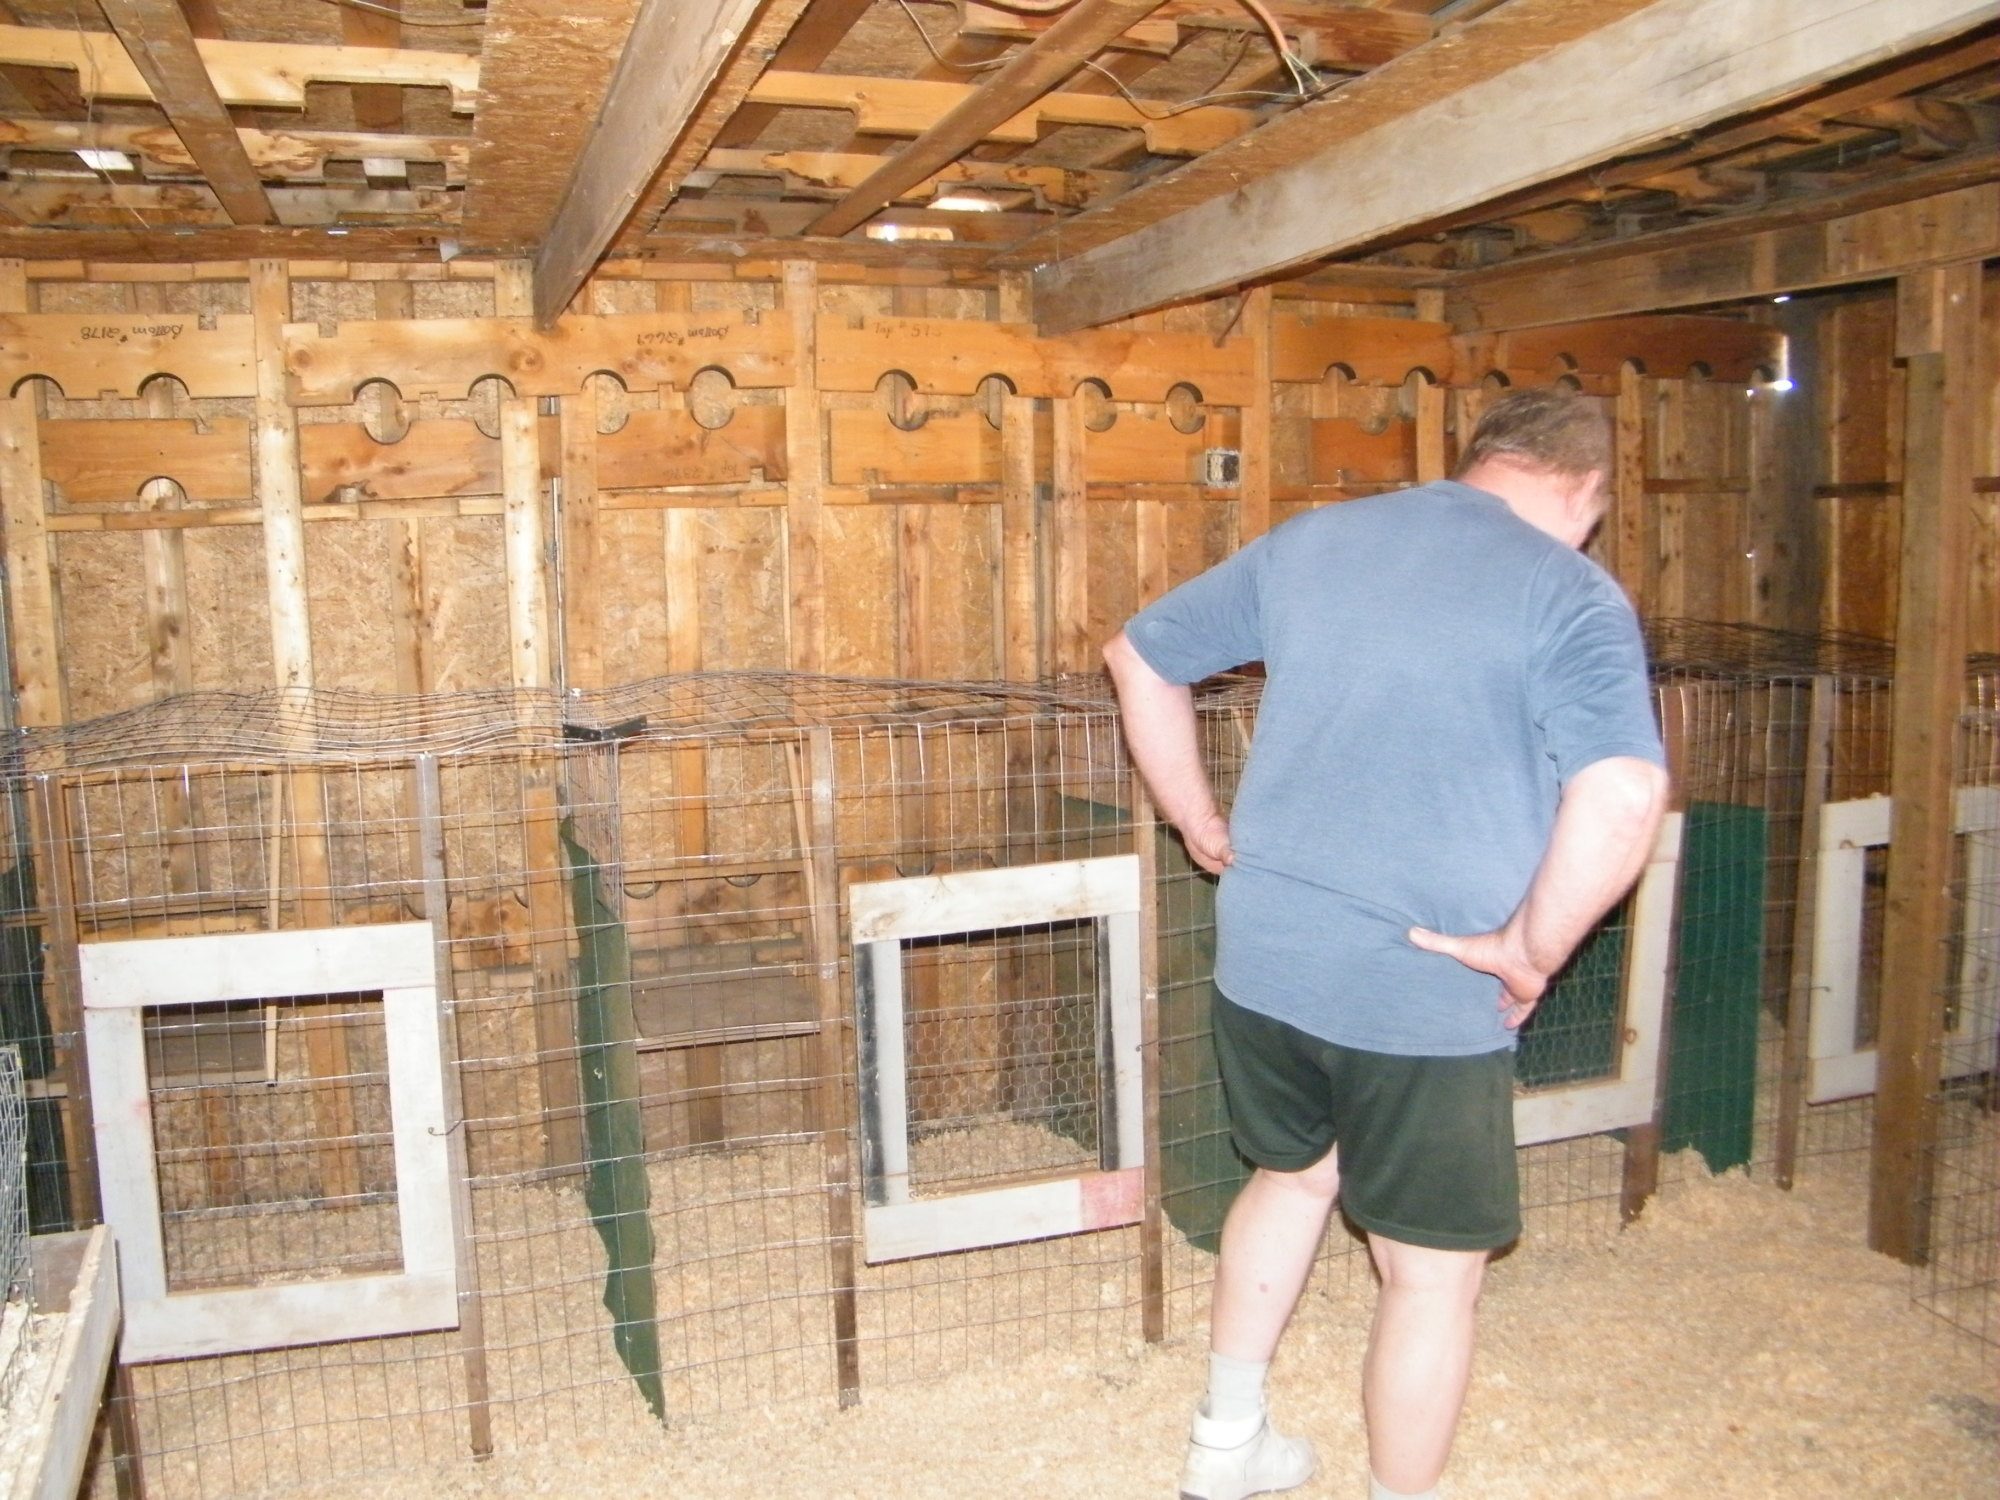
The diagram is great but kind of hard to picture with all the small pens...are they open pens with wire walls or are they solid wall construction? I think if the pop doors to the outside are left open at night, it should draw good air but if not, the vent under the roost would be a good placement.

I am kind of wondering about the poop boards when you are using deep litter, though...what would be their use if the desired result was binding nitrogenous feces with carbonaceous litter? I'm always hoping my birds will poop MORE in the coop instead of less.
Only in the real world!!
lau.gif
 
Sounds like you would have decent airflow if you've left a lot of the cracks open, though I have found that the cracks, being evenly spaced throughout the coop and small, don't seem to actually pull the air in one direction like the venting does. At least, that was my experience in a coop of similar ventilation with the cracks between boards. It wasn't until I added another large vent under the roost that I finally achieved the level of ventilation I needed with the deep litter.

The diagram is great but kind of hard to picture with all the small pens...are they open pens with wire walls or are they solid wall construction? I think if the pop doors to the outside are left open at night, it should draw good air but if not, the vent under the roost would be a good placement.

I am kind of wondering about the poop boards when you are using deep litter, though...what would be their use if the desired result was binding nitrogenous feces with carbonaceous litter? I'm always hoping my birds will poop MORE in the coop instead of less.


LacyBlues- Bee explained it well. I thought maybe pictures would help?

My doll house coop. I enclosed the run to give them more space. I left about a 2 inch gap at the bottom and at the top where side meets roof there is a 1 inch gap you cant see.

The smaller structure with the pvc pipe faces east. I only covered the top half with plastic the bottom half is open......snow just collected in front of it. Their roost was right in front of that.


My hoop coop this open end faces north (most winds come from south southeast here) If you look closely inside on the right & left towards top you can see large squares. These were the first vents I used and they let it to much rain so I covered them up with plastic.


I put these smaller ones in place of the larger ones. As you can see they are much lower. I only put 2 in across from each other. Amazingly they allow a lot of air flow. I have 2 more I can put in of they are needed.

And because I tend to overdue things I also put roof vents in. But the cooler air comes in those bottom vents and lower area not covered in tarp intentionally for air flow and hot air escapes at the top. Even when the temps were in the 90s this summer it was noticeably cooler in the coop. During the winter when the tarps are let down on the sides to keep the snow and drafts out those little vents at bottome are going to be essential to let fresh air in. I will then decide if the 2 others I have will need to be installed.


This is the tarp I am speaking about when I say roll it down for the winter. This is the south east corner/side. They have been up since April and are only put down when there was a lot of rain to stop it from blowing into the coop. They will stay up to the snow flies. Its been in the low 40s at night but the girls are plenty warm.

Hopes this helps !!!

Ok, so smaller vents won't work. I was hoping I could use what I have to cut holes... the largest hole saw is, I think, 2 inches. So, I'm gonna have to figure this out.

The poop boards were put there when I didn't know what kind of winters we have here. I built them all about a month before we moved, in early July. The pens are all 2x4 welded wire and between them is shade cloth (so the boys won't fight). I'll find a picture and post it so you can see.

200x200px-ZC-3be78f0e_Maranspullets101.jpeg


This was taken before we moved in and I didn't even have pop doors up or cut yet.
 
Last edited:
Quote: ANY vents will work.
The "rule of thumb" is 1 Sq Ft per bird, so if you use small round vents, you just need more of them .

If that's what you want to use, I'd suggest looking at "marine clamshell vents", made to be waterproof , but still allow air movement

They come in differents styles and sizes, and are made to cover holes rather than to be INSERTED into the holes

Here are a couple of examples:

 
I established my extra vent by sheer accident and then discovered how much better the birds and bedding did in the winter once it was there...so it was a happy accident. I had made a broody pen in an adjacent building and wanted to have the broody and chicks have sight and sound with the flock, so I cut a big square out of their building, another big square out of the side of the coop to match and just spanned the gap with some lumber and then placed a piece of fencing over it.

Long about winter when the broody pen was open and open to air, I blocked off that big opening with a piece of cardboard...but it later slipped off. I kept meaning to put it back but didn't get around to it...and then I noticed how much better the litter smelled, how much drier it was being kept and also no more dark rims on the rooster's comb points. I put 2 and 2 together and figured it out...from then on I didn't block that hole off...it was a foot square in size...but the air was not flowing directly in from the outside, it was flowing from an adjacent pen that had open air construction. No direct wind flow but plenty of air flow nonetheless.

Happy accident that I am now using to regulate the airflow in my hoop coop...last winter I had it too buckled down and got condensation on the roof! Opened it up in a big way and everything righted itself real quick and in a hurry. I'm convinced that one can never have TOO much ventilation, only too little.
 
Quote:
ANY vents will work.
The "rule of thumb" is 1 Sq Ft per bird, so if you use small round vents, you just need more of them .

If that's what you want to use, I'd suggest looking at "marine clamshell vents", made to be waterproof , but still allow air movement

They come in differents styles and sizes, and are made to cover holes rather than to be INSERTED into the holes

Here are a couple of examples:

We made such a clam shell using old fencing material. Cut a hole and cover with rat wire, then box it with opening at the bottom; exit hole was on opposite wall high up. I can feel tthe air rushing in. Turkey hens sit on a roost above the hole, sitting in a toasty zone. Hole on the other end is 10 inches square. The system acts like a chimney.

I used to think this was too much air, but I don't smell ammonia anymore.
 
I established my extra vent by sheer accident and then discovered how much better the birds and bedding did in the winter once it was there...so it was a happy accident. I had made a broody pen in an adjacent building and wanted to have the broody and chicks have sight and sound with the flock, so I cut a big square out of their building, another big square out of the side of the coop to match and just spanned the gap with some lumber and then placed a piece of fencing over it.

Long about winter when the broody pen was open and open to air, I blocked off that big opening with a piece of cardboard...but it later slipped off. I kept meaning to put it back but didn't get around to it...and then I noticed how much better the litter smelled, how much drier it was being kept and also no more dark rims on the rooster's comb points. I put 2 and 2 together and figured it out...from then on I didn't block that hole off...it was a foot square in size...but the air was not flowing directly in from the outside, it was flowing from an adjacent pen that had open air construction. No direct wind flow but plenty of air flow nonetheless.

Happy accident that I am now using to regulate the airflow in my hoop coop...last winter I had it too buckled down and got condensation on the roof! Opened it up in a big way and everything righted itself real quick and in a hurry. I'm convinced that one can never have TOO much ventilation, only too little.

I have less sickness in my open pens than the closed up pens. I'm learning the hard way. But I am learning!!

I have a group that has a lot of openings at the four foot level and the triangle ends of the barn are open BUT there is not enough air movement at the floor level.

I don't have my woods style barn completed but this is how I think it works. THe open end starts about 12 inches above the floor level, for about 3-4 feet. It spans the entire wideth of the building, say 10 feet. THe depth of the building is 16 feet. From what I read, the back of the barn experiences a lower air flow, but allows the air to be replaced many times over in a day ( and night), slowly, not like a wind blowing thru.

I also think it allows birds to move to where ever they are more comfortable as the areas vary from the far back furtherst from the open screen, to the other extreme, right at the screen.

IN the book the first few feet that are likely to have some rain hit the floor, is to be sand. ANyone have anythought on this as I want to do the deep litter method, could this get too wet??
 
I can't imagine deep litter holding water and moisture any less than sand. I rather enjoy the more wet portions of my DL now, in this open air coop style, as that is where the bugs seem to congregate, so eventually the chickens dig that out and toss that litter to another side of the coop...where it piles up, holds more moisture, attracts the bugs and once again earns the attention of the chickens. Cycle repeats over and over throughout the year. I used to rake it all back even when I saw it dug out, but soon learned that I was doing WAY too much work when the chickens would eventually redistribute that bedding anyway.
 
I can't imagine deep litter holding water and moisture any less than sand. I rather enjoy the more wet portions of my DL now, in this open air coop style, as that is where the bugs seem to congregate, so eventually the chickens dig that out and toss that litter to another side of the coop...where it piles up, holds more moisture, attracts the bugs and once again earns the attention of the chickens. Cycle repeats over and over throughout the year. I used to rake it all back even when I saw it dug out, but soon learned that I was doing WAY too much work when the chickens would eventually redistribute that bedding anyway.
lau.gif
THat is my kind of maintenence!! None.

I need to put in a roost, and these birds are said to need a roost only 2 feet high, not higher as they are rather heavy. Can I put a big long right on the floor?? Like an 8 inch wide tree trunk?? I have an oak which is roughbarked that can go in-- or black birch which is smooth.

THoughts ?
 
ANY vents will work.
The "rule of thumb" is 1 Sq Ft per bird, so if you use small round vents, you just need more of them .

If that's what you want to use, I'd suggest looking at "marine clamshell vents", made to be waterproof , but still allow air movement

They come in differents styles and sizes, and are made to cover holes rather than to be INSERTED into the holes

Here are a couple of examples:


So if I was to put two square foot holes say in the doors of the main coops (south side) and have them covered with something like this, would that be sufficient, or should I also make a window up high (even though my roof is made of pallets and it has plenty of openings up there)? In the doors would be the closest I could get the vents to the main perch areas.

One of these years (hopefully soon) I want to replace this roof with something slanted that will allow hot air to ascend and escape and winter humidity as well. Doing this may be hazardous though. It is flat and it is all pallets, I have no idea how the previous owner managed such a job! Nor do I have any good idea how I could dismantle the thing There are NO posts inside this building except one that I put up in a low spot and yes, when it rains, it runs inside the building as well. We only get 5" of rain a year (including any snow) so it can be lived with but is a major pain in the backside when it does happen! Most of our rain comes in the spring or early summer.

I appreciate everyone's help. This is really helping me to figure things out.
 

New posts New threads Active threads

Back
Top Bottom