• giveaway ENDS SOON! Cutest Baby Fowl Photo Contest: Win a Brinsea Maxi 24 EX Connect CLICK HERE!

DIY Thread - Let's see your "Inventions".

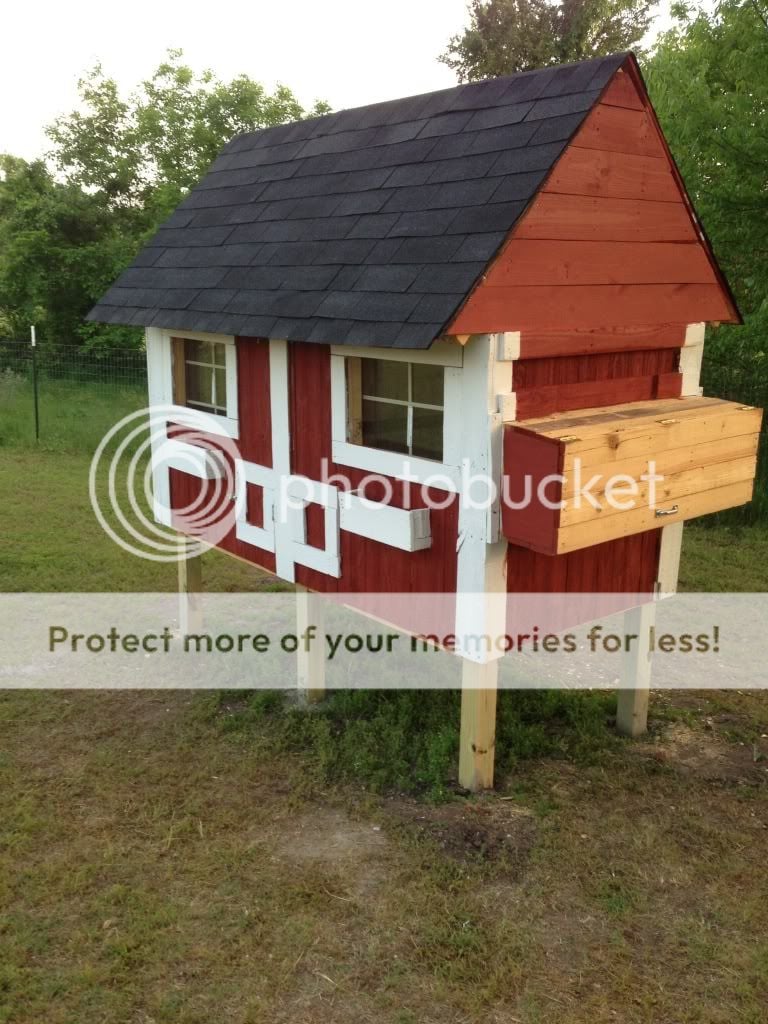
Hello all. I am new to the forum and new to chickens. Always lived in the country and don't know why I haven't had them before. My daughter has been pestering me so I finally broke down. After looking at several designs I sorta came up with my own. I have access to basically an endless supply of pallets so I figured I would use them(free) to keep the cost down. Here's some pics of my coop


null_zps7ec988fc.jpg

null_zpsd717d273.jpg

Wonderful job!
 
Quote: You can get food grade 55 gallon barrels at the feed store for somewhere between 20 and 30 bucks... They usually carried stuff like soda syrrup. Some have an openable top the kind that fasten on with a clamp but most you will have to cut an access hole in the top if you are going to scoop water Though they do make siphons just for those tanks they are pretty cheap. Hand pumped to start. and fit into the bung hole on the top.

deb
 
Base Water Heaters

And the base heaters I made from heated dog bowls last year. Will probably use again with these glass waterers this year but I also have a different idea I'd like to try too.

I needed to rig something to keep water from freezing on the broody side of the hen house with the vintage glass waterer. I also used these under pie pans with fermented feed in them to keep it from freezing solid since I put out a bunch when I go out to work in the morning for the whole day.


I first thought about making a "cookie tin heater" but decided not to do that as I feel that they may pose a fire risk for various reasons.

Instead, I decided to use the heating element from a heated dog bowl. That way, if my experiment doesn't work - or when I'm done using it - I still have a heated dog bowl to use! Double duty and these heat elements are designed to do the job already and wired correctly to handle the job...I feel the risk of fire is much lower using these elements. They also have the thermostatic control built right in so I don't have to purchase another item!

So...here we go.

Here's the water bowl right from the farm store. $14.99


Here's the bowl after I removed the heating element.


Here's the heating element. I believe the part in the center is the thermostatic heat sensor. It will only heat when the temperature drops below a certain degrees. I think it upper 30's on these. Under the heat element is Styrofoam for insulation and the plastic base that normally sits under the dog bowl.


Here is a cookie tin I picked up at Good Will $0.75. Notice that the top has a rim that will catch water if I have a leak. It was just the right size for the heater base....this is VERY COOL as I purchased it the day before I picked up the dog bowl and had no real idea that it would fit. I think that was Providential...just sayin'
smile.png


I used Duct tape to attach the cookie tin lid to the heater base. Here you see the plastic bottom-side of the heater base which is normally under the dog bowl.


When completely taped down, the duct tape is fully covering the edges so that no water or shavings can get in there.


In the hen house:


With Fermented Feed


I had a couple of them.


Here is is with an evil plastic waterer base before I got the vintage glass bases.
gig.gif


Excellent idea.... Have you thought of taking the original bowl and flipping it over slip that tin cover over the base to keep water from getting in..... Heat rises. And you do need to get it all raised up off the ground to keep stuff from being scratched into the water.

deb
 
Yes - they set raised up on blocks.
So dog bowl flipped over would be just the right height. Unless the thermostat needs to be up against the surface that contains the water or the base of the heater is super insulated.... there is no reason that bowl couldn't heat as well upside down. In my case I would have to take it apart to see how it all worked before trying it.... but you have already done it.

By the way I reallly like the low profile that heater and tin lid create and that assembly is very very versitile.

deb
 
I originally tried setting my ceramic bowls into the dog bowl itself. I didn't want something sitting in heating plastic, and I also wanted the insert to be removable for a quick clean out and return without having to unplug the whole bowl and mess around with that.


That particular ceramic bowl fit in very well, but it ended up cracking and a chunk came out of the side. Thought it was a fluke and bought another. Cracked in the exact same place after using a couple weeks.

My theory was that the temperature difference between the base and the top edges was too great therefore cracking due to cold to hot contact.

I had originally had water in the plastic (kind of like a double-boiler) to distribute the temp evenly but it was very messy and I quit putting the water in. I may try this again with some kind of pyrex for the fermented feed.

Others who aren't concerned about the plastic use something like a gallon ice cream pail with a handle and set it in the bowl. Easy to lift right out to clean and replace. I just don't like a big open waterer in the winter as I know a person that had one of her kiddos step in hers by mistake and lost the toes on her feet due to frostbite.
 
Last edited:
On flipping the dog bowl...wonder if I could take the heater out like I did, cover with the tin and replace it in the dog bowl upside down. Then it would be protected and have the base raised up, etc.

Maybe I'll grab one of those and see how that works. I'll report back :D
 
Excellent idea.... Have you thought of taking the original bowl and flipping it over slip that tin cover over the base to keep water from getting in..... Heat rises. And you do need to get it all raised up off the ground to keep stuff from being scratched into the water.

deb
That's a good idea Deb...modify the original bowl so the heating element could be flipped 'right side up' and the original bowl (sitting 'upside down') would act as a stand. ;-)

The original bottom edge could act as an anti slip ring. Hmmmmm.....
 
I originally tried setting my ceramic bowls into the dog bowl itself. I didn't want something sitting in heating plastic, and I also wanted the insert to be removable for a quick clean out and return without having to unplug the whole bowl and mess around with that.


That particular ceramic bowl fit in very well, but it ended up cracking and a chunk came out of the side. Thought it was a fluke and bought another. Cracked in the exact same place after using a couple weeks.

My theory was that the temperature difference between the base and the top edges was too great therefore cracking due to cold to hot contact.

I had originally had water in the plastic (kind of like a double-boiler) to distribute the temp evenly but it was very messy and I quit putting the water in. I may try this again with some kind of pyrex for the fermented feed.

Others who aren't concerned about the plastic use something like a gallon ice cream pail with a handle and set it in the bowl. Easy to lift right out to clean and replace. I just don't like a big open waterer in the winter as I know a person that had one of her kiddos step in hers by mistake and lost the toes on her feet due to frostbite.
You are probably right about the temperature differences...... How about a nice Stainless steel bowl insert. Mixing bowls sets are pretty cheap DAng easy to clean and sterilize.... Put a gravel in the heating unit to give good surface contact. After cleaning you just nestle the bowl into the gravel.

deb
 

New posts New threads Active threads

Back
Top Bottom