Not so sure it's all that pretty or innovative since I had the idea pop into my noggin while reading on this site. But I like to think using the weatherproof "rope light strings" is just shy of being normal....for me. It's a plain jane Rubbermaid 14"x10" approx. tote/storage box with a snap-on lid. It has 2 strings of the enclosed weatherproof little bitty lights joined together (factory coupler built in them) with one power cord going out a small slot in the top snap-lock ridge. And both strings are covered up and around by about 10-15 pounds of sand. The box is about 1/2 to 2/3 full. There are reinforcing blocks of wood inside on each end to screw the end outside legs (legs 8"wide for stability by 12" tall) through and make sure the legs are sturdy. It's approx 6" above the floor for "peep clearance". With just one string it only ran about 12 +- degrees F. above room temp (about 85-90F). With 2 strings joined it runs at about 105F and the peeps are happy under it. I have it plugged into a portable receptacle and dimmer combo I made for the last spring's chick brooding.
Rope lights are like a "Utilitech Clear Rope Light" they are incandescent type small lamps inside... not LED types! they don't heat much...google that. I bought these at Lowes (or your local home improvement center) years ago for display lights above the cabinets for my wife's fancy glasswork before she passed. They are joinable by weatherproof screw on connectors.. I suppose a 25 watt or two regular light bulb would work inside the sand too?? ..and the sand is NOT filling the tote box all the way up! It weighs enough as it is!. The sand evens out the heat all over and it's like a heat storage bank. <---For those shorter then 4 hours but worry-some power outages that sometimes occur at not-quite-the-right-time-or-place..
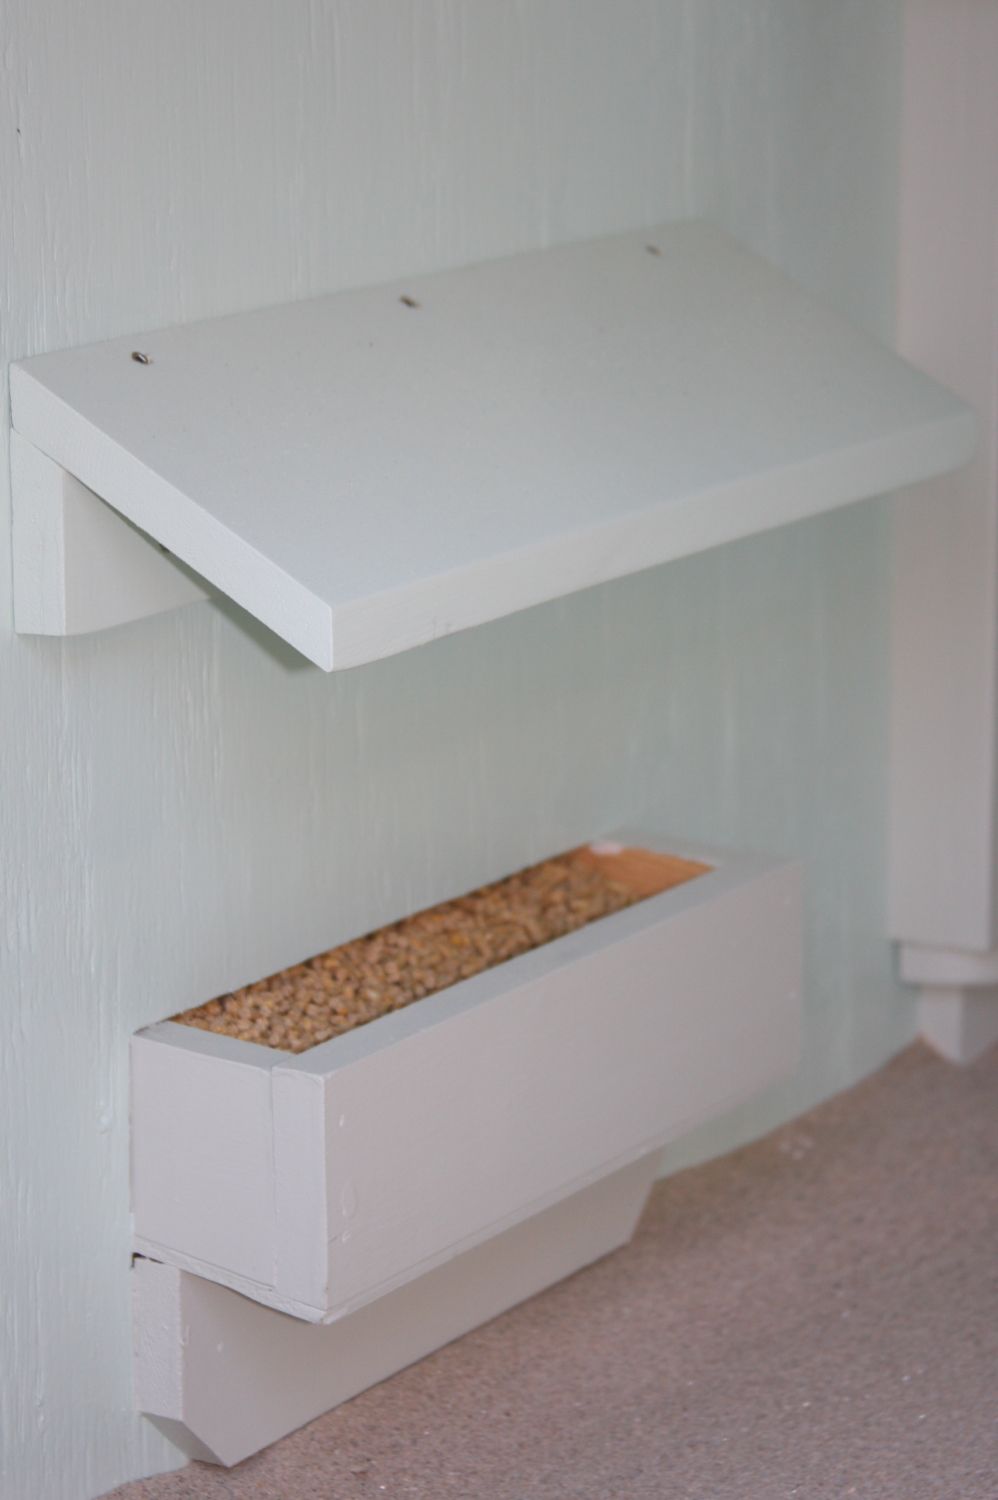
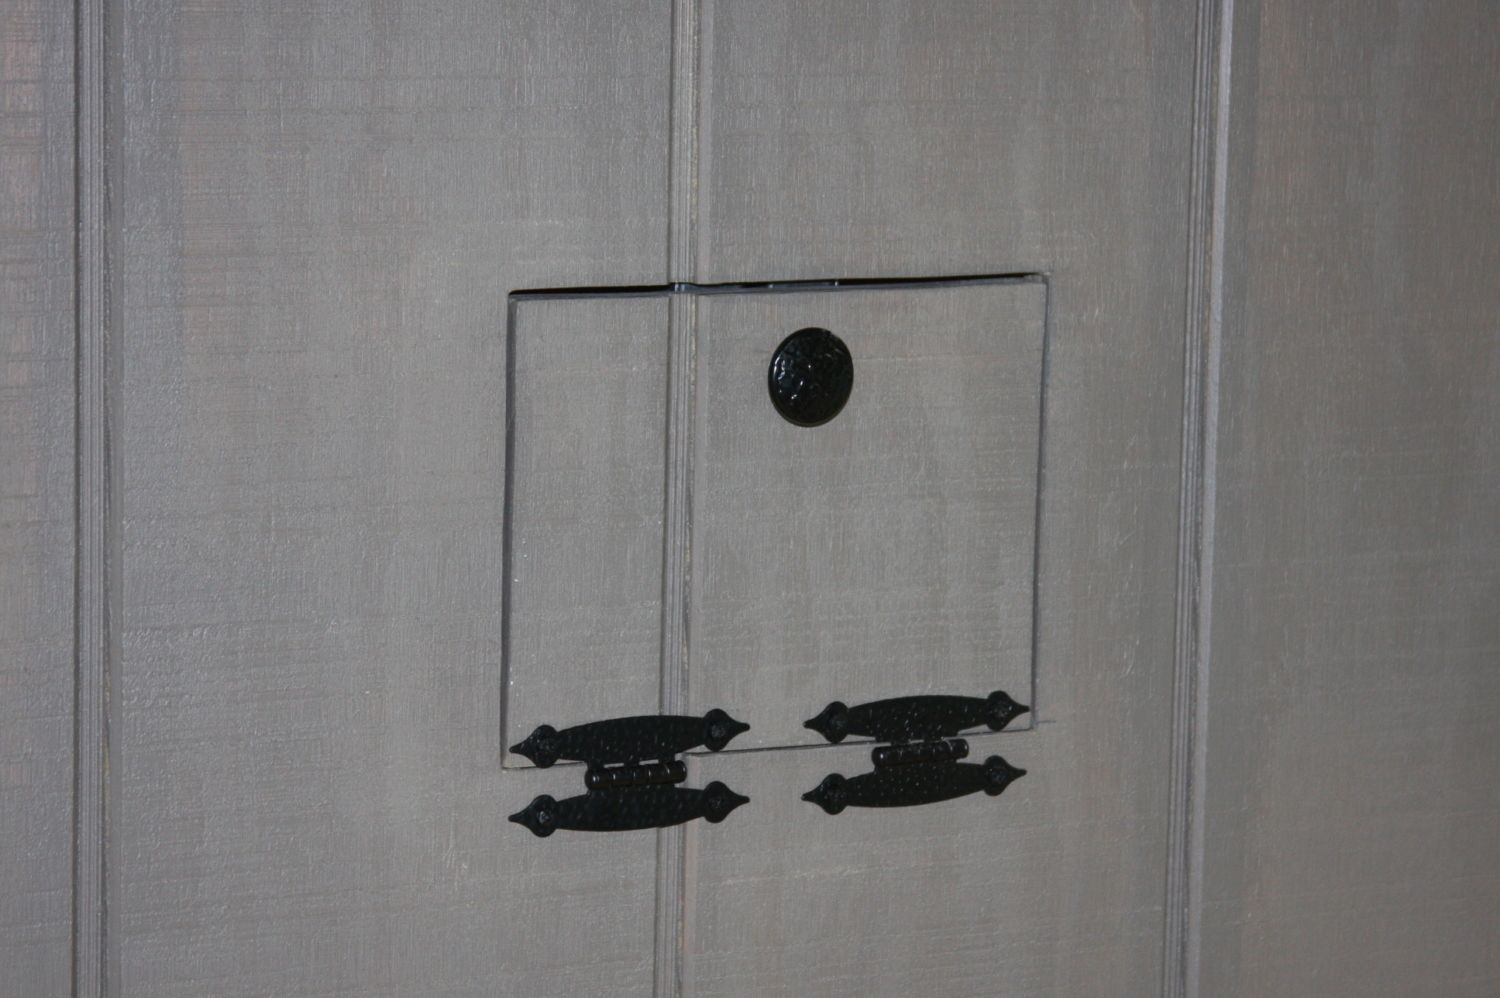
When I built my coop, I used the space inside the wall for a feeder. It saves space inside the coop. There is a small door on the exterior wall to fill from, and on the inside of the coop, the feed goes down into a tray. The tray can be removed for cleaning, but so far, it has stayed very clean. Water cannot get in since the fill door is under the roof of the run so it stays nice and dry. I'm sure I'm not the first person to do this, but this set up works very well for me.
If you're like most and keep your coop nice and dry, then you are no stranger to DUST...
You can call it whatever pleases you (chicken dander), but I'm sure you realize what's in the air, I'll just refer to it as "dust".
Now just how do you rid the coop of dust, easily, quickly, and effectively, without the need for hazmat suits?
My simple solution eliminates my coop dust in less than 5 minutes.
After considerable thought, this took about 20 minutes to build, super easy solution.
Tools required:
Materials required:
All 4" plastic black drain pipe and components, available at most big box stores, surprisingly inexpensive.
These are utility hangers, I used one outside the coop, one inside the storage area, as they came as a pair.
I already had and use an electric leaf blower to blow the dust out of the coop, but all to often, I was just blowing the dust around the coop and not really out. Dust everywhere. I was using masks, goggles and protective clothing...
This method creates a positive pressure inside the coop, essentially replacing the normally stagnate air about once every 2 minutes, with fresh, outside the coop, dust free air.
How it works:
Simple...
Turn on the stationary blower, use a second blower to move the dust into the "jet stream" where it gets swept away and finds its own exit. My coop is well ventilated.
That's it...
My build:
Observations:
1. Make sure you do not exceed the amp ratings of your electrical wiring. Leaf blowers use powerful motors, same with vacuum cleaners. I purposefully purchased my second blower, as I did not need a power sucking unit. New, my second blower was under $30 and uses ~7 amps. Rated for 150cfm. My wiring can handle ~15 amps, all GFCI.
2. Start outside the people door and work your way in. Dust just disappeared for me, Didn't seem to need any dust protection at all. Regardless I would always wear a mask. I had to blow into the litter to actually see how well it worked...I do not recommend you do that while in the coop...you will not believe how much dust is in 8 inches of pine shavings litter after 9 months...
3. Super powerful blowers are not necessary nor recommended. You are blowing dust, not wet pine needles after all.
4. Under 10 minutes to setup, use, and dismantle, the entire system.
5. Total cost of materials, including 1 new blower, was under $50.
I have two similar devices in mind. One for vacuum extraction for cleaning.... sort of like a whole house vacuum... I dont do deep litter. But rigid pvc pipe plumbed with ports in each pen... caps on the ones not being used...
and one to deliver feed from my truck to hoppers for storage. The latter will require a gas powered leaf blower. I have seen these home built on line.
On the other side of the coop I drilled at least a half dozen, probably more, 4" holes up high just in case some ammonia got up there.
That wall is in the storage side of my shed, separated from the birds by a 6 foot wall and hardware cloth.
All the other ventilation is lower, where the roof meets the walls.
If you look carefully, you will see an existing one above the door.


 Premier 1 folks, whats your voltage like?


 BYC's 52-Week Photography Challenge — Week 10: Get Low! — Mar 9–15, 2026
 Some pages not loading and blaming it on ad blocker (don’t use)