- Mar 5, 2018
- 53
- 137
- 136
I was getting some chickens to help keep down the tick population, but I knew I needed a coop - a place where they could roost at night without fear of the coyotes, coons, and other wildlife roaming these hills...
Because I work two jobs I do not have a lot of spare time, and because of a number of reasons I did not want to spend a lot of money . . .
So what was I to do?
Pallets! Pallets are easy to come by an generally free, so I gathered a small stack of them and began my work. No written plans, just kind of a picture in my mind of what I intend to have as a finished project - and it changed several times during construction!
Initially I thought about taking the pallets apart and using the wood to build the coop - that is what I had seen done here and on other sites on the web. But when I attempted that I ended up with more split and broken boards than I had in usable lumber. Plus, it was tiring and time consuming.
Since I am neither a good builder, nor one to waste time, I put the ole noggin to work and figured there was no point in re-doing what someone else had already done! So I decided to use the pallets themselves as the walls.
I also figured out pretty quickly that if I was going to use the pallets as the walls I would need pallets of the same size. Its amazing how many different sizes and types of construction pallets come in.
I found several pallets of the same size and took the bottom "skids" off. Then I made sure the ends of the boards along the edge were all cut to the same length. It's amazing (amazingly frustrating) how much a quarter of an inch can be!

Once I had my four pallets chosen and ready I got four posts. I was able to get 4x4 treated posts about 7 feet long from the cull lumber pile at the local lumber yard. They are too split and slightly bent for deck supports and such, but perfect for my job. I think I paid about $5 apiece for them.
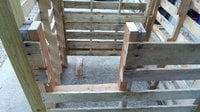
Using deck screws, I screwed two of the posts onto the sides of a pallet . . .

Then I did the same thing with another pallet and two posts, and then I completed the box with the 2 remaining pallets.


The chicken coop is upside down in the two photos above. But that makes it easy to do the next two steps - I cut some of the slats out for the door - i added a small 2x4 framing for stability and to give me a place to fasten the hinges, etc.

Also, while it is upside down it is easy to install the floor. Using a some waferboard (OSB) that I had, I cut a piece to fit - not quite 4'x4', more like 48" x 40". After having the basic dimensions I cut the 4'4 corners out so it fits between the posts.

There is a bit of the flooring extending past the pallet on the near side of this last pic - there is a reason for that which we will get to later . . . for now it is time to set thing contraption upright.
The weight of four pallets and four 7' 4x4s is more than some people can handle by themselves so you may need assistance with this part. I managed by myself. But hey, if you used enough screws to this point you won't have to worry about it falling apart if you drop it! : )
Anyhow, There needs to be a roof, right? So I took a 2x4 that was long enough to reach from front to back (about 48" in this case, but it will vary depending on the size of pallets you use) and I simply drew a line from one side end of the board tot he other side end creating two matching triangles. Making that cut was a bit challenging as it was hard to clamp the board in place to hold it while I sawed it - and I really like keeping all of my fingers. These two triangles became my roof rafters, and then I nailed the other half of that waferboard on them to create a roof with just enough slope for the rain to run off...

The picture above shows those roof rafters, the chicken coop has been moved to location by this point 'cause my nephew was here and he helped me. We rolled it into the pick up bed, drove to the place I wanted it, and rolled it out onto its pole legs... The roof also received a covering of scrap tin roofing from the local scrap yard, since tin withstands the rain and snow better than the waferboard...
I also took a sapling about 1 1/4" inches in diameter and cut it to length and screwed it to the uprights in the middle, about a foot up from the floor, to create a roost. A roost about 48" long is enough for 4-5 chickens....but my RIR rooster things he's king of the roost and won't share...but that's a whole other story.
The next part of this project was creating the nesting boxes. So in the back of the coop I cut out the pallet slats but left the studs. This is the place where that floor stuck out a bit from the posts
that I had mentioned earlier - you can see it better in this pic...

Then I created a "box" using some scrap plywood, waferboard, and pieces of pallet slats, held together by those metal plates that builders use - obtained from the local hardware for about $1.50 apiece. . . .


I also used waferboard for the roof of the nesting boxes and made a door using a small frame and screen. So then I was done til winter.... The open slats allow for plenty of breeze and fresh air in these hot, humid, Ozark hills where sometimes the night-time low is in the upper seventies. I have thought about wrapping the whole thing in chicken wire or something a bit smaller to keep out the black snakes and other possible varmints. But it is shown in the pic below and the whole process described thus far it cost less than $50 and took about 8-10 hours spread out over several days.

As winter was approaching - and Ozark winters can be as cold as the summers are hot - I screwed some siding I had purchased onto the sides to keep the wind out, and painted it red just for fun...
You may notice that this near side is not quite covering to the top . . . if this siding were permanent I would by enough to cover that, but since it comes off again in the summer I'm not going to worry about it.

Even with the siding (damaged / seconds at the lumber yard) I have well under $100 invested in this chicken coop. The chickens are happy, I'm happy. And if these plans help you with building your coop, I will be even happier.
Because I work two jobs I do not have a lot of spare time, and because of a number of reasons I did not want to spend a lot of money . . .
So what was I to do?
Pallets! Pallets are easy to come by an generally free, so I gathered a small stack of them and began my work. No written plans, just kind of a picture in my mind of what I intend to have as a finished project - and it changed several times during construction!
Initially I thought about taking the pallets apart and using the wood to build the coop - that is what I had seen done here and on other sites on the web. But when I attempted that I ended up with more split and broken boards than I had in usable lumber. Plus, it was tiring and time consuming.
Since I am neither a good builder, nor one to waste time, I put the ole noggin to work and figured there was no point in re-doing what someone else had already done! So I decided to use the pallets themselves as the walls.
I also figured out pretty quickly that if I was going to use the pallets as the walls I would need pallets of the same size. Its amazing how many different sizes and types of construction pallets come in.
I found several pallets of the same size and took the bottom "skids" off. Then I made sure the ends of the boards along the edge were all cut to the same length. It's amazing (amazingly frustrating) how much a quarter of an inch can be!
Once I had my four pallets chosen and ready I got four posts. I was able to get 4x4 treated posts about 7 feet long from the cull lumber pile at the local lumber yard. They are too split and slightly bent for deck supports and such, but perfect for my job. I think I paid about $5 apiece for them.
Using deck screws, I screwed two of the posts onto the sides of a pallet . . .
Then I did the same thing with another pallet and two posts, and then I completed the box with the 2 remaining pallets.
The chicken coop is upside down in the two photos above. But that makes it easy to do the next two steps - I cut some of the slats out for the door - i added a small 2x4 framing for stability and to give me a place to fasten the hinges, etc.
Also, while it is upside down it is easy to install the floor. Using a some waferboard (OSB) that I had, I cut a piece to fit - not quite 4'x4', more like 48" x 40". After having the basic dimensions I cut the 4'4 corners out so it fits between the posts.
There is a bit of the flooring extending past the pallet on the near side of this last pic - there is a reason for that which we will get to later . . . for now it is time to set thing contraption upright.
The weight of four pallets and four 7' 4x4s is more than some people can handle by themselves so you may need assistance with this part. I managed by myself. But hey, if you used enough screws to this point you won't have to worry about it falling apart if you drop it! : )
Anyhow, There needs to be a roof, right? So I took a 2x4 that was long enough to reach from front to back (about 48" in this case, but it will vary depending on the size of pallets you use) and I simply drew a line from one side end of the board tot he other side end creating two matching triangles. Making that cut was a bit challenging as it was hard to clamp the board in place to hold it while I sawed it - and I really like keeping all of my fingers. These two triangles became my roof rafters, and then I nailed the other half of that waferboard on them to create a roof with just enough slope for the rain to run off...
The picture above shows those roof rafters, the chicken coop has been moved to location by this point 'cause my nephew was here and he helped me. We rolled it into the pick up bed, drove to the place I wanted it, and rolled it out onto its pole legs... The roof also received a covering of scrap tin roofing from the local scrap yard, since tin withstands the rain and snow better than the waferboard...
I also took a sapling about 1 1/4" inches in diameter and cut it to length and screwed it to the uprights in the middle, about a foot up from the floor, to create a roost. A roost about 48" long is enough for 4-5 chickens....but my RIR rooster things he's king of the roost and won't share...but that's a whole other story.
The next part of this project was creating the nesting boxes. So in the back of the coop I cut out the pallet slats but left the studs. This is the place where that floor stuck out a bit from the posts
that I had mentioned earlier - you can see it better in this pic...
Then I created a "box" using some scrap plywood, waferboard, and pieces of pallet slats, held together by those metal plates that builders use - obtained from the local hardware for about $1.50 apiece. . . .
I also used waferboard for the roof of the nesting boxes and made a door using a small frame and screen. So then I was done til winter.... The open slats allow for plenty of breeze and fresh air in these hot, humid, Ozark hills where sometimes the night-time low is in the upper seventies. I have thought about wrapping the whole thing in chicken wire or something a bit smaller to keep out the black snakes and other possible varmints. But it is shown in the pic below and the whole process described thus far it cost less than $50 and took about 8-10 hours spread out over several days.
As winter was approaching - and Ozark winters can be as cold as the summers are hot - I screwed some siding I had purchased onto the sides to keep the wind out, and painted it red just for fun...
You may notice that this near side is not quite covering to the top . . . if this siding were permanent I would by enough to cover that, but since it comes off again in the summer I'm not going to worry about it.
Even with the siding (damaged / seconds at the lumber yard) I have well under $100 invested in this chicken coop. The chickens are happy, I'm happy. And if these plans help you with building your coop, I will be even happier.