Well we finally have the coop and runs finished and I am quite pleased with how it turned out. Using this message board really helped my husband and I a ton. The coop in the photo measures 8X10. Keep in mind that to the left of the run there will eventually be another smaller coop; that is our next step. Nearly 100% of the materials here were salvaged from an old 1800s barn which we torn down this past spring. We saved the post and beam large pieces for our house which well be building soon. Having these barn materials saved us a ton of money. We did purchase the 4X4 post for the run and coop and set them 3 deep. The run is chicken wire buried 12 deep all around including the top. The back half of the run is a metal roof which was left over from a pole barn. The coop has hardware cloth at all openings, vents and eaves.
The first three photos here are the outside of the coop, run and storage shed. The storage shed was preexisting here as my garden shed. We decided to build the run and coop off of it so that it would blend into the back lawn nicely. The storage shed is nice having so close since we can store the feed barrels and all the chicken accessories in it. Due to salvaging and using old materials we saved a ton of money. And having a handy husband was a giant help also.

These windows were found at a yard sale for free, they were actually off of a single window top and bottom but we took them apart from the frame and hinged them to the coop. This has been working great to open the coop during the days to get a nice breeze thru the coop and to keep it aired out. Weve been closing them at night since the roost the girls seem to use the most is directly beneath it and I dont want the breeze directly on them.
Under the eaves we tacked up hardware cloth so that it still is decent ventilation but predators cant get in. The hardware cloth is actually under the siding and the gingerbread trim pieces so that its nearly impossible for anything to pry up.
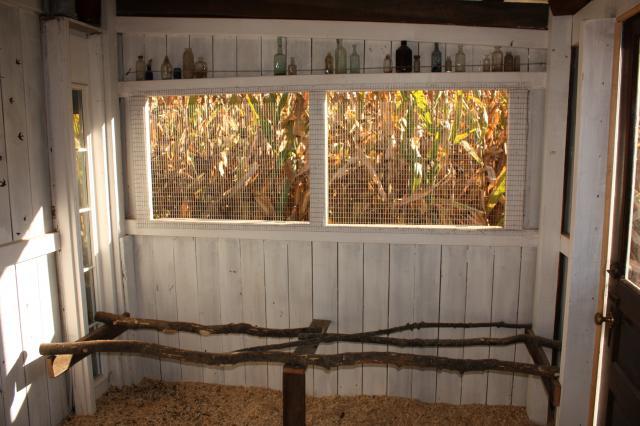
Inside the coop we used natural branches for the roost. We buffed the tops of the branches with sandpaper to get any rough bark areas off.
Here you can see the vents at the top on the east side of the coop these vents came from a habitat for humanity store for 50 cents. The long window to the right also came from the habitat for humanity store for $10. The floor in the coop is vinyl flooring with wood shavings and a tiny bit of stall dry mixed into it.
This side of the coop has more roost and the back wall has rooster art, I figure the girls may want to check out some hot rooster art. Under the photos is where the nest boxes will go. We are going to cut the nest boxes into the wall so that when I gather eggs I can enter thru the storage shed to get them and theyll be well insulated since not on an exterior wall.
This is the main door to the coop and also from the habitat for humanity store; can you tell we love that place?! To the right of the door youll see all the names and breeds of the chickens we have that was my daughters touch to the coop.
This photo shows the windows and vents a little better on the east side of the coop.
Youll see the run here and notice it has two entrance doors.. one enters a larger section of the run and the other is for the other side. They can be opened up as one run or we can keep them as two runs depending on the need. The next coop will attach to the small side of the run. Currently we have our 8 week old girls in the large side since they are outside 100% of the time and come and go from the coop/run. Our 4 week old girls are using the small side of the run and we are still bringing them in the house at night.
In each side of the run there is a large sandstone foundation stone that the girls seem to really enjoy getting up on. There is also a 3X4 dust box in each section filled with sand and top soil.. this is under the metal roof so that itll stay dry.
Here you can see the divider chicken door connecting the two runs. This is hinged and flips up and hooks so that we can leave it open completely eventually if needed so that the girls can have full access to both sides.
You can see the troughs here that we are using to give the girls treats above each trough is a bell that we ring every time we put treats in. They know exactly what the bells means now so the hopes are that when they begin free ranging well be able to round them up easier if needed.
Each section of run also has a ladder roost that is screwed in place. They seem to enjoy these a lot also. These were hayloft ladders out of the old barn we tore down.
The first three photos here are the outside of the coop, run and storage shed. The storage shed was preexisting here as my garden shed. We decided to build the run and coop off of it so that it would blend into the back lawn nicely. The storage shed is nice having so close since we can store the feed barrels and all the chicken accessories in it. Due to salvaging and using old materials we saved a ton of money. And having a handy husband was a giant help also.


These windows were found at a yard sale for free, they were actually off of a single window top and bottom but we took them apart from the frame and hinged them to the coop. This has been working great to open the coop during the days to get a nice breeze thru the coop and to keep it aired out. Weve been closing them at night since the roost the girls seem to use the most is directly beneath it and I dont want the breeze directly on them.

Under the eaves we tacked up hardware cloth so that it still is decent ventilation but predators cant get in. The hardware cloth is actually under the siding and the gingerbread trim pieces so that its nearly impossible for anything to pry up.

Inside the coop we used natural branches for the roost. We buffed the tops of the branches with sandpaper to get any rough bark areas off.
Here you can see the vents at the top on the east side of the coop these vents came from a habitat for humanity store for 50 cents. The long window to the right also came from the habitat for humanity store for $10. The floor in the coop is vinyl flooring with wood shavings and a tiny bit of stall dry mixed into it.

This side of the coop has more roost and the back wall has rooster art, I figure the girls may want to check out some hot rooster art. Under the photos is where the nest boxes will go. We are going to cut the nest boxes into the wall so that when I gather eggs I can enter thru the storage shed to get them and theyll be well insulated since not on an exterior wall.

This is the main door to the coop and also from the habitat for humanity store; can you tell we love that place?! To the right of the door youll see all the names and breeds of the chickens we have that was my daughters touch to the coop.

This photo shows the windows and vents a little better on the east side of the coop.

Youll see the run here and notice it has two entrance doors.. one enters a larger section of the run and the other is for the other side. They can be opened up as one run or we can keep them as two runs depending on the need. The next coop will attach to the small side of the run. Currently we have our 8 week old girls in the large side since they are outside 100% of the time and come and go from the coop/run. Our 4 week old girls are using the small side of the run and we are still bringing them in the house at night.

In each side of the run there is a large sandstone foundation stone that the girls seem to really enjoy getting up on. There is also a 3X4 dust box in each section filled with sand and top soil.. this is under the metal roof so that itll stay dry.

Here you can see the divider chicken door connecting the two runs. This is hinged and flips up and hooks so that we can leave it open completely eventually if needed so that the girls can have full access to both sides.

You can see the troughs here that we are using to give the girls treats above each trough is a bell that we ring every time we put treats in. They know exactly what the bells means now so the hopes are that when they begin free ranging well be able to round them up easier if needed.

Each section of run also has a ladder roost that is screwed in place. They seem to enjoy these a lot also. These were hayloft ladders out of the old barn we tore down.


 It makes me wish I'd thought of it.

