Hi all!
I've got 4 fertile and growing eggs left out of the 20 that I started with. Unfortunately it just seems like a bad hatching season for everybody, but I'll be happy to have my perfect little babies, no matter how small the number.
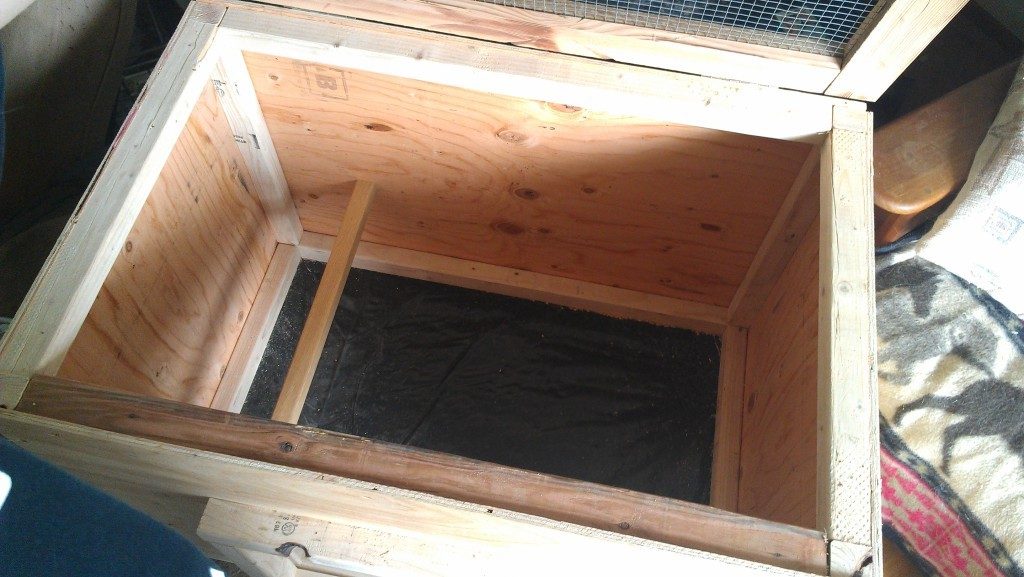
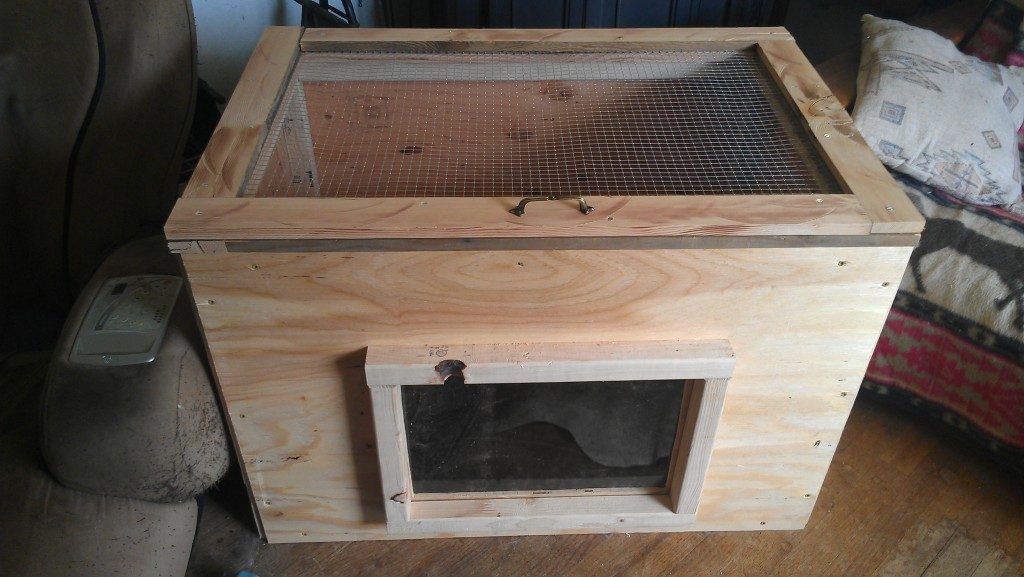
Anyways! We've been getting ready for these little guys and yesterday we went out and bought an 8'x4' sheet of plywood and a couple scrap 2"x4"s in the $0.51 cull lumber pile. We had the 8'x4' cut straight down the middle, then into four 3'x2' panels, and two 2'x2' panels. Each 2"x4" were cut in half, to make 2"x2"s to use for the supports on the inside of the brooder. We also bought 24"x25' roll of hardware cloth (going to use it on the coop as well). We used about $20 worth of what we bought (we were left with one 3'x2' panel and one 2"x2").

The black at the bottom is a double layer of Visqueen sandwiched between the 2"x2"s and the bottom plywood for easy cleaning and so that the water and poo doesn't get soaked into the floor wood... We used 2" deck screws for everything but the lid. And also used the lid hinges and a handle that we had lying around the barn.
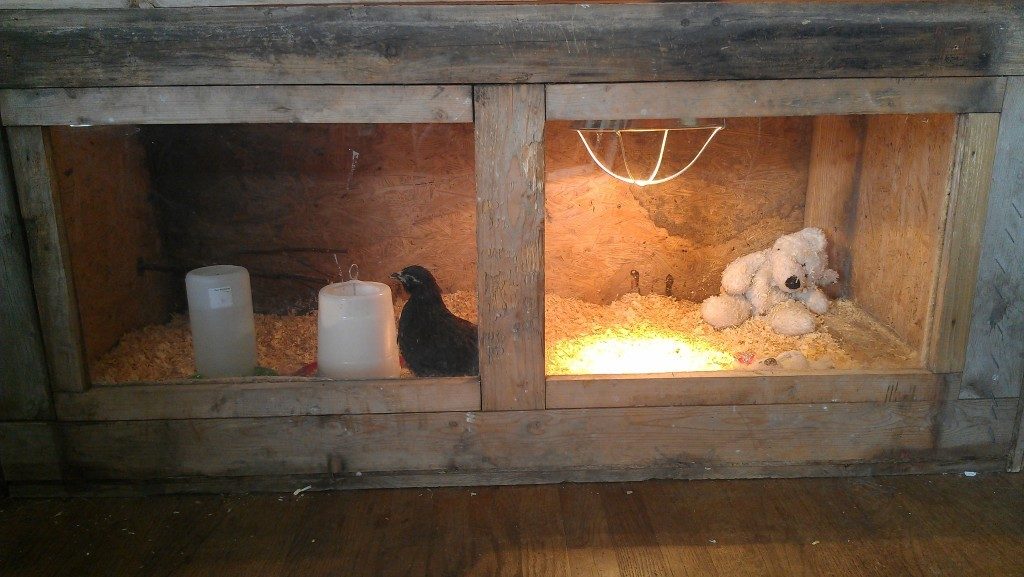
Now, in the first brooder box that we made, I had to have windows in the front so that I could always just peek over at the kids and watch them without having to hover over the top.
That's Bug, my little Olive Egger hatched from my own birds - Lavender Ameraucana and Black Copper Maran.")
And this brooder box is about 6-7 years old.. All that wood was bought from the hardware store, you can see how much it's been through LOL!
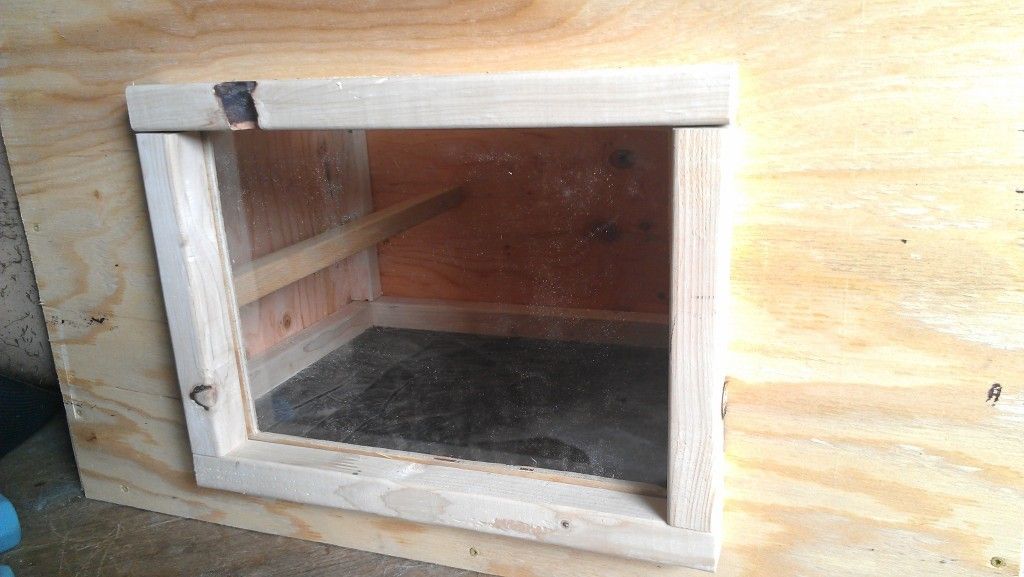
So originally, to talk my dad into building a new brooder with me, I said it does not have to be big or complex, just a quick put together box, but while we were building it I asked "So, no window?" And he was reluctant, but he found a spare piece of plexiglass that we had from other projects. The piece he pulled out was the PERFECT size, so we used a bansaw to cut out a hole in the front piece of plywood, and used some of the extra 2"x2"s for a "frame" to hold it in place.
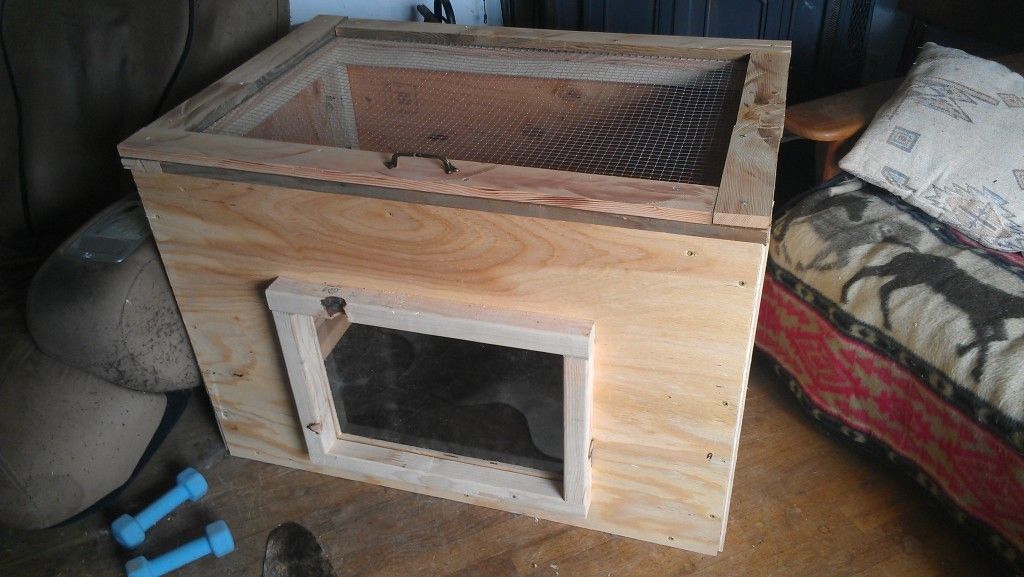
So in all the brooder is much more sturdy and well built than the original, and it only took a couple hours and $20 bucks to throw it all together! I think it looks pretty darn good!
There's also a perch on the one side just for fun!
So that's the brooder, now on to their pen.
We're stealing some ideas from Randy and his beautiful Pea Palace, but putting in our own little details.
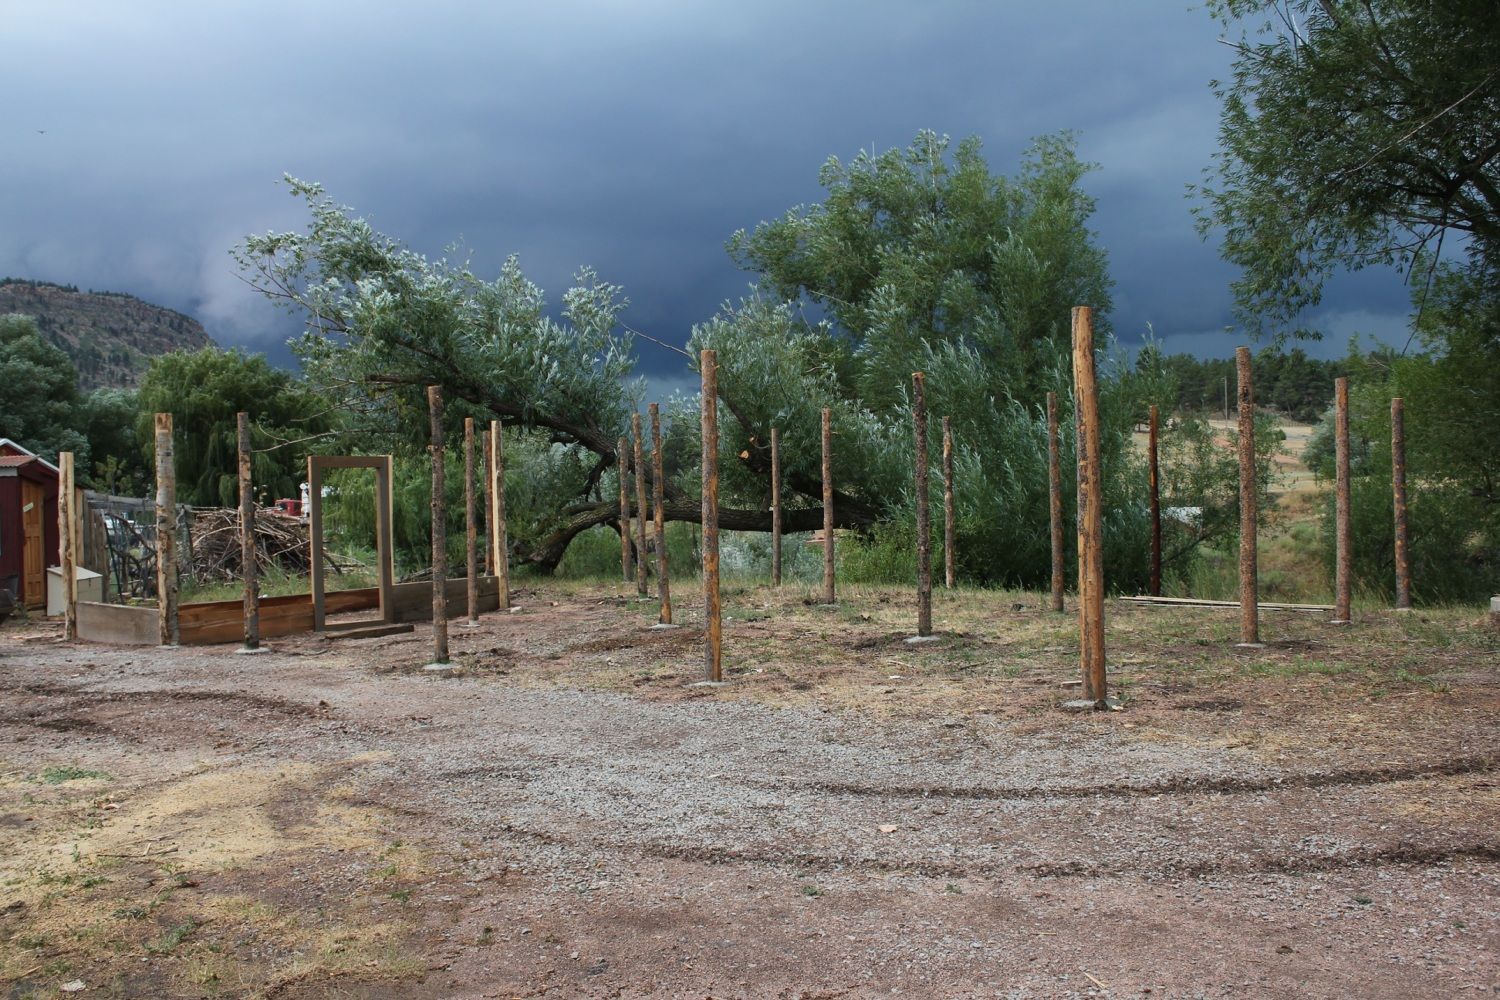
The fence for the yard is 30'x40' and within there is an 8'x16' enclosed "coop" that will be their first outside home as well as their forever home when they are allowed to go outside. So far we're focusing on the "coop" first so that we can move the babies out to it when we need to!
All of the "pen" posts are spaced 10' apart, and four of them will have 4"x4" perches, none of which will be on the outer perimeter posts to keep the chance of the males getting their trains snagged by predators - we don't have too many predators but it's better safe than sorry, I think.
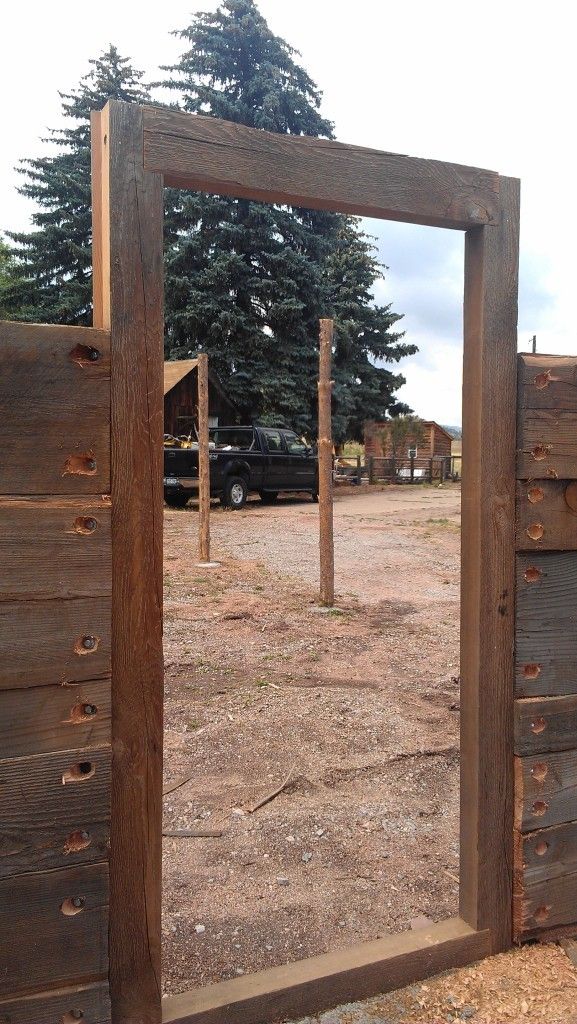
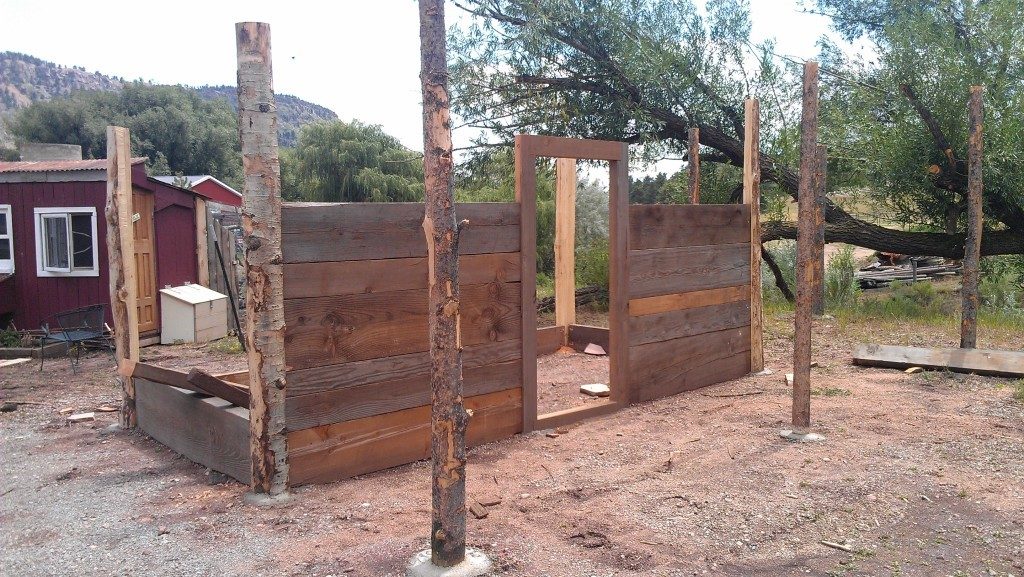
In the pic above you can see the building's door frame and bottom boards. For the walls of the "coop" we are using large boards of lumber that my dad got at an auction for a great price - he's just happy to be using it all up. For the posts we bought 10ft tall log posts from our next door neighbor. They are each cemented 2 feet into the ground, there's 8ft of log above ground. And the "coop" logs are thicker in diameter, and are notched out so that the wall boards have a barrier to bolt into and stay put. The front of the building is going to be 8ft tall and will slope down to 6ft in the back. For the fence perimeter we will use 2"x4" welded wire for the top 5ft, and the bottom 3ft we will have a sort of sight barrier - maybe made of wood, maybe metal, not quite sure yet - for more protection from predators.
This was before we had bolted the boards into the logs - used several lag bolts laying around - and added more boards on the walls. The pics below illustrate the progress since the pic above.
Some of the boards are heavily warped, but we're doing what we can.
And that's what we've got going so far! Unfortunately, progress will have to be put on hold for 2 weeks because my parents are going to Norway for their 25th wedding anniversary, and I can't exactly do all this by myself. Hopefully I can upload progress pictures as we get more built.
Thanks for looking, hope you like it!
I've got 4 fertile and growing eggs left out of the 20 that I started with. Unfortunately it just seems like a bad hatching season for everybody, but I'll be happy to have my perfect little babies, no matter how small the number.
Anyways! We've been getting ready for these little guys and yesterday we went out and bought an 8'x4' sheet of plywood and a couple scrap 2"x4"s in the $0.51 cull lumber pile. We had the 8'x4' cut straight down the middle, then into four 3'x2' panels, and two 2'x2' panels. Each 2"x4" were cut in half, to make 2"x2"s to use for the supports on the inside of the brooder. We also bought 24"x25' roll of hardware cloth (going to use it on the coop as well). We used about $20 worth of what we bought (we were left with one 3'x2' panel and one 2"x2").
The black at the bottom is a double layer of Visqueen sandwiched between the 2"x2"s and the bottom plywood for easy cleaning and so that the water and poo doesn't get soaked into the floor wood... We used 2" deck screws for everything but the lid. And also used the lid hinges and a handle that we had lying around the barn.
Now, in the first brooder box that we made, I had to have windows in the front so that I could always just peek over at the kids and watch them without having to hover over the top.
That's Bug, my little Olive Egger hatched from my own birds - Lavender Ameraucana and Black Copper Maran.
And this brooder box is about 6-7 years old.. All that wood was bought from the hardware store, you can see how much it's been through LOL!
So originally, to talk my dad into building a new brooder with me, I said it does not have to be big or complex, just a quick put together box, but while we were building it I asked "So, no window?" And he was reluctant, but he found a spare piece of plexiglass that we had from other projects. The piece he pulled out was the PERFECT size, so we used a bansaw to cut out a hole in the front piece of plywood, and used some of the extra 2"x2"s for a "frame" to hold it in place.
So in all the brooder is much more sturdy and well built than the original, and it only took a couple hours and $20 bucks to throw it all together! I think it looks pretty darn good!
There's also a perch on the one side just for fun!
So that's the brooder, now on to their pen.
We're stealing some ideas from Randy and his beautiful Pea Palace, but putting in our own little details.
The fence for the yard is 30'x40' and within there is an 8'x16' enclosed "coop" that will be their first outside home as well as their forever home when they are allowed to go outside. So far we're focusing on the "coop" first so that we can move the babies out to it when we need to!
All of the "pen" posts are spaced 10' apart, and four of them will have 4"x4" perches, none of which will be on the outer perimeter posts to keep the chance of the males getting their trains snagged by predators - we don't have too many predators but it's better safe than sorry, I think.
In the pic above you can see the building's door frame and bottom boards. For the walls of the "coop" we are using large boards of lumber that my dad got at an auction for a great price - he's just happy to be using it all up. For the posts we bought 10ft tall log posts from our next door neighbor. They are each cemented 2 feet into the ground, there's 8ft of log above ground. And the "coop" logs are thicker in diameter, and are notched out so that the wall boards have a barrier to bolt into and stay put. The front of the building is going to be 8ft tall and will slope down to 6ft in the back. For the fence perimeter we will use 2"x4" welded wire for the top 5ft, and the bottom 3ft we will have a sort of sight barrier - maybe made of wood, maybe metal, not quite sure yet - for more protection from predators.

This was before we had bolted the boards into the logs - used several lag bolts laying around - and added more boards on the walls. The pics below illustrate the progress since the pic above.
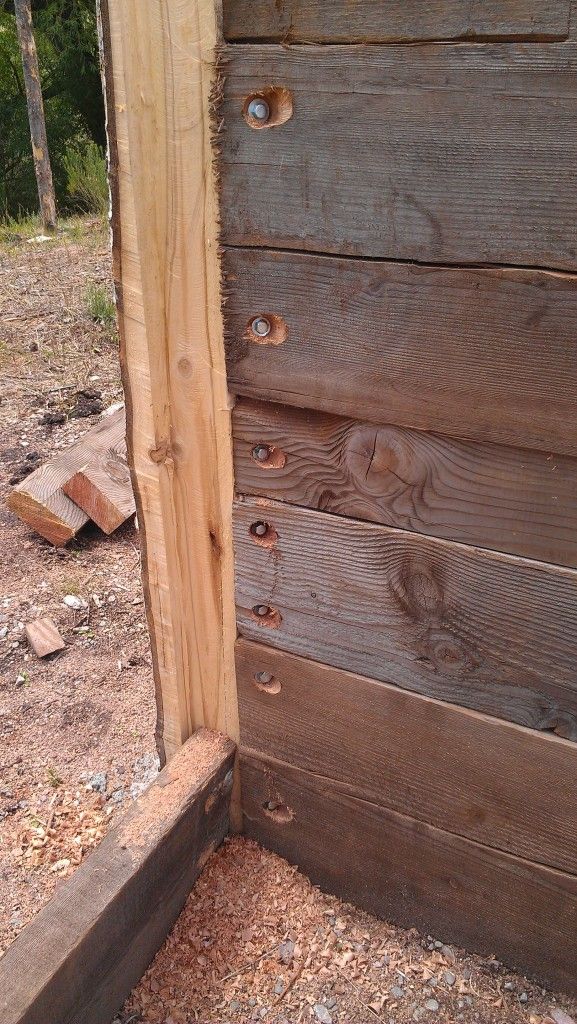
Some of the boards are heavily warped, but we're doing what we can.
And that's what we've got going so far! Unfortunately, progress will have to be put on hold for 2 weeks because my parents are going to Norway for their 25th wedding anniversary, and I can't exactly do all this by myself. Hopefully I can upload progress pictures as we get more built.
Thanks for looking, hope you like it!
Last edited:


