I forgot there were any pictures of building these roost but I ran across them today... so I thought id share just how I built these.
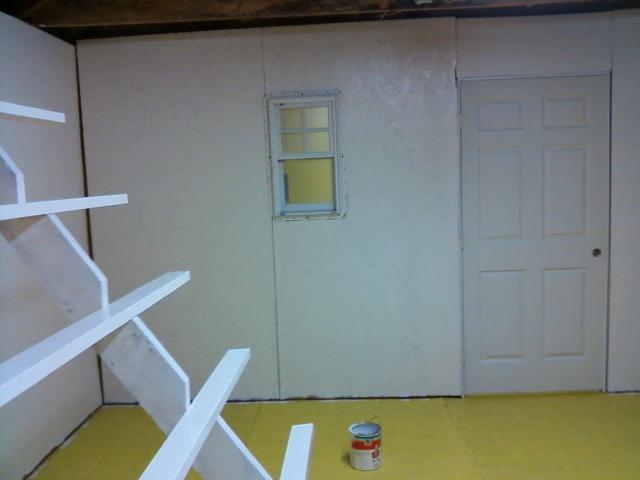
First I used two heavy rough 2" x 6" for supports. One end of the supports reaches up and rests on the wall but is hinged on the rafter with a bolt that runs trough the support board and the rafter. The other end of the support board is not connected to the floor but rather sits on the floor with a "shoe" to avoid putting to much pressure to a single point on the floor.

Once the boards were in place I measured off equal distance that looked about right for spacing and then I used a level to mark the supports so the actual roosts would set level for the hens. By waiting till the boards were in place I was able to eliminate any guess work in what would be level when I stood them up.

I used a skill saw to cut the slots for the roost but needed a saber saw the finish cutting out the corners. Once these were all cut I added the 2 x 4 x 10' roost turned sideways to allow comfort and warmth of the chickens feet.


Lastly I added a couple heavy coats of enamel paint to help with bug control and ease of cleaning in the future.

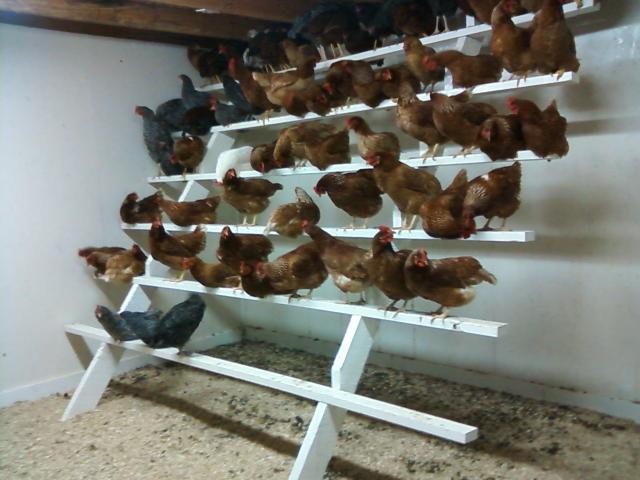
As far as cleaning goes the entire roost is hinged and can be raised up near the rafter for easy of cleaning however I can comfortably walk underneath them as well so that may not even be necessary. When wiring this building I was careful to add a couple power outlets above the roost just in case I decide to add any heat lamps during winter. The florescent lights are on a timer to give an extra hour and a half of lighting in the morning before dawn.
Finally, Add 70 plus chickens
 (Think using chicken math I could squeeze a few more hens on there?)
First I used two heavy rough 2" x 6" for supports. One end of the supports reaches up and rests on the wall but is hinged on the rafter with a bolt that runs trough the support board and the rafter. The other end of the support board is not connected to the floor but rather sits on the floor with a "shoe" to avoid putting to much pressure to a single point on the floor.
Once the boards were in place I measured off equal distance that looked about right for spacing and then I used a level to mark the supports so the actual roosts would set level for the hens. By waiting till the boards were in place I was able to eliminate any guess work in what would be level when I stood them up.
I used a skill saw to cut the slots for the roost but needed a saber saw the finish cutting out the corners. Once these were all cut I added the 2 x 4 x 10' roost turned sideways to allow comfort and warmth of the chickens feet.
Lastly I added a couple heavy coats of enamel paint to help with bug control and ease of cleaning in the future.
As far as cleaning goes the entire roost is hinged and can be raised up near the rafter for easy of cleaning however I can comfortably walk underneath them as well so that may not even be necessary. When wiring this building I was careful to add a couple power outlets above the roost just in case I decide to add any heat lamps during winter. The florescent lights are on a timer to give an extra hour and a half of lighting in the morning before dawn.
Finally, Add 70 plus chickens


