Leahy Incubator Restoration Advice

KatzFarm

In the Brooder
Mar 1, 2018
9
15
27
SW Michigan (Marshall)
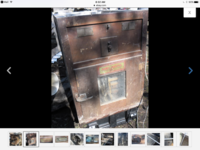
Looking for operating manuals, restoration advice, and parts sources for restoration of Farm Master (Leahy) 228.7 redwood cabinet incubator. I know very little about incubators and not much more about chicks. I do have a farm, hen house, and now an incubator and the desire to start a nice flock of Barred Rocks.

The back story on the incubator is the breeding stock I am looking for is mostly available via eggs. Hence, I need an incubator. Being I have an affinity for the antique and desire to do things the hard way I bought this cabinet incubator off EBay. I will pick it up next week...11 hour round trip adventure but I can see my son on the way so all is good. I was the underbidding on a Humidaire Model 20. I dropped out at $610 plus shipping. I also missed out on a smaller Farm Master to home and a great deal on another Humidaire 20 on Craigslist. So, I figured I'd get this one even though it is larger than I need. Anyway, i enjoy restoring things and,this will be right at home on the centennial farm

Where can I get parts and which types of replacement parts are recommended such as thermostat etc? I don't mind investing in good parts.
Pointers to other threads, etc, most welcome!


Thanks!

Scott
 

Attachments

  • IMG_5488.PNG
    IMG_5488.PNG
    2.3 MB · Views: 221
  • IMG_5489.PNG
    IMG_5489.PNG
    2 MB · Views: 151
  • IMG_5494.PNG
    IMG_5494.PNG
    2.6 MB · Views: 151
Hey Scott
Congratulations on getting an antique incubator. I found a Leahy 416 a few years ago and refurbished it. https://www.backyardchickens.com/articles/the-new-old-leahy-416-redwood-incubator.72051/

The wafer thermostats and microswitches are available from GQF Manufacturing or Incubator Warehouse. GQF also carries the heating coil. If it's like mine, the fan motor is very similar to an old style kitchen hood vent fan. If it doesn't work, vacuum or blow air to clean it, try a few drops of oil in the oil ports of the motor.
My wiring was sound but was the old crusty type of romex. I wrapped it in a silicone tape mainly to contain any insulation fragments.

Feel free to message me with any questions. I'd be glad to help out.
 
Thank you! I learned a lot reading about your restoration. I plan to follow a similar route. Hopefully it will be straight forward but I sure appreciate the offer to ask questions.

Thanks

Scott
 
IMG_5492.PNG
IMG_5497.PNG
IMG_5512.JPG


Update and Incubator Questions

Hi,

I started on the restoration of my incubator today. It is a Sears branded FarmMaster 228.7 four drawer Leahy made machine. Perhaps you can help me understand and/or confirm the electrical components?
Heating system. There is a resistance coil mounted near the fan which loops thru porcelain insulators to create heat as the air is drawn in thru the rear vent over the water pan. The water pan sits on a galvanized screen at the top of the unit. The pan is still there and in tact.
The heating coil works.

The fan turns very very slowly. Almost not moving at all. I blew it off with an air compressor and added a couple drops of oil to the shaft. It turned a bit faster afterward, but not nearly up to a speed that would draw any air in. I pulled the motor and am taking it into an electrical motor shop. It's obvious the armatear needs attention and the coils cleaned at a minimum. Hopefully it can be put back into service. Nice heavy little Robbins & Myers motor. If I can't bring this motor back into service I see modern replacements are available and will install one.

Overall the wiring looked ok. No breaks. Nothing really rough or crusty.

I could use some clarification on the electrical. Here's what I think I know: Two switches on the front face of the cabinet. One controls the interior light and the other controls the heating coil element. The light lights and the coil gets hot. The front also has a perforated metal dome in the switch plate area which I assume is for an indicator light. No bulb was present. I'm not clear on function or type of replacement bulb it would take?

This leaves the thermostat. What is the toggle switch inside the cabinet for? I see it is electrically connected to a black box on the upper left which has two coils inside and what I believe is a contact switch. Is the contact switch a limiter for the heat or is it to turn it on? The outside of the box has a screw which I believe adjusts the thermostat wafer. How does the wafer work? Does it expand when heated and engages the switch in front of it turning off the hearting coil? Looking at Leahy 416s I see they have heating rods on the bottom. My unit being made for Sears is different with a resistance heating coil near the fan. This coil doesn't seem like it would be up to the task of maintaining incubator temps if the cabinet is not in the house or other heated building. Is this right?

Also one of the glass guauges inside is broken. The thermometer is in tact, but a long glass tube which I assume is for measuring humidity was busted. Suggestions for a replacement?

Trays are in great shape and the cabinet is sound. I want to get the cabinet operational then do a deep cleaning and cosmetic restoration.

I don't need a fan to test the heating and thermostat so I'll close it up and see what happens but I'm not sure which switch is supposed to control what. At a minimum I plan to replace the wafer. How is the thermostat suppose to work?

Posting some pics in hope of some insights.

Thank you!

Scott
 
Found a YouTube video on the wafer thermostat and micro switch. I got it. It expands and turns off the heating coil. Ordered a new wafer and switch. Also a new heating coil.

Also found a replacement motor someone else had in their Farm Master that seemed to be working nicely. Same motor in Ebay is half the price of the one on Amazon. I'll trun the armature on the lathe before I buy the replacement motor. Never know, I might get it going fine. https://www.amazon.com/HVAC-Motor-1550-rpm-115V/dp/B000LDPO6G

Haven't totally figured out the toggle switch but saw a couple vague posts about it being an overtemp alarm. If so, the coils in the black box are a buzzer. It's wired into the transformer along with the micro switch. I'll get the cabinet hot and see what happens.

To solve the broken humidity gauge issue I will buy a digital temp/humidity gauge with a temp probe on it and just run the wire into the cabinet thru a vent hole and put the display on the top. Getting down to the floor to read the interior gauges would get old anyway. I'll keep an eye out for a glass humidity gauge and put one back in to keep the unit original.

The temp alarm is still a bit of a mystery, but I feel good about the unit. The racks are in excellent shape and the water tray is still with it.

The hinges on the lid need some attention. The exterior hardware shows rust. I may do something with the exterior cosmetically. I don't find the condition of the finish as is to be a turn off. Just honest wear and history.

I will repaint the interior. The bottom metal plate is in tact but rusty. The interior wood is ok, but a fresh coat of paint would brighten it up a bit. The interior original paint color is silver so I'll stick to that.

Please feel free to make suggestions and comments. Also could use a manual although I think the controls are starting to look pretty straight forward.

After a long search I have some really good Barred Rock eggs coming mid April.

Have a great day

Scott
 
When you get the new wafer thermostat, hold it up to your ear and gently shake it so you can hear what a good one sounds like. The new switch may have a strip of metal across the bottom that the old one doesn't have. It wouldn't fit in my holder so I took the metal strip off.

For the motor, maybe try some electrical contact cleaner.

Humidity - I have 4 of the Incutherm thermometer/hygrometers and they all read different and none of them are accurate. I bought a wet-bulb thermometer to hang in the window of the door.
https://www.amazon.com/Taylor-Preci...-Precision-Permacolor-Mercury-Free-Hygrometer

Not sure about the temperature alarm. Can't tell from the photo but it is a low voltage buzzer and could be wired off the toggle switch. You'll have to open the electrical box to see how it's wired. It makes me wonder if the bulb holder on the left is a temperature controlled contact that completed the buzzer circuit.

On my 2nd incubator all the hardware was rusted or tarnished badly. Since the sizes were different from what is currently available, I ran them through my reloading tumbler to clean them up. I then painted them with a spray metallic paint.

None of the redwood incubators I have seen have been painted in the inside. To seal the interior defeats the purpose of the redwood. When you run it, you'll want to run it for a couple days at high humidity so the wood absorbs some moisture, then drop the humidity down before putting in your eggs. It might be whitewash instead of paint. If it is paint, you can bet that it's lead based.

The exterior finish on my Leahy was in good shape. I just cleaned it with some Murphys. The second one needed a total strip job. I finished it with a couple of coats of Danish Oil. I bought a jar of Kramer's Best Antique Improver to coat the Leahy with but just haven't done it yet. I did use it on some antique picture frames and it did an amazing job of restoring them.

The switches on the front are Despard style. You can buy the switches and plates on Amazon. Not sure about the indicator light. Mine just has a red light the same size as the switches. You'll have to pull the switch plate off to see what's inside.

I would recommend adding a fuse to the electrical box if you have room in the box for it. https://www.amazon.com/gp/product/B005T6O72M/ref=oh_aui_detailpage_o09_s00?ie=UTF8&psc=1 A surge protector alone doesn't do what a fuse will do. A friend made a homemade incubator from a wine chiller and it caught on fire from an electrical overload.

Reading back on your earlier post, one switch powers the light, the other switch powers the heater and fan. That switch stays on unless you open the door. Turn it off or you blow hot air out the door. The indicator light only comes on when the heating element is heating. The fan runs continuously and the heating element & indicator light is wired through the wafer switch.

There's not a photo of the thermometers. Is the broken tube above the water tray? If so, GQF sells a wet-bulb thermometer that is a metal dial type but the bulb sock goes into the water tray.
My water tray was gone, I use a deep lasagna pan and cover it with foil to regulate the humidity. It was trial and error to figure out how much to leave open. I put a ping pong ball in the pan to keep the foil up off the surface of the water.

Hope this helps. You're going to love it once you get it running. I wouldn't trade mine for 2 modern cabinets.
 
IMG_5513.JPG
IMG_5514.JPG
Thanks to Tabasco Jack & dbcooper02 I have a good understanding and start on the restoration on the incubator.

I followed Tabasco Jack's lead and purchased new snap switches, Depard switches, and a thermostat wafer. I am waiting on those parts. The unit is right now happily cycling on and off and the primary thermostat appears to be working. I have ordered a Taylor mason thermometer as suggested. The fan motor is at an electrical motor shop for service and I hope to have it back good as new.

Thanks to dbcooper02 I have a manual for my model which is a great help also. The manual has saved a lot of confusion and trial and error even up to this point. Db also provided me the insight that this incubator was made by Reliable and not Leahy. I wondered why the heating element and one wafer for the two switches was a different set up than the Leahy units I was looking at. The one wafer set up with two switches had me really confused as I did not see the safety switch as it is under the primary and obscured by the mounting bracket.

I cleaned the interior and exterior. The exterior I applied Howard's Antique Restore finish and followed it with the Howard's beeswax polish and conditioner. I'm happy with the results, rusty hinges and all. I usually take restoration to extremes and in this case I tried something new with the Howard's and am happy with the result.

Today I ordered the parts mentioned above and will paint the bottom metal interior plate but not the wood sides. I will also make a missing piece for the rear vent cover from copper flashing.

The unit is fuse protected and the fuse protection does work. I tried putting the incorrect bulb in the heater indicator light socket and got a flash and blown bulb and fuse. It's the screw in type 6 amp and a replacement was easy to find. I have a couple extras also ordered from EBay as I like the cool clear glass fuses Pyrex made back in the day.

The racks and water pan are in the shed waiting for a warmer day to clean them up outside. They seem to be in great shape. Since this is a working 200 ac farm and I do the work I am happy to have the incubator on track. Now I can study the manual, incubation, chick rearing, and get the hen house ready on the side while I get ready to till and plant. It looks like I will have to use a temporary containment fence for a couple months until the sawmill delivers the wood for fencing the barn yard. I plan to build a shed roof run off the back gable of the hen house and have a picket fence day use side yard on the north side of the hen house. Everybody goes in at night.

Oh, and I need to run exterior water hydrants and power to three barns including the hen house. Power and water where you need it is a luxury. I worked restoring this farm for two years with neither running water or electricity.

If all goes as hoped for the incubator will have its own little heated building before fall. I'm also a new beekeeper we have two nucs coming in May too.

Thanks again Jack and db. Your help is most appreciated!

Couple pics of the Reliable incubator after a bath and some Howard's finish restorer.

Scott
 
Last edited:
We just bought one very similar. The heating coil is on the back not on the bottom. The wafer is just a metal rod that is in the front and there is a dial of sorts on the front we have let it run a few days but we are not getting the temp we need.. the fan is running but the heat isn't working.. what should I look at doing? I don't really want to get into it too much. But I am at a loss as to what or where to start... temperature control is what I need. I have a styrophom incubator that got busted but the heater still works and I assume I could put that into this box but my wife is not in favor of that idea as she has seen and read about fires caused by such great ideas.. I can try to post some pics later.
 
We just bought one very similar. The heating coil is on the back not on the bottom. The wafer is just a metal rod that is in the front and there is a dial of sorts on the front we have let it run a few days but we are not getting the temp we need.. the fan is running but the heat isn't working.. what should I look at doing? I don't really want to get into it too much. But I am at a loss as to what or where to start... temperature control is what I need. I have a styrophom incubator that got busted but the heater still works and I assume I could put that into this box but my wife is not in favor of that idea as she has seen and read about fires caused by such great ideas.. I can try to post some pics later.
The heater from a styrofoam incubator will not be big enough. Post some photos and we'll be glad to help you with it.
 

New posts New threads Active threads

Back
Top Bottom