Major update, it looks like a coop now! (Updated 6-18)

Firefyter-Emt

Songster
12 Years
Jul 26, 2007
236
1
131
Northeastern Connecticut
:rolleyes:
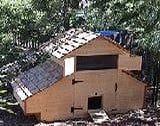
Well, I spent the better part of the day working on this. I had the bottom frame and the floor platform built before this. Today was the day to frame out the walls and build the roof rafters. I am happy to say that I did find a pitch whick will allow me to use 24" x 4' sections of metal roofing. This will allow me to cut the 8' sheet in half and get 48" of coverage with no waste!

I started in on the nest boxes as well, I will have three just because it fills the wall, but we only have the six chicks sitting in my shop awaiting thier coop. (2 wks old) The coop is 4' x 6' with a 6' x 8' run (Not counting the space that can be used under the coop itself.)

The run still needs to be framed out, but there will be three panels that are roughly three feet to fit the three foot hardware cloth. I will have nine feet of hardware cloth to fit into eight feet to allow me to wrap and overlap. I plan to run the hardware cloth up and down so it is one full sheet when seen, then I may have a foot and a half under ground if I cut the left over in half. The whole roof will also be covered with the metal roofing, but I may add some chicken wire over the bare rafters for a while to let the "money well" to come back up!
wink.png


Well, here is where I am at today. Now to ponder ventilation! (Any thoughts would be nice)

cc-3.jpg


cc-4.jpg


I like how the access under the coop will look. The angles on each side will be covered with siding which will be the same siding as the coop. (re-used cedar shingle siding) The back side and the right side will also be side to the ground, but the left side will have a hardware cloth covered hinged access door to clean out the run under the coop. I may fill this end with sand first, but plan to add sand to the whole run as time allows
cc-6.jpg


Updated 6-18-08 with progress photos!

I finished off the underlayment today and the nest boxes are done. I really like how the nest boxes came out. (Note the double walled treatment so that the inside of the box was "smooth")
wink.png


I need to add the roost in front of the nest boxes as well as the main coop roost, but mostly the coop itself is togather. Now I can frame out the run so I can get more rafters up. This is needed before the underlayment is put on the roof. Once that is done, I can get the metal roofing in place over the coop. Then I can turn my sights on getting all the doors built and the coop sided!

cc-8.jpg


cc-9.jpg


cc-10.jpg


cc-11.jpg
 
Last edited:
smile.png
Nice coop! I also spent the day today building mine... our uneven ground requires A TON of work to get a level floor but the footer, frame & floor joists are now in place (mine is 9X11 and tall enough to stand in) and the plywood is simply sitting ontop at this moment.

anyway...
Now to ponder ventilation! (Any thoughts would be nice)

I've seen this "box" sorta thing.. or maybe you'd call it an additional roof... but you could add one of these possibly and vent it all the way around...
here's a coop with something like that...
The Chicken Condo
ChikenCondo.jpg

except you could vent yours on all 4 sides...

that would be my idea...looks like your pretty handy with the tools there!​
 
Thanks all!

I was looking at these photos and a thought dawned on me for a major air-flow improvement. Once the rest of the roof rafters are installed for the run, you will not see the upper part of the roof that faces the run. I can make one huge triangle shaped fold down panel out of the roof section. The panel can have the very top tip cut to fit so that it will fold down flush to the next roof "truss" and lay flat against a stop block. I could add a couple braces so that the panel will not sag from sitting this way all summer. The end of the run will have the section above the door (Roof truss) screened in too. This will allow the air flow will go right into the coop thru the roof trusses. With an added vent on the outside wall I think I will get some great airflow.

I am also debating adding a window in the middle of the wall facing the run so I can let air in durning the winter time. Maybe sa couple smaller vent holes in the large fold down panel too. That way when the panel is shut for the winter I still have a place to let the air escape, yet is not in the direct outdoors. I might plan to block off the upper roof truss area on the run end to keep the drafts down. How much "non-closing" air flow should I plan to use for the winter? We can hit sub-zero at times here in Northern Connecticut.
 
Last edited:
Quote:
I would suggest making it so that all of your ventilation *can* be closed if you want/ need to. Even aside from occasional very cold snaps, there will probably be times when snow is moving very sideways and you'll want to close the upwind side of the coop completely.

FWIW, for ventilation openings you are specifically considering you're likely to use during the wintertime, I'd suggest making them high up on the walls (protected by roof overhang if possible) and not right next to or over the roost, insofar as possible.

It's a great looking coop! They will want to sit on the nestbox roof, unless it is vinyl-ed and used as a droppings board for a roost above it, so you will want to poo-proof it as much as possible
smile.png
I like the way the ridge of the roof continues out to the run.

Keep posting pics
smile.png
,

Pat
 

New posts New threads Active threads

Back
Top Bottom