I planned on some sort of foam on the back too maybe just some foam sheet material ripped down just to dampen up the blow if they roll into the side. Have your birds been able to stretch their head under there and eat at the eggs? I suppose a deeper collection area is best so they cannot reach the eggs.
I planned on some sort of foam on the back too maybe just some foam sheet material ripped down just to dampen up the blow if they roll into the side. Have your birds been able to stretch their head under there and eat at the eggs? I suppose a deeper collection area is best so they cannot reach the eggs.
With the 12" collection area they haven't been able to reach anything (although I don't know how hard they've tried if at all). But Opa's original design was a 6" collection area, he increased to 12" for that exact reason.
Yes I came across his threads as well, I like his 6 nest unit as well and his rubber "curtain" he has to keep the hens from seeing the eggs in the back of the box
So, I'm trying to understand how you have this situated to be able to collect the eggs from the outside. Is it half outside and half inside? I didn't see any pictures of it from the outside - do you have any that you can post, please?
So, I'm trying to understand how you have this situated to be able to collect the eggs from the outside. Is it half outside and half inside? I didn't see any pictures of it from the outside - do you have any that you can post, please?
typically, that's how it works, but the folks from this post haven't been on it since 2013, so your odds are not good they will answer. You can search this site for newer posts.
After doing a bunch of reading and looking at all the pics in Opa's thread about his new design, I decided to take a crack at building my own set of roll out nest boxes. I have a sweet little EE who lays 5 large/jumbo green eggs each week but has become an egg eater, if this means I don't have to cull her, it was worth the effort!!
I built my boxes using left over scrap lumber from other projects, mostly 3/4" and 5/8" OSB, some 3/8" plywood, and a small sheet of 1/4" particle board. So I had to come up with my own plan, to fit the lumber I had available, but I was still able to stick with basic dimension recommendations. The boxes are ~10"x12"x12" in the front and 12"x12"x12" in the back. Most of my OSB was already cut at 2'x4' so I just went with 8 boxes. The plywood was 18"x4' so I have a ~6" flat area at the end of the ramp, but I think that will work ok.
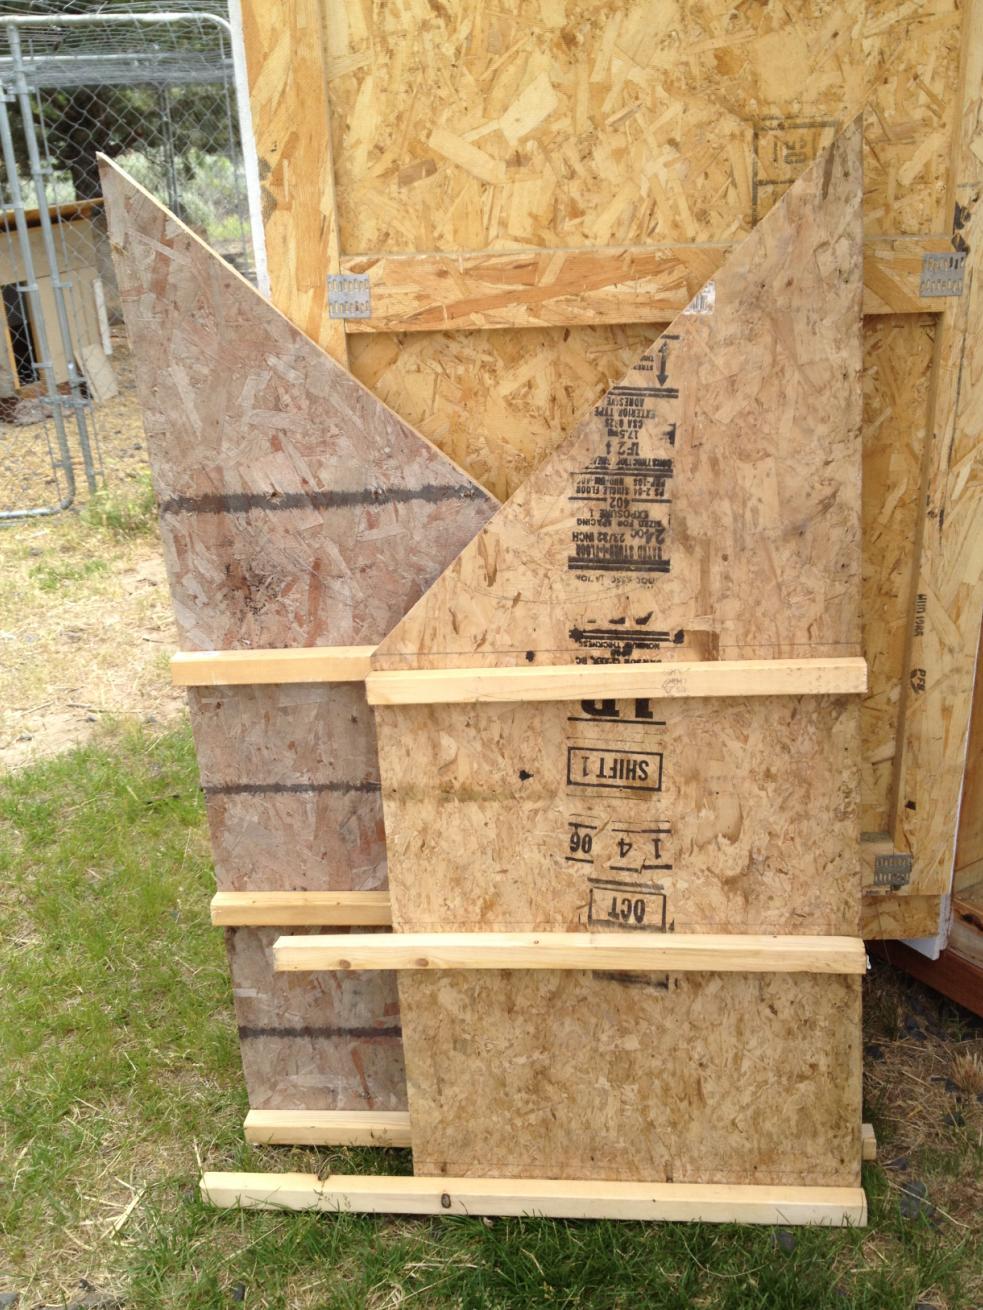
Getting started, drew my design/dimensions on my 8' piece of OSB and laid out the dividers for a test fit before cutting.
My little helper... Very helpful and loves to hand me dropped pencils, fetch screws, etc.
Don't worry, he knows to stay well away when I'm using the circular saw.
The sides are done. I added the 2"x2" so I wasn't drilling into the ends of the OSB "shelves". This way I can drill down into the 2"x2" to attach them. I extended the lower ones so they can serve as supports for the entry steps.
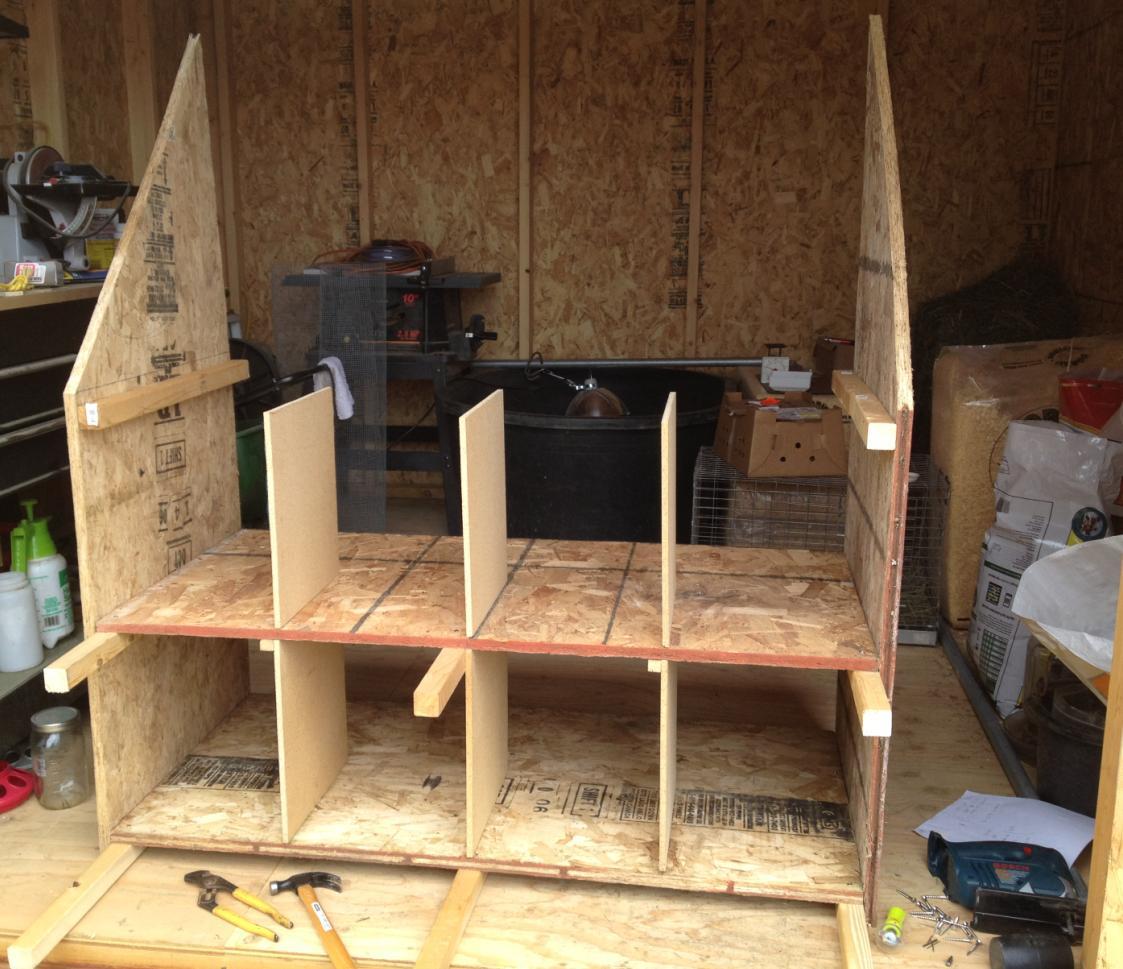
Adding the shelves and dividers. I did this in steps, 1) I glued the bottom of the dividers to their respective shelves and used a few finishing nails with each to hold them in place (to impatient to wait for the glue to dry). 2) I screwed the little support pieces to the bottom of the middle shelf. 3) I installed the two shelves and connected the tops of the bottom row of dividers to their support. Then repeated steps 2 and 3 with the top shelf.
I put everything together inside my shed, we had thunder storms all day long and I wanted to be able to just close the doors and run for the house if it started to dump rain.
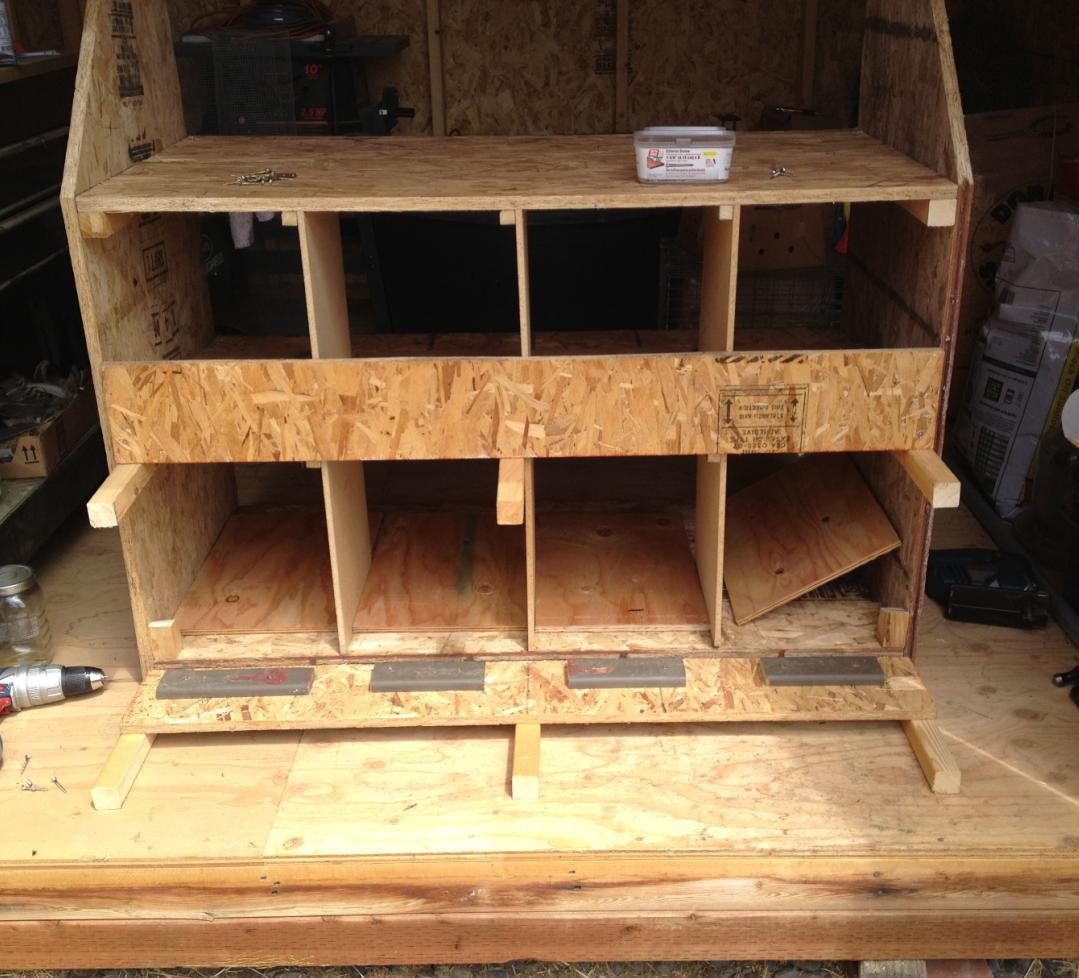
I really liked Opa's ramps, and had the perfect 1"x4" scrap to use to duplicate his ramp angle with minimal cutting, right until I realized that my ramps were only 18" (vs his "24) and I needed to decrease my front height to 2 5/8" to keep the same angle. After searching through my scrap for something that would work and require less cutting, I found the perfect boards, but they weren't long enough to make side ramps. So I decided to just put them at the front each nest box, with a brace at the back of each ramp I don't think they will slip off.
On the bottom row of boxes, in the lower left and right corners, you can also see small 2"x2" scraps. These were to attach the front trim pieces. I would have used them regardless (the whole didn't want to drill into the ends of OSB), but since all my wood was already cut at 4', meaning the shelves and trim boards were the same length, the trim boards don't actually reach to the outside of the side boards. Oops...
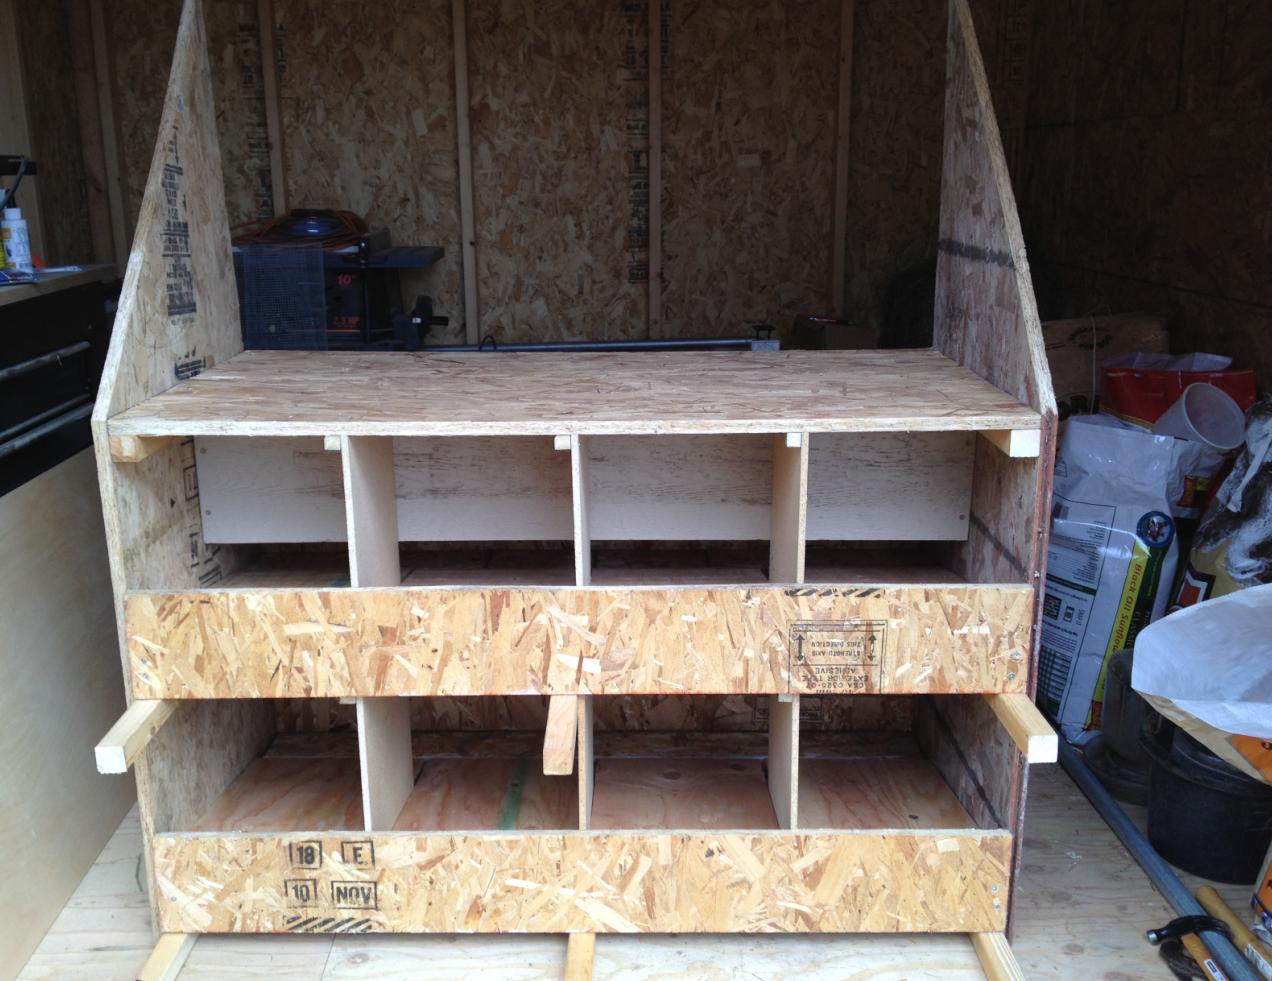
One back board in place, I left a 2 3/4" gap to accommodate the height of whatever fake grass I end up with and still have 2" for the eggs to roll under. The back boards are held in place with 4 screws so I can adjust height pretty easily if I need to.
At the back of the bottom row of ramps you can just see the stop board at the end of the egg collection area and a bottom board to act as a brace for the ramps, a nice little piece of scrap siding that just happened to be the right length and thickness.
I'm ready to paint once the clouds clear up. Once I've build a base stand for it to sit on, and gotten it moved (thank goodness DH is strong, this thing will be heavy!!), I'll add a hinged top board for storage on top and the steps. Didn't want to add steps until last as they will just be in the way while painting/working on the front of the boxes.
Looking good. Do you have pictures of the collection side? Have you thought about adding a pushout bar to keep the from roosting in the boxes at night?
typically, that's how it works, but the folks from this post haven't been on it since 2013, so your odds are not good they will answer. You can search this site for newer posts.
I do that all the time! Post on old posts and Yes the outside egg nests are like an open bookcase inside with perches. I would you tube how to make a nest box and you will see many options. Have fun!
Looking good. Do you have pictures of the collection side? Have you thought about adding a pushout bar to keep the from roosting in the boxes at night?
Yes I have seen that too. My concern with that is that if a chicken is in the box when it closes, they are trapped.
Better to push them out I think. Like in this video. Notice how the Push Out panel doesn't go all the way to the bottom, even at it's lowest position, that is so it doesn't push the eggs out, just the bird. Neat.


 and Yes the outside egg nests are like an open bookcase inside with perches. I would you tube how to make a nest box and you will see many options. Have fun!

 Question of the Day - Wednesday, January 28th, 2026


 BYC's 52-week Photography Challenge. Week 3: (Jan 19-25, 2026). Theme: Hot, Hot, Hot!
 BYC's 52-week Photography Challenge. Week 4: (Jan 26 - Feb 1, 2026). Theme: Books!