New Hen House build

Thank you to everyone for their very kind comments.


Beautiful setup!

Just a question: if you have netting on top of the pen, are you going to put the chickens to bed every night? Or have an automatic door? I have a pen similar to yours and the coons just climb right in and make a tasty meal. So I'm thinking of putting 2 electric fence wires up - one 6" from the ground and one 4" from the top. That should stop the coons...I don't have electricity in my coop, so the auto door I got won't work & sometimes I get home late.

Cheers,
N. VA

I'm not positive how all this will work out when it's finished.
From what I've read chickens will put themselves to bed at or around dusk. I have no actual experience with that myself as my first chickens are less than 2 weeks old.
I do have an automatic door that I made; It was one of the first things I tackled when I started this project. I think it's on page 3 of this thread.
Which manufacture of Pop door did you go with? Or did you make it yourself?

Sorry to hear you are having raccoon problems.. I'm really trying to avoid that from happening. Are you saying you have netting covering the top of your run and they are still getting through? How many chickens have you lost?
Originally I considered using hardware cloth to cover the run, but they don't exactly give that stuff away. In lieu of costs I went with a Cutler Supply netting.. more so for the aerial predators though.

I'm really trying to avoid using an electric wire around the pen. I've used them in the past to protect my gardens from deer but it always became a bit of a pain when the grass grew up and grounded out the hot wire.

Get that pop door operating and you may not need the hot wire. Are you going to run the power yourself, or have it done? I feel very comfortable doing electrical work, if you have any questions I would be more than happy to help.

Sincerely,
Gerry
 
I know I haven't updated in a long time.. but I do have plenty of progress pics. I'll submit separate posts for each of the projects.

I finally attached the aviary netting to the top. This was a pretty frustrating task to tackle alone. I just tacked into place with screws in key locations. I plan to go back with some 1x redwood material to give it a finished look.


I made the main door for the run with rw 2x4's and connecting them using mortise and tenon joinery.


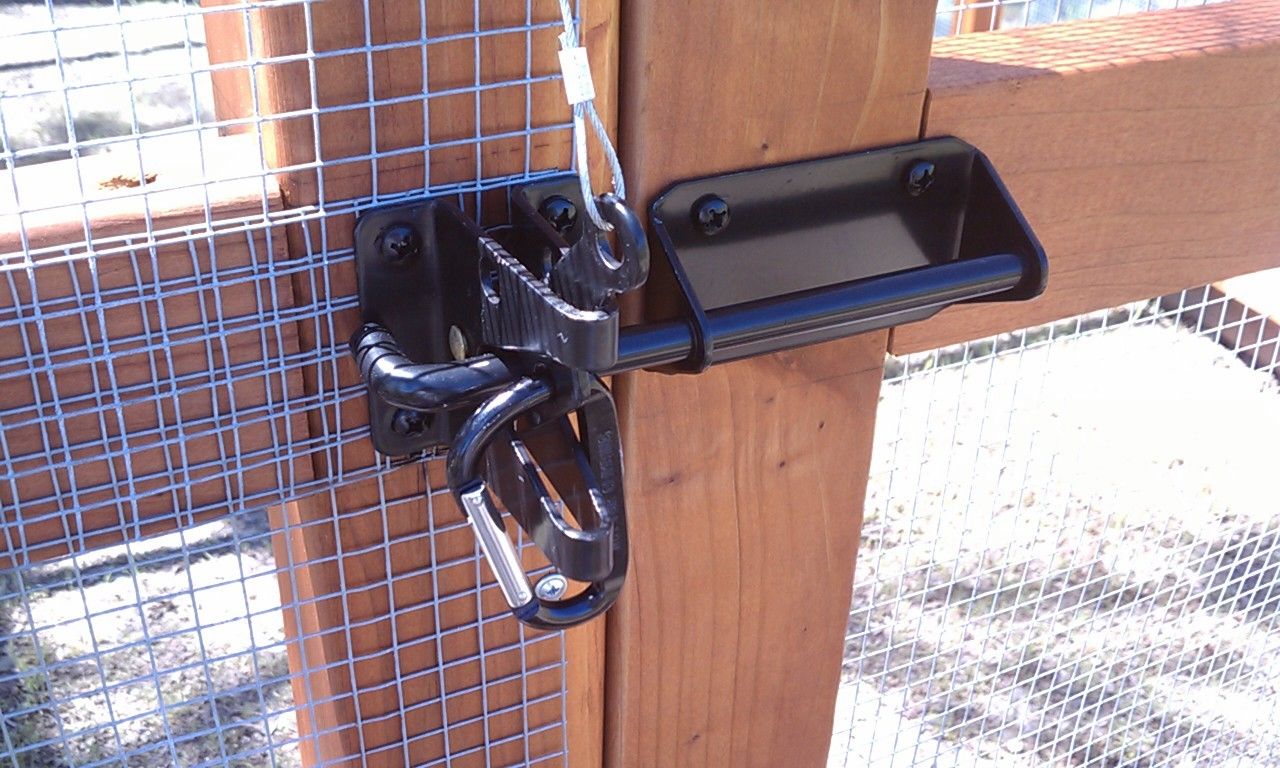
Standard gate latch, handle and carabiner lock.


Unlocked


I used 1/16" aircraft cable so I can open the latch from the inside.


This is the second latch I installed that will hold the door open when they free range.

 
The second door I've been working on I made using similar mortise and tenon joinery. I wish I had used a better grade of pine. As I started to mill the wood to size, It started to bow pretty bad. The more I worked with it the more stress was released and it kept getting worse. I had put so much time into the joints, I chose to use it anyway. There are still a few things I can try to remedy the bow.


Shot the joints.. this was done in six places.


An assembly shot


Close up of the T&G assembly


After a lot of sanding.... Installed view from the human side


...and from the poultry side


I'll bore the holes for a standard door knob and lock.
Plus, I still need to secure the hardware cloth to the door. I'm just happy it's on.

Updated pic of the installed hardware cloth.


Last edited:
The next item that was installed were the droppings boards and roosts. I give 100% credit to "Thespoiledchicken" and her awesome thread! Thanks Trish!
https://www.backyardchickens.com/t/621363/poop-board-convert-warning-graphic-gross-poop-pictures


Sorry, I didn't take any pics of the assembly or mounting the shelves to the walls .. Just this shot before I painted it.
I made sure to seal every inside edge with a good quality caulk as per a recommendation on Thespoiledchicken's thread.


Fresh coat of paint


As far as the roosting boards.. I decided to use L brackets whenever the board came into contact with a wall. I wanted them to be somewhat hidden.


I used the cleanest df 2x3 studs and cut a 1/4" radius on any edge their feet would come into contact with.
Using my router again, I cut a dado into each of these corner boards to they would all be at the same level.

Then of course a ton of sanding.


The finished product.


I decided to use a simple 22-1/2degree angle for the roost supports at the ends.
I screwed them in from the bottom of the dropping boards and one in from the side of the 1x4.

In this view, placing my hands on each of the roosts.. they support my weight without creaking, or moving... I'm very happy with how sturdy the are.


As far as dimensions..
The width of the droppings board is 24".
I set the roost bars bottom edge at 9" above the droppings boards.
 
Okay, last update for today. You may have noticed in a few of the pics... I made the baseboards from the same cheap rough pine. I just cut them to size (height) and ran a 1/2" radius on the top edge. It was much cheaper than buying pre-made base at that height.

This is a quick shot of the auto watering cups I set up last night.

I decided to make my own couplings to attach the cups to the main line. Considering it is being installed indoors, I just wanted to be safe.
I outline what I did in a previous thread.
https://www.backyardchickens.com/t/632490/watering-cup-brackets-cracking-solved#post_8537766


Next on my list... I'm working on the designs for a roll out nest box... and of course finishing up the human side of the coop.

Thanks for looking!
smile.png
 
All I can say is WOW!!!!!!!!!!!

This is nicer than my house
lol.png


It looks fantastic. I know your babies are going to love it. I can't wait to see pics of move in day.
wee.gif
Thank you for the very generous compliments.
The "Kids" have been in for about a week now and I couldn't be happier with the results.
On the first night four of them were still hanging out in the run, so I helped them in the coop.
The second night just one of the SLW's was still in the run.
On the third night and every night since then they have all been inside when the auto-door closed. Y-yess!

Plus they just started using the in-wall feeder and a few of them are using the watering cups now. Very proud of them!

Are you going to paint or stain the door?
That's a great question... I haven't really decided. Originally I thought about painting it, just so it could be wiped down.
Now that it's up, I kinda like the look of the pine.

What are your opinions?

Any suggestions or recommendations out there?

really beautiful craftmanship. i would love to take a class from you. what breeds did you pick & why?
Thank you, what a great compliment. I really do appreciate it.

I have Silver Lace Wyandottes, Blue Laced Red Wyandottes that I received from Jerry and Rebecca Foley about six weeks ago.
Black Copper Marans (Bev Davis) that I bought from Heaven Sent Ranch.. they are about five weeks old now.

I picked the Wyandottes because of their beauty. With their lacing and the deep rich colors, I think they are absolutely stunning!
As far as the Marans.. I think they are a very statuesque and Regal looking bird.. (and I wanted their dark eggs).
wink.png


I couldn't be happier with my choices; I have some very sweet birds.

this is going to turn out nice I'd love to see the finished project.
thumbsup.gif

Thank you. I have to admit, I can't wait to see this project finished as well. Ha ha!
big_smile.png

The only thing I've done was to make the access door for the in-wall feeder. Not much of an update, I know.

I'll continue to post with progress picks of the human side of the coop as I go.

Thanks to everyone for the great questions, compliments and encouragement.
 

New posts New threads Active threads

Back
Top Bottom