Well we processed a few more meaties tonight and we got some pics... I hope no one is upset if they are too graphic, if so, just let me know and I will delete them off of the post.
We had 4 birds that hit weight goals +some... so planned to do them after Radioman got home from work. Busy around here lately with broodies hatching and lawn work increasing. When I got home from work this morning I seperated the 4 into a large chicken crate (with water available) and sat it in the shade away from other activity.
We have been very lucky... our birds have been able to grow to pretty good size with good health. I had hoped to keep one or two of the hens for eggs if they stayed slimmer but in the last 2 weeks they really packed on some size so I knew they weren't viable to grow out to adulthood. Maybe some of the group we have left.... who knows.
Our birds today ranged from about 8 to nearly 11 lbs live weight... here is one standing next to a 5 gallon bucket for reference.
As I showed in my previous butchering post, we use the cones and bleed our birds. Here Radioman demonstrates the position he will make the cut. Finding the angle of the jaw, cut just under it toward the back of the neck.
After we bled out the birds we washed them in warm soapy water with some bleach in it, and then dunked them in the scald water (temp between 150 and 155 degrees) till the wing feathers were easy to pull. They then went to the plucker, then the cooling tub to wait for a few minutes till we were ready to finish the processing. My previous post on butchering had pics of those steps, but in this one we got more picks of the cleaning/finishing part of the process.
This is very graphic from here on out...
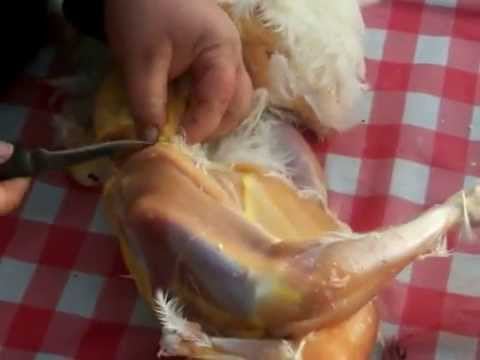
I remove the head just under the jaw... then on the underside of the neck I slip my filet knife tip under the skin and cut the skin open down the length of the neck to where it joins the body. You can then slip your fingers between the skin and the meat of the neck and pull the skin away from the neck. There is a lot of fibrous tissue under the skin that may free up easier if you touch it with a filet knife, but once you have done a few it frees up pretty simply. I prefer to leave the skin attached at the base of the neck to the body, it is nice for holding in stuffing if you are baking the bird whole, or even to help with holding in marinade if you are doing it. You can always cut it off later if you don't want it for anything.
In the pic below I am holding the windpipe, right above my fingers in the pic is the esophagus (food tube to stomach) and the deflated balloon looking thing above and to the left of my fingers is the crop.
Pic below shows me pointing to the area the crop is attached to the breast meat at the base of the neck. The crop is held in place against the meat by an overlay of fibrous tissue. Once you locate the crop you can either pull it free by running your finger between it and the meat and break through the tissue that way or use the tip of the filet knife to cut it away. I try to not puncture it to avoid spilling anything out of it. It was actually easier when we did our first bird with some food in his crop to help us as newbies find it, but I prefer working on them when they are empty.
Using a sharp but strong bladed knife I cut through the back of the neck at a point about even with the 'shoulders'. This is made easier by firmly holding the neck in one hand and bending it sharply downward, with the other hand use your knife to cut into the meat till you feel bone, then allow the knife to slide along the bone till it hits a joint between 2 vertebrae and it will cut through rather easy. I cut about 2/3 through from the back....
Then bend your neck back the other way and cut the rest of the way through to remove it from the underside.
After the neck is removed, you can grasp the windpipe and esophagus in one hand and pull it to the side and slide your fingers between them and the edge of the opening into the body cavity, this will break them loose from the tissues that hold them in place and make their later removal easier. Then pull them to the other direction and repeat on the other side till they are free of attachment to the body and are just hanging loose.
Then turn the bird around to begin work on the other end for evisceration...
The 'tail' is the end of the tailbone and also is the area where the oil gland is... you don't want the oil gland to remain at all. I choose to just remove the tail, though I have seen others who remove less... but the oil gland does need to go, either way.
I cut across at the base of the tail, cut between the vertebrae...
The pic below shows some landmarks that will be used for the next few cuts. Just above middle of the knife blade is the end of the breastbone. The funky looking lump seen at the bottom is the underside of the tail (the cut has already been made through it on the other side. The bumps just above the tail on the left and right are the ends of the pelvic girdle and are easily felt when you are dealing with a real bird, but hard to show in picture.
Pull the skin slightly away from the body at the point of the breastbone and make a side to side cut through just the skin about an inch across. Then cut downward from each end of that cut to join the cut which you made earlier at the base of the tail.
Very carefully cut through any fat you have exposed to open the back of the body cavity....
Either flip the bird over or stand it up on it's end to do the next step. Carefully complete cutting the tail free by cutting along either side of it between the pelvic bones. This needs to be done carefully because you actually want to keep the vent and intestine intact (at least that is my preference) The 'tube' between my fingertips and the knife blade is the intestine where it joins the anus. This can be freed from the body like we described freeing the crop. carefully work around it with either your finger or knife to cut through the fibrous connective tissues. you will end up with a cap of skin which includes the tail, oil gland and butt and it will remain attached to the entrails via the end of the intestine.
Lay the bird back down, with the cap loose you can now access the body cavity for evisceration. I hold my hand flat and run it into the bird tight to one side, then the other. When I have reached in as far as I can I run my hand up and down the rib cage to loosen everything, on the second side after I finish loosening the entrails I curl my fingers slightly to pull them out as a whole.
With practice you can get everything including the lungs, windpipe and esophagus all at once, but don't worry about trying to get that much until you have done a few and get used to what you are feeling. The primary thing to do is get the intestines and liver out and out of the way first. (the liver because it has the gall bladder attached and it is easy to puncture and is filled with green bile which is gross and foul smelling. I like to get it out right away to avoid breaking it by accident)
Once you have the intestines and liver out of the way you can reach back in to scrape the body cavity, the lungs are tight to the backbone near the neck opening and there is a channel on either side of the spine which houses a lot of blood vessels and some other organs type tissues that need scraped out with your fingers or even a scraping tool.
In the pic above each of my fingers are pointing toward the channels which lay on either side of the spine...
Cut the legs off at the joint. If you bend the leg sharply and place a sharp knife into the depression it will open up quite wide, then just slide your knife between the bones to cut the ligament and seperate the leg.
Then rinse your birds....
and line them up for a show off pic...
Our finish weight ranged from 6 lb 8oz to 8lb 6 oz. They are resting in the fridge for packaging later.
Reposting this for pic purposes, this shows some of the cutting around the vent area. It isn't a difficult process, but definitely not the place to try to hurry. Take your time and you will be used to it after a few birds and your time will improve.
Can anyone post how to make the cuts to actually tuck the legs into the skin? we have a rotisserie and it would be great to know how to do this better next batch! we tried a bunch of ways, but just didnt get it right!
Can anyone post how to make the cuts to actually tuck the legs into the skin? we have a rotisserie and it would be great to know how to do this better next batch! we tried a bunch of ways, but just didnt get it right!
Here's one of the most thorough articles I've seen on butchering a CX at home here on BYC....just scroll down and you'll find those pics~among all the others on butchering in the article~ about which you ask. I've shared this article over and over to newbies, so you may want to bookmark this one, it's a goodie!
Here's one of the most thorough articles I've seen on butchering a CX at home here on BYC....just scroll down and you'll find those pics~among all the others on butchering in the article~ about which you ask. I've shared this article over and over to newbies, so you may want to bookmark this one, it's a goodie!
Here's a poorly done vid clip out of a processing vid I'm putting together....all very amateur, so please forgive the poor quality. I'm none too good at speaking on vid and my son's none too good on getting zeroed in on the action.
Need some advice on chicken processing. We just completed our second round and seem to be doing something wrong. It is my understanding from reading that rigor should eventually relax. Ours remain stiff in a full upright pose making them difficult to fit in a roaster. Processed Sat and still stiff Mon morning.
Need some advice on chicken processing. We just completed our second round and seem to be doing something wrong. It is my understanding from reading that rigor should eventually relax. Ours remain stiff in a full upright pose making them difficult to fit in a roaster. Processed Sat and still stiff Mon morning.
Not sure if you are using CX or DP birds, if you are free ranging or pen raising your birds, but a lot of that has to do with the tightness of the muscle fibers prior to death as well. Those limp, rubbery CX found in the store have come from extremely young birds that barely moved all their lives and then they have saline injected into the meat, which works like a corrosive substance that dissolves fibrous tissue, leaving it mushy and the tendons and joints loose.
I could let my free range CX or DP birds rest for days and it wouldn't relax those very toned thighs...it would have to decompose before that would happen. That's just healthy meat for ya.
CX=Cornish Rock Cross, the most common broiler chickens raised for meat in the US, particularly by commercial growers.
DP=Dual Purpose, breeds that are bred to provide both eggs and meat and are the most typical breeds found in backyard flocks.
And, yes, the free ranging is a factor as to whether they are ever tender and "relaxed" enough to have their legs just fall to the side or be easily moved after death. Those are very toned birds and, even after rigor mortis has come and gone, they will still be stiff and the muscle fibers and tendons will be taut and inflexible compared to the CX, which are birds that are merely 2 mo. old when killed and have not moved further than the water nipple and feeder all their lives.