Smoky Mountain Hen House - COMPLETE!!! (pg 5)

Quote:
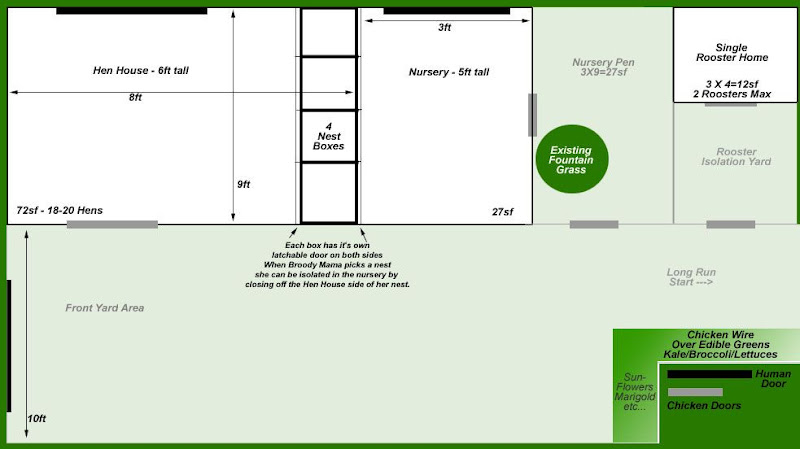
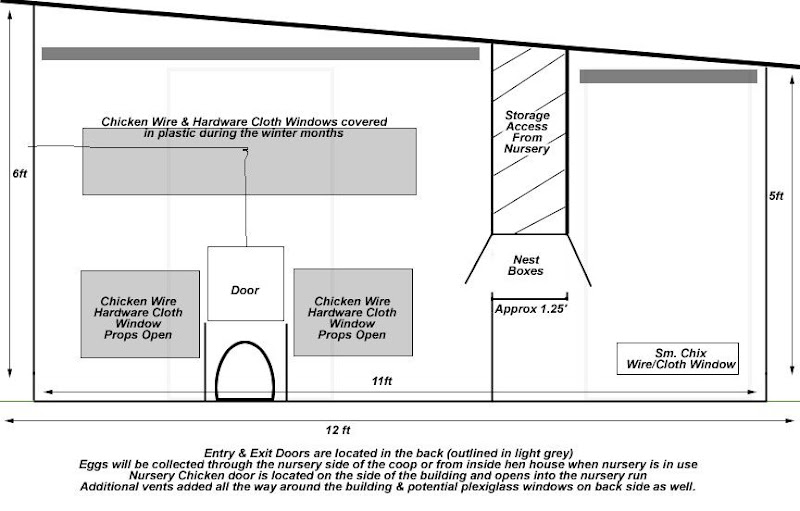
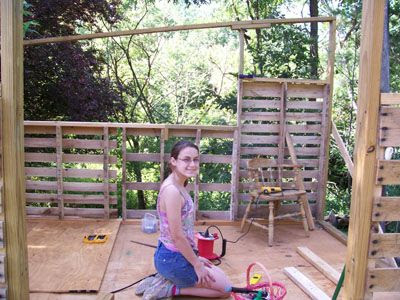
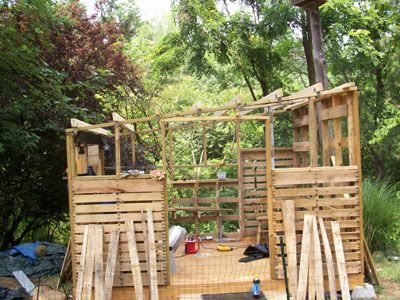
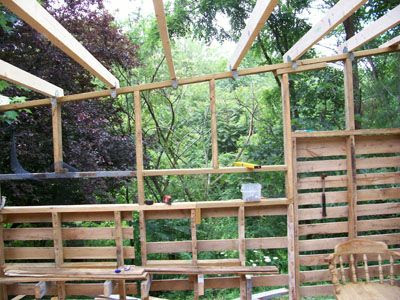
I really like the idea of having a seperate brooder area or nursery. I do as well. My reasoning is that if I allow a broody hen to sit on eggs or supply her with eggs, She will not need to be moved when chicks hatch.
If she is left with the hens in the coop once the chicks hatch you have to move her. So, I am going to give the broodies their own area, with nests just slightly off the ground so the chicks will not get hurt.

Also, when you get babies in July and then later if you choose, you have a broody area for them. No need to ever have them in the home like most do with day olds.

Just keep planning with the future in mind and ease of raising chickens.
 
Ok...
We went to lowe's, sized the TufTex roofing we want to use & tweaked the sizing & orientation to accommodate 5 $30 sheets -$150, to me a fair price for a nice roof. We are buying 3 smoked panels and 2 clear installed in alternating fashion so they will have alot of natural light but not too much...
We also measured the actual space we have in mind, and we just couldn't squeeze in any more length without seriously transforming our yard, this way, some natural yard elements will be in the nursery run, which should be nice for them.
Here's my updated plan
chix%20coopREVISED.jpg


and here's the new frontal view ideas, also includes a bit of an inside & back view... I just love doodling in photoshop!
smile.png

chix%20coopFRONT.jpg
 
So here we are... about 6 hours into construction & prep. We have had to rethink some things as expected but mostly on how we are going to house many roosters, babies & hens. We will have to add a breeding run in order to keep track of who belongs to who, fortunately that doesn't really change our hen house plan, so off we go!

The frame is layed out. Purchased
9 Pier Blocks
5 - 2X6X12's for the frame (cut down) and waterproofed
8 - 2X4X12's for the floor joists & base plate (what you attach the walls to on the floor)
We chose UNTREATED wood, for lack of chemicals, and lack of eventual shrinkage from not using it cured. All natural lumber was waterproofed with Thompsons Water Sealer
4 - sheets of flooring plywood, waterproofed on the side that faces the ground under the coop.
5 - 12' panels of TufTex plastic roofing

We also purchased, a roll of 1/2" hardware cloth for windows, joist hangers to make our lives easier, a roll of metal "vent" material for venting, long deck screws for putting together the frame, and probably a few other misc. things, but nothing major.

Total Cost for Round 1 at Lowe's: $401
Thats a lot, but what we're building should last 10+ years without major repair and can be repurposed as just about anything if we get out of the chicken raising game.

Onto the pics.. real pics!
Darling daughter waterproofing our new lumber & ply
LexiSealsWood.jpg


the next day or so:

Here is the 2X6 frame set in place with the 4 corners on blocks. LOTS of digging to get it level, nothing in the Smokies here is flat, not even what looks flat. This took a few hours to accomplish.
6-20no2.jpg


Here we have all 9 pier blocks installed & the frame leveled. The center 2X6 is in place (to add more support) and floor joists are going in now.
6-20no3.jpg


Here I am installing the floor supports which go from joist to joist pulling everything together to work as one floor:
6-20no4.jpg


And here are hubby & I laying out the plywood flooring, one sheet fastened already. We did move one of the floor joists over to fall right at the edge of the ply to make building easier. They were on 16" centers, more than adequate, but now this one is more like 20" so we added more support there to help with the extra gap.
6-20no6.jpg


I only included some of the key pics here.. for the full set of building images & chicken plans etc you could visit my Chicken Planning Album: http://picasaweb.google.com/bodyflight.net/ChickenPlanning

So glad to have actual photos to share now.
Today we're off to Lowes to pick up a vinyl floor, which should last longer than our planned hardwood floor underneath course sand, which is what we're going to be using for the chicken coop. After that.. it'll be time to figure out how to make walls, windows & doors out of all the scrap lumber & pallets we've found & have been donated. Wish us luck!!!!
 
Last edited by a moderator:
Let me first start by saying my local Lowe's in NEWPORT, TN is completely useless. They never have anything cheap stocked, and so the vinyl floor is OUT OUT OUT. Instead, and for a few dollars less, we bought a 10X13 pond liner! what could be more perfect for a sand & gravel base than a pond liner I ask you? PLUS it's oversizes so we can flip it up around the wall edges and keep everything contained.. AND we can easily remove it for cleaning NOT TO MENTION that if we give up on the chickens, my husband is waiting to steal it for his "dry creek bed" to make it so it actually is a pond/creek of sorts with water LOL...

So we got our sand, 1.5 tons, hubby bought extra for a path project and he & DD shoveled half of it next to the hen house and it is waiting to go in.

We have 2 walls up & are starting the back wall tonight. I've written all about it in my BYC blog with some pics & a link to all the pictures are at the picassa link.

Here's our current state of construction as of 30 minutes ago...
frontwallcomplete.jpg


It's starting to look like somethin....
wee.gif
 
Well... we're making good progress... 4 walls up and roof structures is going up, however, we have had nothing but torrential rains here lately.. every frickin day
<start rant>
barnie.gif
my NEW FLOOR is already warped & waterlogged!! I send the DD out after every rain to sweep off the water, and it's watersealed but it's still plywood, it shouldn't get rained on, I just didn't think it would take this long to build!!!
he.gif


THEN of course, DH is not a "builder" type at all, yet insists on taking over my pet project at every turn and so it's like torture to get anything done around here! He's of the laid back mindset that just about anything is "good enough", and I am the POLAR opposite in that I want to get it as right as possible the first time, I do NOT want to be "repairing" the hen house year after year... I would like this building, because that's what it really is, to be safe & secure for at LEAST 10 years!!! with mimimal repair & adjustments but CERTAINLY nothing structural. This is why I spent the money to build the floor frame with good wood & money on the roof structure too, just for "insurance". For me, this is an investment of our time & money & shouldn't be treated with any less respect. We worked hard for this money we're spending and it all shouldn't fall down in a couple of years!!!!!
</end rant>

So... here's to hoping,
fl.gif
the rain goes away for a week until I get my rain barrels & this hen house protected from the weather. Gosh I sometimes find living in a rain forest slightly annoying. Someone, send good vibes.... puhlease?
 
I have to give you credit, Your rant was worthy of reading. Just the facts, No personal dramas.
big_smile.png
If I could I would trade you some of this Sunny Ca. weather
cool.png
for some of that rain. Sure could help us with all these fires.

Best of luck to you with the weather and getting that roof on. I am with you about doing it right the first time.
wink.png
So stick to your plan and when hubby wanders over let him help a little.
tongue.png
 
Dilly, thank you so much for your support, I appreciate it.
and thanks for the credit, also received & appreciated.

I used to drive up to Topanga Canyon & Malibu every year to watch the fires... used to be a valley girl for a short while... I hear your plight and feel your frustration.

hugs.gif
 
Well.. we're finally making some good progress, and here are the pictures to prove it...
The rear wall started, one full palette featured here...
1palettebackwall.jpg


The rear wall completed, we used 3 different palettes, in 2 sizes, because that's what we had (this is our 13 year old daughter working hard). The palettes left an interesting area to be framed.....
3palettebackwall.jpg


Here the last wall, the tall wall is going up, first palette in place...
progressWall4goingup.jpg


Last wall complete, with 2 full size palettes which were both 7' tall
wall4complete.jpg


Roof framing is done, and back wall is finally completely framed in
roofframing.jpg


Ok.. now FINALLY a FEATURE!!!
Since there was so much space left after we used the palettes, I decided to build the nest boxes in here, the middle palette was sized perfect for the framing(bottom supports in now). And since the nest boxes are here, I decided to put a ROOST above the boxes with a newspaper dropping board. So I framed in an access door so I can clean up/replace the newspaper from the outside of the hen house.
backwallfinalframing.jpg


And here is the finish of the nest box main frame (dividers will be added later my chix are only 1 mo. old!!) the top of which will be the droppings board. (that's me btw)
buildingnestboxes.jpg


DH installing roof panels
roofgoingon.jpg


Here I am hammering poultry staples into the hardware cloth windows, while DH installs the window screen interior walls. You can also see we started covering the gaps in the front palettes with extra boards...
screensNwindows.jpg


The roof is on, and I think tomorrow the chicks may be able to hang on in the house for a while while we finish up. Have to put down the pond liner & shovel some sand, but after that.. they should be in for the days anyway.

Thanks so much for all your support....
 
Keep up the good work. I love seeing the whole family working together on a project. Looks great and you really thought it out well.
dixy
 

New posts New threads Active threads

Back
Top Bottom