So, my husband and i just bought our first house, on Oahu, where we recently moved. I don't quite know when or how i came up with the idea of CHICKENS! but it happened, and now we have 7 little 2 week old Plymouth Rocks and Light Brahmas in our living room. So, it's coming up on their moving outside time and the construction that took forever in the front yard (where they are going) is done so we started the coop this last weekend. i've been surfing this site and google image for months now and have gone through several designs and redesigns. what i've finally come up with is a 5x16' structure. it's essentially going to be a 3 sided coop since our temps fluctuate between 65-90* year round. since we are told that we get a fair amount of rain during the rainy season, not to mention the sun shines a lot, i am going to roof all but the final 4' or so and the floor will be covered in 6 inches of sand. the coop and run will essentially flow together with the roosting poles, poop board, and nesting box area getting a bit more protection. the part that isn't plywood wall is going to be galvanized hardware cloth.
now, keep in mind as you're checking out my post that neither my husband nor i have so much as swung a hammer in the last decade. what's worse is my husband thinks he knows what he is doing. i had to put up a big fight about asking a neighbor if we could borrow his sawhorses rather than just using that small wall there and maybe a coffee table over there. And then there was the scene where he wanted to use a small hand axe as a hammer, which was fine because HE HAD DONE IT BEFORE. Grrr. already i sensed coop disaster or possibly divorce. anyway, i digress.
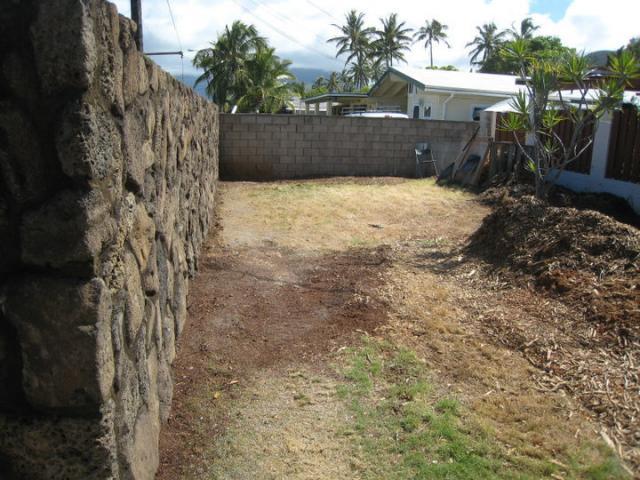
here is a picture of the front yard which looks like crap right now as it's been under a mountain of debris for the last month and it hasn't rained much to boot. the coop is going in the far left corner. that's a very rustic compost pile down their on the right and that pile of stuff in the foreground is the leftover mulch from the 8 ft of bushes we chopped down to replace with a lava rock wall. it's better for the chickens right?
my original plan was to get the wood up off the ground by digging in a base of 8x8x16" cinder blocks -plus this would help foil any evil rats and mongoose who might get it in their heads to dig. however, that plan quickly changed when we got out the digging tools. after a couple hours of pain and suffering, we settled for getting the blocks in level. the dirt here is all rock hard red clay and it's like driving a shovel into a rock. i'm actually curious about how well a mongoose would fare digging. so now i guess i'm gonna have to fork out more money for a skirt. hardware cloth is expensive right? well, it's even more expensive here, as is everything. anyway, ill worry about that later.
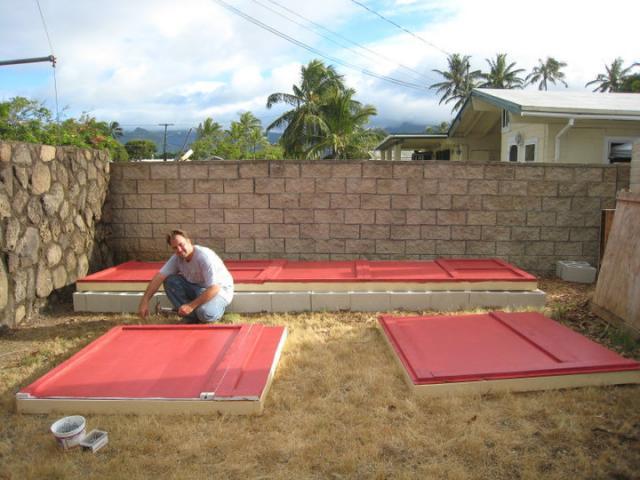
so this last weekend we drove over the mountain to home depot and bought supplies for framing, priming, and painting. Home Depot proved to be a lesson in how nothing is actually the size it claims to be. thankfully a couple months ago, we had the presence of mind to beg a bunch of crappy crate panels off of our movers and collected enough panel-age for walls. sunday we started cutting everything to the actual size we wanted it to be and then knocking the frames together.
here is a picture of the carport scene. that's one of those pieces of crate there and in the background is Mr. Self Confident leaning on one of the side frames and panels. behind all that you can glimpse the barrier of cars that we put up to discourage any nosy neighbors from wandering over and disrupting our work flow. it worked! well, mostly.

and here is the back wall pieces cut out and sized and leaning on their frame, which you can't see.

and lastly, here is the front wall frame. that's me leaning out of what will eventually be a window in the one 5 foot panel that will be walled in on the front side. underneath the window will go two external nestboxes for our biddies. to my left, your right, will be a 3' wide and 5.6' tall door. we had to make the door a little bit shorter than desired because the cinder blocks raised the coop up about 7 inches and we don't want the roof to be so tall that it's clearly visible from the street. as it stands i suppose the highest point of the roof is going to be about 6'3ish.

the last 2 days and nights i have spent priming, which is less than fun. tomorrow i will finish and then start painting, which i'm hoping will go faster but i know it won't. this coming saturday, we are going to drag it all over to the site and stand it all up and hammer it together. sunday we will pretend we know how to make a roof. ambitious? i thought so initially but so far we are on schedule.
progress pics to come!
now, keep in mind as you're checking out my post that neither my husband nor i have so much as swung a hammer in the last decade. what's worse is my husband thinks he knows what he is doing. i had to put up a big fight about asking a neighbor if we could borrow his sawhorses rather than just using that small wall there and maybe a coffee table over there. And then there was the scene where he wanted to use a small hand axe as a hammer, which was fine because HE HAD DONE IT BEFORE. Grrr. already i sensed coop disaster or possibly divorce. anyway, i digress.
here is a picture of the front yard which looks like crap right now as it's been under a mountain of debris for the last month and it hasn't rained much to boot. the coop is going in the far left corner. that's a very rustic compost pile down their on the right and that pile of stuff in the foreground is the leftover mulch from the 8 ft of bushes we chopped down to replace with a lava rock wall. it's better for the chickens right?
my original plan was to get the wood up off the ground by digging in a base of 8x8x16" cinder blocks -plus this would help foil any evil rats and mongoose who might get it in their heads to dig. however, that plan quickly changed when we got out the digging tools. after a couple hours of pain and suffering, we settled for getting the blocks in level. the dirt here is all rock hard red clay and it's like driving a shovel into a rock. i'm actually curious about how well a mongoose would fare digging. so now i guess i'm gonna have to fork out more money for a skirt. hardware cloth is expensive right? well, it's even more expensive here, as is everything. anyway, ill worry about that later.
so this last weekend we drove over the mountain to home depot and bought supplies for framing, priming, and painting. Home Depot proved to be a lesson in how nothing is actually the size it claims to be. thankfully a couple months ago, we had the presence of mind to beg a bunch of crappy crate panels off of our movers and collected enough panel-age for walls. sunday we started cutting everything to the actual size we wanted it to be and then knocking the frames together.
here is a picture of the carport scene. that's one of those pieces of crate there and in the background is Mr. Self Confident leaning on one of the side frames and panels. behind all that you can glimpse the barrier of cars that we put up to discourage any nosy neighbors from wandering over and disrupting our work flow. it worked! well, mostly.
and here is the back wall pieces cut out and sized and leaning on their frame, which you can't see.
and lastly, here is the front wall frame. that's me leaning out of what will eventually be a window in the one 5 foot panel that will be walled in on the front side. underneath the window will go two external nestboxes for our biddies. to my left, your right, will be a 3' wide and 5.6' tall door. we had to make the door a little bit shorter than desired because the cinder blocks raised the coop up about 7 inches and we don't want the roof to be so tall that it's clearly visible from the street. as it stands i suppose the highest point of the roof is going to be about 6'3ish.
the last 2 days and nights i have spent priming, which is less than fun. tomorrow i will finish and then start painting, which i'm hoping will go faster but i know it won't. this coming saturday, we are going to drag it all over to the site and stand it all up and hammer it together. sunday we will pretend we know how to make a roof. ambitious? i thought so initially but so far we are on schedule.
progress pics to come!
Last edited: