Themed "Block of the Month" Sign-Up for June

awesome instructions Nanakat!!! Thank you so much!!
clap.gif
:clap
 
Quote:
What I do is very simple and is less wasteful of fabric.
Often times I see a pattern in a magazine that I really like, but it is for a 9 inch block instead of 12, and all the directions for cutting the pieces is for that 9 inch block.

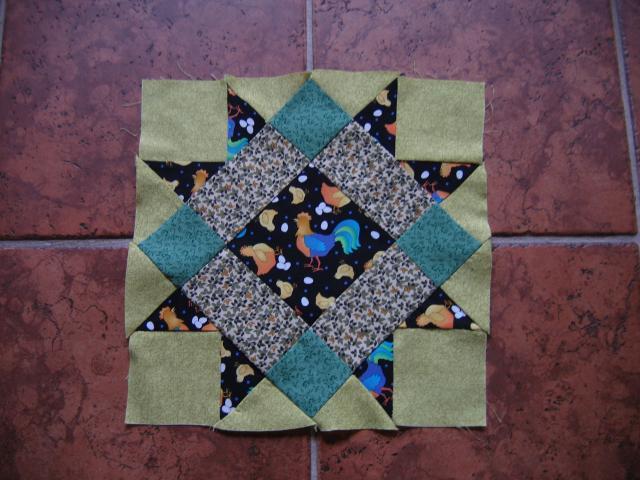
So I draw off the pattern onto a 12 inch piece of freezer paper (you can cut it easily with a rotary cutter on you matt. This is cake plate from the Fall colors swap. I number the pieces for the colors I will use
https://www.backyardchickens.com/forum/uploads/23941_cake_plate.jpg

Then I cut up the pieces and gather together the same color pieces. I then position these onto white fabric. (For this example I'm using a colored fabric so the white paper shows up.) I position them with the seams between and use a ruler to line them up. I iron these to the fabric. What I'm looking for is the most condensed arrangement that yields the pieces with the added seams
https://www.backyardchickens.com/forum/uploads/23941_parts_1.jpg

Here I was able to combine three pieces from the corner into one larger triangle.
https://www.backyardchickens.com/forum/uploads/23941_color_5.jpg

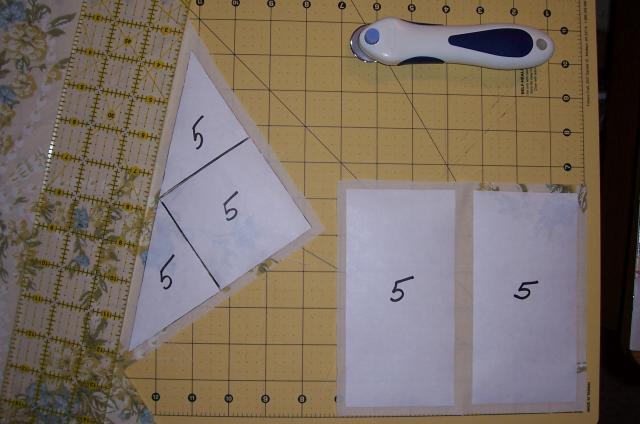
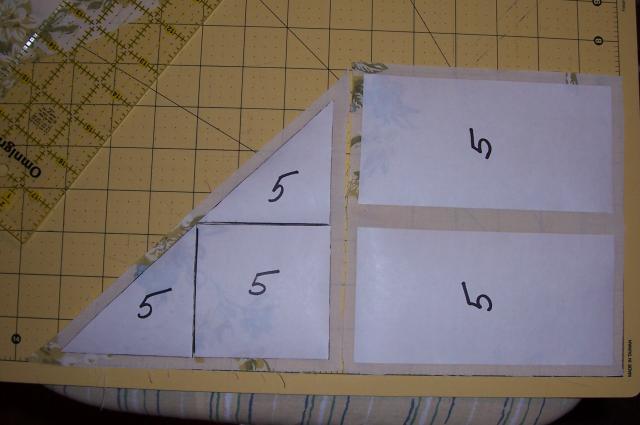
Next I arrange all the same color pieces together on the matt board and make notes of the sizes of the fabric pieces on the original pattern. Now I know how wide to cut my strips for cutting out the component pieces. Here a 7 inch strip will yield the triangle corner and the two rectangles.
https://www.backyardchickens.com/forum/uploads/23941_saving_fabric.jpg

There were four triangles and a 3 inch square for color 1. By playing with the triangle pieces, I could cut a 5 5/8 inch square to cut on the diagonal twice.
The three inch square with seams would be cut from a 3.5 inch strip. The color 2 I decided to make from a rectangle since I wanted to use two different swatches for those pieces. The two together for each swatch could also be cut from a 3.5 inch strip at 4.5 inch.
https://www.backyardchickens.com/forum/uploads/23941_colors_1_and_2.jpg

The hour I might spend in the drafting process is worth it. I use old cotton pillow cases or an old sheet for the drafting process so I'm not cutting up my good quilting fabric. I can stitch these pieces together to make a practice blick and tweek the pieces before I ever cut into my good fabrics. I make notes on the original pattern and can use it to sight measure my block as I work with it.
https://www.backyardchickens.com/forum/uploads/23941_layout.jpg

I hope this helps.

I used this method for my BYCvillie block. I already had the pattern from them so I really thank you for taking the time to show us how to make our own patterns.

My favorite part is that you just measure for the 1/4 inch seam around the freezer paper and sew on that line. Keeps your lines straight and then ya remove the freezer paper and your done.

Keep your freezer paper as you can use it over and over again.

Thank you again for such great instructions.
 
Quote:
Your very welcome and I am glad you like it. O can't even remember what it looks like.
gig.gif
I've been so busy here I couldn't even remember which one I sent out. hehehe
 
Thanks NanaKat for the awesome tutorial!
big_smile.png
Definitely going to have to try that one out!

I really need to get off my backside.. oh wait, I haven't sat down all week... lol... What a busy week!! But it's gonna level out this week so I hope to get all my blocks done for the June swap & Theme Swap
fl.gif
fl.gif


Right now I have to go check out my... FOURTEEN NEW CHICKS!!!
wee.gif

The feed store had too many ordered and the owner is highly allergic once they start getting feathers in so they were giving them away!!! I only got 14 so I will have room for them.. I probably could have gotten them ALL but who needs about 75 peeps??? ( i know, I know... but I don't have room for them!!!
hit.gif
)

ANYBODY at all within driving distance of Columbus NC should go to Little Mountain feed store on Hwy 9 and see what they have left!!


Now off to the barn .......
frow.gif
 
Beverly (leepsy) I got my block today thank you so much. I just love those colors, you can't tell that you had trouble with it, looks like a pro did it to me. Very nice job.


I hope to get to mine today but the way this rainy day is going who knows. Was going to do it yesterday but my daughter and her BF came for dinner and brought me over 20 pairs of jeans to patch, nice of them hey. LOL I am going to make him fix my car for that one LOL.
 
I have watched this from the beginning but when I seen paper pieced, I ran like a screaming school girl. I just cant get the paper piecing. So is it possible to do this block not paper pieced. I love the block.
 
Quote:
Yes it can be made without paper piecing. I didn't paper piece mine.
Unit one
Cut center square 4 3/4 inch square piece A
Cut 4 rectangles 4 3/4 x 2 5/8 piece B
Cut 4 squares 2 5/8 piece C

Unit two
Cut 4 squares 3 inch cut in half on diagonal piece D for points of the star
For background: Cut 4 squares 3 1/2 inch piece E
Cut 4 square 3 inch cut in half on diagonal piece F

To put together Unit one:
sew rectangle C + B + C make two
Sew B + A + B
Line up CBC with BAB and sew together. you will have the center of the block
CBC
BAB
CBC

Unit two: you will have the four outside triangles to add to your Unit one
/ \\ (It's hard to make a square with type)
Sew D + E + D D\\ E/ D
/ \\
Sew F to each end of DED F| D\\ E/ D|F visualize a bigger triangle.

Compare this information to the photo on the first page web site and I think it will make more sense.
http://www.quilterscache.com/B/BeaconLightsBlock.html

If need be PM me your address and I'll send you a copy of my pattern
 
Wow this block was a little hard for me because I have problems with triangles. But it was good practice, so I'm glad I did it.


FrChuckW here is your block. I didn't go out to get new fabric, so i used up what I had on hand, hope you like it.

941_latest_chooks_002.jpg
 
Ginger.....I got your block today and I love it!
love.gif
Thank you so much for the extra material. It is pretty and very nice cotton material. You are a sweetie.
hugs.gif


NanaKat...
frow.gif
Thank you so much for the freezer paper pattern and instructions. I love the block you sent and think I can actually improve on the last block I paper pieced. Thanks a lot.

I just now got on the internet for the first time today. One of my sisters is visiting for a few days and she helped me get some things planted that she brought this time and the last time I saw her. We also picked blackberries, pole beans, tomatoes and blackeyed peas. The pole beans were so sweet and good. Nothing beats growing your own.
 

New posts New threads Active threads

Back
Top Bottom