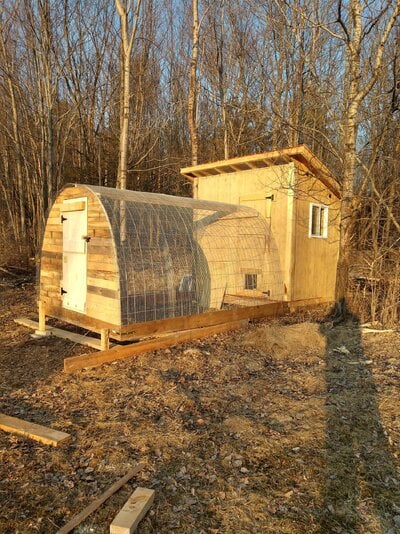
Hoop coop build on a hill - construction progress thread

imacowgirl2

Songster
Apr 11, 2022
373
699
143
south central IL
Because I have about 0.25” of flat land on our entire property, my upcoming endeavor is to build a hoop coop on one of our hillsides for my new meat bird flock.

I built a hoop coop for our bachelor pad last fall on where I thought was flat-ish land, and I’ve learned from that experience — the left side of that coop is about 8” shorter than the right because of bedding migrating downhill to the left. This time I will be accounting for the hill height difference. That coop was also built frameless, the cattle panels are directly on the ground, held in place by T-posts. The new one will have a wooden frame along the bottom.

To account for the height difference, there will be a pallet on the downhill side to which the frame will be attached at level height to the uphill side. Underneath the frame the pallet will be covered with 2x4 welded wire which will extend up and over the hoop coop.

ABED645F-0A79-455A-A211-8135E7C991B0.jpeg

This is the area we are working with - the coop will be where the red box is and the ground under the left side of the coop will be somewhere around 8” lower than the ground under the right side…I took measurements last week but that was before I changed my mind about the location of the coop and the new area is slightly flatter than the old area.
 
Made really good progress today…

Frame in place:

88970512-D068-4702-8705-D29FC364C797.jpeg

Frame leveled and cattle panel in place:
E9E7713D-F278-4D8B-8616-05621FEAD3E5.jpeg


Welded wire fencing on and door frame in place:
F55D94FD-B807-4903-A95A-A8DF2F42C9DE.jpeg


After that we were rushing to get as much done as possible before we had to go to a prior commitment, so I failed to get any more pictures today. We put in the door, covered the entire thing in plastic, cut the pop door, and then hung a tarp on the front since we were supposed to get rain tonight.

Things left to do, hopefully tomorrow:
1. Trim out the pop door and put its track and pulley up
2. Fix latches on door to clip better (and find the right clips)
3. Plastic/tarp on back end
4. Put in more bedding
5. Set up waterer and feeders more permanently
6. Anchor the structure to the ground
7. Pin the skirt to the ground
8. Install roost and nest box.
 
Because I have about 0.25” of flat land on our entire property, my upcoming endeavor is to build a hoop coop on one of our hillsides for my new meat bird flock.

I built a hoop coop for our bachelor pad last fall on where I thought was flat-ish land, and I’ve learned from that experience — the left side of that coop is about 8” shorter than the right because of bedding migrating downhill to the left. This time I will be accounting for the hill height difference. That coop was also built frameless, the cattle panels are directly on the ground, held in place by T-posts. The new one will have a wooden frame along the bottom.

To account for the height difference, there will be a pallet on the downhill side to which the frame will be attached at level height to the uphill side. Underneath the frame the pallet will be covered with 2x4 welded wire which will extend up and over the hoop coop.

View attachment 3427531
This is the area we are working with - the coop will be where the red box is and the ground under the left side of the coop will be somewhere around 8” lower than the ground under the right side…I took measurements last week but that was before I changed my mind about the location of the coop and the new area is slightly flatter than the old area.
Good luck! Be safe
 
Made really good progress today…

Frame in place:

View attachment 3429069
Frame leveled and cattle panel in place:
View attachment 3429070

Welded wire fencing on and door frame in place:
View attachment 3429072

After that we were rushing to get as much done as possible before we had to go to a prior commitment, so I failed to get any more pictures today. We put in the door, covered the entire thing in plastic, cut the pop door, and then hung a tarp on the front since we were supposed to get rain tonight.

Things left to do, hopefully tomorrow:
1. Trim out the pop door and put its track and pulley up
2. Fix latches on door to clip better (and find the right clips)
3. Plastic/tarp on back end
4. Put in more bedding
5. Set up waterer and feeders more permanently
6. Anchor the structure to the ground
7. Pin the skirt to the ground
8. Install roost and nest box.
Any more pictures?
:pop
 
Made really good progress today…

Frame in place:

View attachment 3429069
Frame leveled and cattle panel in place:
View attachment 3429070

Welded wire fencing on and door frame in place:
View attachment 3429072

After that we were rushing to get as much done as possible before we had to go to a prior commitment, so I failed to get any more pictures today. We put in the door, covered the entire thing in plastic, cut the pop door, and then hung a tarp on the front since we were supposed to get rain tonight.

Things left to do, hopefully tomorrow:
1. Trim out the pop door and put its track and pulley up
2. Fix latches on door to clip better (and find the right clips)
3. Plastic/tarp on back end
4. Put in more bedding
5. Set up waterer and feeders more permanently
6. Anchor the structure to the ground
7. Pin the skirt to the ground
8. Install roost and nest box.
Looks good. But don't see your issue of elevation. Are you building the run first?
 
121A762A-688C-4C4B-956C-36A73B38A212.jpeg


North Elevation - the board that the plastic is screwed to is roughly level, there is approximately 8” height difference between the front and the back on this side.

2C52B8D0-DA9E-4C96-82D0-26AEAA159EB8.jpeg


South elevation - its harder to see because the bedding inside has already migrated significantly, but in the back corner (left side when looking at picture) there is almost 14” span between the actual ground and the bottom of the level board that the plastic is attached to

9C16646F-2916-444E-84BF-3008113031DF.jpeg


Front elevation - is an optical illusion in this picture due to extra buildup of some wood chips on the left side of the picture, but the board was within an inch of level when sat on the ground across the front, so we just went with it.

Overall I’m pretty pleased with it. As suspected, the bedding is heavily migrating towards the lowest point, and is been nice to not lose 10+” off bedroom on that side of the coop. I’m eagerly awaiting tree trimming season here so that I can get more free wood chips to finish filling it enough to keep the bedding from migrating as much as it is.

And here is a picture of the back of the coop…they pop door will be just 2-3” off the floor inside the coop once all the bedding migrates.

50456EF0-1ABB-4F57-9FB7-450452D73058.jpeg
 

New posts New threads Active threads

Back
Top Bottom