INCUBATING w/FRIENDS! w/Sally Sunshine Shipped Eggs No problem!

Status
Not open for further replies.
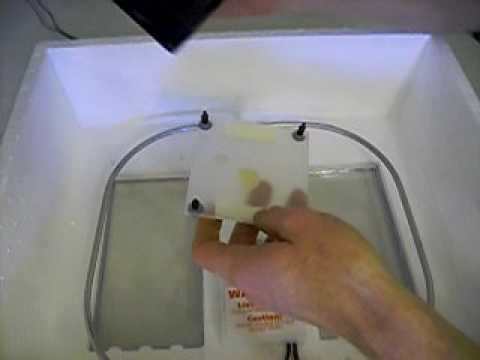
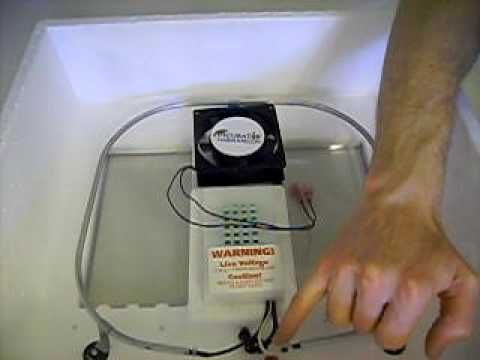
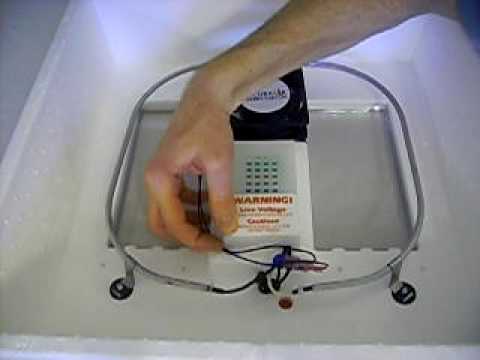
What's a snap switch? I'm not electronically gifted here lol
I did just replace both wafers in it about a month ago with beams new ones. Maybe the switches that they connect to?

I knew he would figure it out. He was probably just trying to train you! He did used to stay outside until it was almost too dark to see when he was with the main flock but I assumed that was just because he didn't want the other roosters to see him coming back in lol.

Does your DW like him?

The switches that the wafers actuate.
There IS a thread on here somewhere
The guy posted his actual interchange with the company representative.
Seemed like the ORIGINAL switch wasn't being made anymore, and the rep kept telling him to replace the snap switch with the one that is no longer available.....
Not sure if the new wafers are different in a way that makes them incompatible with the old switch, or vice versa.

Maybe replace the wafers and switches together as an assembly

Or upgrade to a different thermostat/controller.
 
OK I made a coolerbator yesterday. Calling it the picnicbator. I decided to use the smaller cooler I have had for a few years (and never used). Here it is


The top on this cooler is not hinged to the cooler. It comes completely off and actually has a storage area inside. Like so


When I opened the cooler up I found two plastic trays inside. Looked like excellent water wells to me.


OK so I started the lid modifications by cutting a 6"x6" piece of Plexiglass and drew a 5"x5" square inside the lid.


I then cut the box out of the lid using a jigsaw (this was extremely difficult because of the 4" recess inside the lid) and turned out like this


Next I made a couple pieces of Z style aluminum (lucky enough to have a brake on hand) sliders for the window and screwed them to the lid like so


Since the window slides to the open position, the bator can be accessed without removing the lid entirely, limiting the amount of temperature and humidity loss GREATLY! I can also close the top lid to keep the flashing light from bothering me.

So now onto the box itself. These are the devices I installed into the cooler itself


So first I figured out where I wanted the fan and drilled my bolt holes for mounting. I also drilled 12 11/32" holes on 2 sides (6 holes each) for ventilation (before mounting the fan to avoid accidentally hitting it with the drill bit). Installed the fan.


Now onto the heat bulbs and wire screen. I used 1/2" hardware cloth for the screen (plan to cover with shelf liner). I cut a small 5"x5" piece of 1/2" plywood from a cutoff and mounted the plastic lampholder directly to that. Used a cord from a trash electronic device and just left the plug on it. Wired the other end to the fixture. So after I put the water wells, heat source and guard screen in I had something that looked like this


Next up is making my controller. I constructed a box 6"x5"x5" out of a cutoff of 1/2" plywood. On one end I mounted the digital temperature controller. On the other, I mounted a receptacle and drilled holes for the main power input and the thermocouple sensor to come out. Wired it all together and closed up the box ends.


So the heating element just plugs into the receptacle and the thermocouple goes through the vent hole close to the heat source.

I've got it running right now, and with one water well humidity is sitting steady at 57%. I don't think I'm going to be able to use the other. It's too big. So still working out a couple minor kinks but that's what I've got so far.

I really hope nobody quotes this post
lau.gif
 
OK I made a coolerbator yesterday. Calling it the picnicbator. I decided to use the smaller cooler I have had for a few years (and never used). Here it is The top on this cooler is not hinged to the cooler. It comes completely off and actually has a storage area inside. Like so When I opened the cooler up I found two plastic trays inside. Looked like excellent water wells to me. OK so I started the lid modifications by cutting a 6"x6" piece of Plexiglass and drew a 5"x5" square inside the lid. I then cut the box out of the lid using a jigsaw (this was extremely difficult because of the 4" recess inside the lid) and turned out like this Next I made a couple pieces of Z style aluminum (lucky enough to have a brake on hand) sliders for the window and screwed them to the lid like so Since the window slides to the open position, the bator can be accessed without removing the lid entirely, limiting the amount of temperature and humidity loss GREATLY! I can also close the top lid to keep the flashing light from bothering me. So now onto the box itself. These are the devices I installed into the cooler itself So first I figured out where I wanted the fan and drilled my bolt holes for mounting. I also drilled 12 11/32" holes on 2 sides (6 holes each) for ventilation (before mounting the fan to avoid accidentally hitting it with the drill bit). Installed the fan. Now onto the heat bulbs and wire screen. I used 1/2" hardware cloth for the screen (plan to cover with shelf liner). I cut a small 5"x5" piece of 1/2" plywood from a cutoff and mounted the plastic lampholder directly to that. Used a cord from a trash electronic device and just left the plug on it. Wired the other end to the fixture. So after I put the water wells, heat source and guard screen in I had something that looked like this Next up is making my controller. I constructed a box 6"x5"x5" out of a cutoff of 1/2" plywood. On one end I mounted the digital temperature controller. On the other, I mounted a receptacle and drilled holes for the main power input and the thermocouple sensor to come out. Wired it all together and closed up the box ends. So the heating element just plugs into the receptacle and the thermocouple goes through the vent hole close to the heat source. I've got it running right now, and with one water well humidity is sitting steady at 57%. I don't think I'm going to be able to use the other. It's too big. So still working out a couple minor kinks but that's what I've got so far. I really hope nobody quotes this post:lau
Fricken sweet
 
OK I made a coolerbator yesterday. Calling it the picnicbator. I decided to use the smaller cooler I have had for a few years (and never used). Here it is
Next up is making my controller. I constructed a box 6"x5"x5" out of a cutoff of 1/2" plywood. On one end I mounted the digital temperature controller. On the other, I mounted a receptacle and drilled holes for the main power input and the thermocouple sensor to come out. Wired it all together and closed up the box ends.


So the heating element just plugs into the receptacle and the thermocouple goes through the vent hole close to the heat source.

I've got it running right now, and with one water well humidity is sitting steady at 57%. I don't think I'm going to be able to use the other. It's too big. So still working out a couple minor kinks but that's what I've got so far.

I really hope nobody quotes this post
lau.gif
Sweet bator. I love the controller box idea.
 
Quote: yes its a full body. they are what three four weeks old? I use the grow gel after hatch pre pro biotics for a week or two then acv in waterers. Yes! he did, he had curled toes and I missed it but never fixed it because he was getting processed. And is processed, all of them are since Saturday. I processed 7 and a bantam dark cornish roo too.
Those are the halloween hatch birds. They had to go and it was nice so I did the deed.


I like Benny's turner. But I plan to put a pull string on either end so there won't be a rod sticking out. Or perhaps a jointed rod, so it could lay flat when not in use. Food for thought, for sure.
I agree I love it as well.

Question: on a forced air LG styro should the fan be blowing into the incubator or out? I started with a still air but added a fan as a kit designed for the styros. I installed it based on the instructions but it seems like its spinning the wrong way. Part of the reason I'm thinking that is its having severe low humidity issues. Just my thinking but if the humidity in the room is lets say 50% and the fan is circulating that air into the incubator wouldn't it be roughly the same.
Hi @NaJoBeLe if you are installing a fan point it so the air is pointing to the lid, that way it will hit the lid and spread outward.
 
You will ALSO need a 120v input 12v DC output USED adaptor/transformer/inverter. We used one from an old phone. You will snip off the end and wire it to the pc fan. Wire the black to the black and the red to the other mixed color wire. Secure w/ electrical tape and wire nuts. Location should be where it can blow across the bottoms of BOTH bulbs so that the heat is quickly dispersed and this also will reduce HOT SPOTS in the incubator under the bulbs.

ALWAYS SET IT SO IT BLOWS ACCROSS THE LAMPS BUT UNDER THEM A BIT SO YOU DONT GET HOT SPOTS UNDER THEM, KEEP LIGHTS AS HIGH AS YOU CAN WITHOUT MELTING THE LID. CUT CANS IN HALF FOR OVER THE TOP IT IT BECOMES AN ISSUE!


LL


inc7b.jpg


Quote:
Originally Posted by casportpony
I think you also need mounting hardware like this:


-Kathy​
Here, I just went back to the neighbors and took a pic of another one that I did for her. It is similar to yours. Now, don't make this any harder than it is. This was done using 2 deck screws. You don't need spacers doing it this way. Screw the screw in until you get the desired height. She hatches a lot of birds in these incubators I set up for her.

There might be some useful tips here:
0.jpg

0.jpg

0.jpg

Quote:
Originally Posted by chicken hawk 33

How do I attach it so it doesn't burn up,and attach a phone charger to it​


I am thinking you will need to create some kind baffle out an half inch or so to send the air out instead of down into the eggs, you can do this with long screws or something.


need a 120v input 12v DC output USED adaptor/transformer/inverter. We used one from an old phone. You will snip off the end and wire it to the pc fan. Wire the black to the black and the red to the other mixed color wire. Secure w/ electrical tape and wire nuts.
inc7b.jpg
FI-2200_400x480.jpg
see the fan in this unit, the fan is on the lid and made so the air is run out the side to the heat source​


Anyway, I put a $4 computer fan in her little giant a year or two ago to help her out. I want to say it's a 44mm. It fit right inside of the elements. See pics. And also a pic of the phone charger we used. She hatches well over 80% with eggs she gets from me and a lot of times higher. You do not need a full 12v for that little styrofoam job. You just need to move air and not too much.


https://www.backyardchickens.com/t/601352/little-giant-incubator-tricks/540#post_9703013
Originally Posted by cmom

I installed fans in my still air incubators. I think the because of the air being circulated, the temperature stays more even throughout the incubator. There is only 2 ways to hook up the fan. If you don't have the wires right the fan will blow in reverse and all you need to do is reverse the wires so the fan blows in the right direction. I have my fans blowing up towards the top of the lid of the incubator so the air isn't blowing down on the eggs. If the fan blows down on the eggs, when they start to hatch the air blowing on them can cause the membranes in the eggs to dry out and the chicks to stick in the shells. I took some tubing and made some spacers so there is air space between the top and the fan.

This is my still air Hova-Bator I installed a fan in. I wired this one to my heating element.
This had wire nuts I cut off and put new ones on.


This is my LG I installed a fan in. I put a separate adapter on it. With this incubator I would
have to cut the wires and lengthen them, so I put an adapter on instead.


Quote:


this is the can cut out I was talking about for the coolers to keep lights higher but protect the lid post #50
900x900px-LL-648a0145_100_0228.jpeg
 
Last edited:
Status
Not open for further replies.

New posts New threads Active threads

Back
Top Bottom