The Rooster's Den Coop
created: May 2008 final cost: $271.00 (we had a lot of free stuff)
housing: 6 Araucana hens and 1 Speckled Sussex roo
This coop started out as a very urgent need to house the 6 Araucana chicks that I brought home one Saturday afternoon. We've talked several times about getting chickens, for a couple different reasons, and now we have them with no house. So out came the paper and pencils to develop a plan. After searching BYC and looking at dozens of coop designs we had an idea of where to start.
The coop will be 8' long by 5' wide, with 7' front ceiling tapered down to 6'. My husband wanted to be able to stand inside without hitting his head. According to our calculations, we should be able to house up to 12 chickens comfortably. I am a stay at home mom, and we plan to free range the chickens as much as possible. My neighbor across the street actually asked us to cut down some of the brush at the road so that she could watch the chickens....maybe a future BYC member?!
We had several 6x6 landscaping timbers laying around and decided that we would use them as the base of our coop and run. Hoping that the size of them would warn off any predetors. As you can see in the first photo, we cut them to the sizes that we needed and nailed them together. The run size is 7'6" by 10'.

In photo #1: You can see the timbers nailed together. We had added floor joists under the coop section and put OSB board down. Just to give a little bit of protection against moisture, we had painted it - of course using left over paint from another project, trying to keep our costs low. We had to make a few adjustments to level off the frame...which looks better than in the photo. I'm a pretty bad photographer.
In photo #2: We started to frame up the walls using 2x3 construction. Again, we are trying to keep our costs low and they were cheaper than 2x4's. However, we did put them 12" on center, rather than 16" on center to handle the snow load that we get in the winter. We have the coop facing westward, so we had decided not to put windows on the east and north side to keep the sun from overwarming in the summer and out of the winds in the fall and winter. The back wall (6' tall) is standing in the photo and my husband is working on the front wall (7' tall) which was framed for a door and window, the chicken door will be underneath the window, but hasn't been framed as of yet.
Photo #3: Ok, now three of the walls have been framed in. I promise it is level and plum...just bad photo shooting.
Photo #4: We have framed in all four walls. The 4th wall, facing South, has a good sized window in it for good ventalation. My husband has started to put the rafters up, which are 2x4's, 12" on center. Like mentioned above, we wanted to make sure that the roof could hold the snow load in the winter.
Photo #5: Here is my husband working on the last of the rafters. The rafter's were notched in the front to sit better on the top plate, but we only have them resting on the back wall plate. Yes, they were nailed in as well.
Photo #6: Then came the OSB board. We had a couple of sheets laying around from another project, so we had decided to use them for the walls. We did have to purchase 8 more sheets. We decided to paint it the same color as our house and shed. I like things to match, and my husband didn't want it to look cheezy.
Photo #7: Ok, I missed a couple of steps....we put OSB on the top of the rafters, then did the tar paper, drip edge and shingles (left overs that we had). My husband also closed in the front overhang and back overhang with pine boards we had. I guess I have some more painting to do. We also put in 1/2" hardware cloth on the window and framed it in using 2-1/2" pine board, which was also used for the corner boards. We have two windows that fit into the openings that will be put into place for the fall and winter months, which are removable.
Photo #8: Here is my son getting in on the action. He really wanted to help nail, so we put him to work nailing the frame work, for the run, onto the 6x6 timbers.
Photos #9 & #10: Different views of the run framing. We used 2x4 PT to frame the run. We were careful to span the uprights only 4 feet across (also puting in cross pieces to stiffen the frame up) to accomodate the 4' chicken wire that will be used. There is plenty of space to staple the wire to, especially with the cross pieces. We have framed in a space for the door in the front of the run. We plan on puting in two cross pieces over the top (attaching to the coop with joist hangers), so that we can also put wire over the run....don't want anything to get in!
Photo #11 & #12: You can see that the joist hangers were put into place on the coop and on the run.
Photo #13: Here you can see the 2x4's that will support the top of the run and what the chicken wire will be stapled to.
Photo #14: We have started to put the chicken wire on! Yeah - it's starting to look like a coop!
Photo #15: We have completed the wire and we have started to paint the trim.
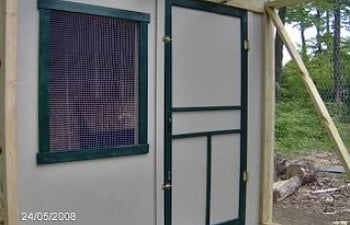
Photo #16 & #17: We created our door out of an old screen door that we painted green, took out the screen and put in a piece of plywood, which was painted the same color as the coop. In the next photo is our window in place. As mentioned above, we have it only screwed into place so that we can easily remove it for ventalation.
Photo #18: My very own home made feeder. I got the idea from this site, but made a smaller version. It holds about 4-5 pounds of feed. We only have it screwed to the wall so that we can later raise it as the birds get bigger.
Photo #19: And my very own nesting boxes. Milk crates made everything so much easier.
Photo #20: My husband attached an eye hook from the door to the frame of the run so that the door could be kept open for easier cleaning, since there are spring loaded hindges on the door.
Photo #21: We did add in one roost for now. It is pretty low because the girls are only 6 weeks old. We plan to add more and a bit higher, but this was ok for now. We used a 2x3 board laid on it's side so that they sit on the three inch side.
Photo #22: WE ARE DONE! We did add a couple of finishing touches....we added a corner board in the run and put sand in it for the girls (which they love on the hot days because it stays cool). And finally, we added three very old and rusty hindges that we had found on the property (which used to be a farm with a grist mill) onto the front door of the run. Sorry, I only have a side view shot....need to take a few more photos.
UPDATE: We have made some changes already...
1. The sloped board covering the nesting boxes has now been hindged so that we can lift it up to clean out the milk crates and we can use it for extra storage.
2. We added the pop door. My husband made it so that we could simply slide the door upwards using the handle and set it aside. We also added a small ramp for the girls, not that they needed it.
3. Added two more roosts inside the coop. I can't beleive how many birds will actually sit on a 4' board!?!?!
4. We added shelving above the nesting boxes for extra storage. We have their grain and extras in 5 gallon, covered, pails sitting on the shelf. So far we haven't had any issues with the girls wanting to get on it.
I'll add pictures to the additions at a later time.
Thanks for looking!
created: May 2008 final cost: $271.00 (we had a lot of free stuff)
housing: 6 Araucana hens and 1 Speckled Sussex roo
This coop started out as a very urgent need to house the 6 Araucana chicks that I brought home one Saturday afternoon. We've talked several times about getting chickens, for a couple different reasons, and now we have them with no house. So out came the paper and pencils to develop a plan. After searching BYC and looking at dozens of coop designs we had an idea of where to start.
The coop will be 8' long by 5' wide, with 7' front ceiling tapered down to 6'. My husband wanted to be able to stand inside without hitting his head. According to our calculations, we should be able to house up to 12 chickens comfortably. I am a stay at home mom, and we plan to free range the chickens as much as possible. My neighbor across the street actually asked us to cut down some of the brush at the road so that she could watch the chickens....maybe a future BYC member?!
We had several 6x6 landscaping timbers laying around and decided that we would use them as the base of our coop and run. Hoping that the size of them would warn off any predetors. As you can see in the first photo, we cut them to the sizes that we needed and nailed them together. The run size is 7'6" by 10'.

In photo #1: You can see the timbers nailed together. We had added floor joists under the coop section and put OSB board down. Just to give a little bit of protection against moisture, we had painted it - of course using left over paint from another project, trying to keep our costs low. We had to make a few adjustments to level off the frame...which looks better than in the photo. I'm a pretty bad photographer.

In photo #2: We started to frame up the walls using 2x3 construction. Again, we are trying to keep our costs low and they were cheaper than 2x4's. However, we did put them 12" on center, rather than 16" on center to handle the snow load that we get in the winter. We have the coop facing westward, so we had decided not to put windows on the east and north side to keep the sun from overwarming in the summer and out of the winds in the fall and winter. The back wall (6' tall) is standing in the photo and my husband is working on the front wall (7' tall) which was framed for a door and window, the chicken door will be underneath the window, but hasn't been framed as of yet.

Photo #3: Ok, now three of the walls have been framed in. I promise it is level and plum...just bad photo shooting.

Photo #4: We have framed in all four walls. The 4th wall, facing South, has a good sized window in it for good ventalation. My husband has started to put the rafters up, which are 2x4's, 12" on center. Like mentioned above, we wanted to make sure that the roof could hold the snow load in the winter.

Photo #5: Here is my husband working on the last of the rafters. The rafter's were notched in the front to sit better on the top plate, but we only have them resting on the back wall plate. Yes, they were nailed in as well.

Photo #6: Then came the OSB board. We had a couple of sheets laying around from another project, so we had decided to use them for the walls. We did have to purchase 8 more sheets. We decided to paint it the same color as our house and shed. I like things to match, and my husband didn't want it to look cheezy.

Photo #7: Ok, I missed a couple of steps....we put OSB on the top of the rafters, then did the tar paper, drip edge and shingles (left overs that we had). My husband also closed in the front overhang and back overhang with pine boards we had. I guess I have some more painting to do. We also put in 1/2" hardware cloth on the window and framed it in using 2-1/2" pine board, which was also used for the corner boards. We have two windows that fit into the openings that will be put into place for the fall and winter months, which are removable.

Photo #8: Here is my son getting in on the action. He really wanted to help nail, so we put him to work nailing the frame work, for the run, onto the 6x6 timbers.


Photos #9 & #10: Different views of the run framing. We used 2x4 PT to frame the run. We were careful to span the uprights only 4 feet across (also puting in cross pieces to stiffen the frame up) to accomodate the 4' chicken wire that will be used. There is plenty of space to staple the wire to, especially with the cross pieces. We have framed in a space for the door in the front of the run. We plan on puting in two cross pieces over the top (attaching to the coop with joist hangers), so that we can also put wire over the run....don't want anything to get in!


Photo #11 & #12: You can see that the joist hangers were put into place on the coop and on the run.

Photo #13: Here you can see the 2x4's that will support the top of the run and what the chicken wire will be stapled to.

Photo #14: We have started to put the chicken wire on! Yeah - it's starting to look like a coop!

Photo #15: We have completed the wire and we have started to paint the trim.


Photo #16 & #17: We created our door out of an old screen door that we painted green, took out the screen and put in a piece of plywood, which was painted the same color as the coop. In the next photo is our window in place. As mentioned above, we have it only screwed into place so that we can easily remove it for ventalation.

Photo #18: My very own home made feeder. I got the idea from this site, but made a smaller version. It holds about 4-5 pounds of feed. We only have it screwed to the wall so that we can later raise it as the birds get bigger.

Photo #19: And my very own nesting boxes. Milk crates made everything so much easier.

Photo #20: My husband attached an eye hook from the door to the frame of the run so that the door could be kept open for easier cleaning, since there are spring loaded hindges on the door.

Photo #21: We did add in one roost for now. It is pretty low because the girls are only 6 weeks old. We plan to add more and a bit higher, but this was ok for now. We used a 2x3 board laid on it's side so that they sit on the three inch side.

Photo #22: WE ARE DONE! We did add a couple of finishing touches....we added a corner board in the run and put sand in it for the girls (which they love on the hot days because it stays cool). And finally, we added three very old and rusty hindges that we had found on the property (which used to be a farm with a grist mill) onto the front door of the run. Sorry, I only have a side view shot....need to take a few more photos.
UPDATE: We have made some changes already...
1. The sloped board covering the nesting boxes has now been hindged so that we can lift it up to clean out the milk crates and we can use it for extra storage.
2. We added the pop door. My husband made it so that we could simply slide the door upwards using the handle and set it aside. We also added a small ramp for the girls, not that they needed it.
3. Added two more roosts inside the coop. I can't beleive how many birds will actually sit on a 4' board!?!?!
4. We added shelving above the nesting boxes for extra storage. We have their grain and extras in 5 gallon, covered, pails sitting on the shelf. So far we haven't had any issues with the girls wanting to get on it.
I'll add pictures to the additions at a later time.
Thanks for looking!