My Grandmother had chickens and I always wanted some of my own. Wasn't able to move to the country, so decided some 8 years ago to bring the country to me and have a small backyard flock. We needed more room after getting some extra chicks this past Spring so started planning to build coop #3. I'm always collecting scrap wood for building projects and figured I could start from scratch (again).
However, I'd noticed some contractors working nearby on electrical lines and every time I drove by I'd see these huge crates they were using to haul transformers on. Hmmm, I thought, they look perfect for the beginnings of a chicken coop! I asked about them & was told they'd be hauled off by the contractor for the trash. Of course, I asked if I could have one (with no thought about how I'd get it home) and they said have at it! I was soooo excited. We managed to get it loaded on hubby's truck with the help of one of the workers.

This is about the time my husband and neighbors started asking how I was going to move it. The more I added, the heavier it got! How will we move it - they keep asking. I'm starting to worry now...it may look small but it IS heavy. My Dad started a joke about hiring a crane...
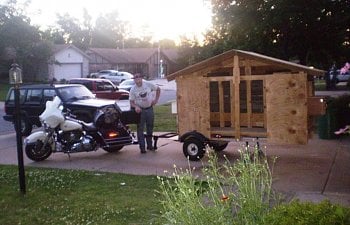
With the back mostly sided and the roof framed out, I started on the nesting boxes, used what I had, some old knobs, hinges, 1x12's, etc. For some reason, I don't have photos of the that construction process. Just your basic carpentry four-sided boxes with lids. Sided the front with some plywood & left room for doors. We called on one of our buds who brought over his motorcycle trailer and believe it or not, we used that to move it. On the trailer & ready to roll.
Just kidding, we didn't use the motorcycle. The push is on!
It's starting to get dark so we brought out the flashlights. Moved the old coop out of the way best we could and set the new one on concrete blocks, leveled up & shut down the chicks for the night in the old coop.
Daylight and I'm back at it...got the fence back up, started dismantling the old coop. Nailed on the plywood for the roof. Fabricated two double doors from plywood and 1x4's, not installed in photo. Figured it'd make cleaning easier on me. Painted the front panels earlier after installing. Also installed two nesting boxes on either end braced between 2x4's.
Old coop gone, doors installed on hinges and finished up the painting. Stapled some recycled window screens over the openings for windows. Will fabricate some wood windows before cool weather sets in. Managed to get some netting strung up temporarily to keep the hens in. One had a yearning for freedom and managed to escape twice but she always came back! Luckily she didn't run into any trouble.
Got the doors on, the coop painted. I did pick up a new roll of rolled roofing and adhesive. My Dad supplied some leftover roofing nails and flashing he had around. The chicken's door is hinged at the bottom with lock on top. Just used a piece of plywood and tacked some 1x2 wood strips on the inside.
Here's a picture of the nesting box on the other end. This one has a hinged lid and opens from the top.
Here's some inside photos of the nesting boxes. There's also a ladder and several perches.
Considering I was fortunate to locate the crate as the basis for framing up the coop, I was able to come up with a pretty decent home for my chickens. I'm pleased with the way it turned out. Maybe with a little more planning, I could have built the walls, roof, etc. in place but it was Spring and the rainy season was here. The chicks needed a stable environment at the time and both coops wouldn't fit in the space. I could have moved it further from the house but room is tight and I didn't want to risk them getting stuck. The rain runs off with the pitch of the roof and I use tarps when it rains a lot to cover the pen.
The chickens seem pretty happy with their new home. It may not be the fanciest coop ever made but it works for us and for the space we have to work with. My only regret is that the chickens can't free range anymore. They used to be able to come and go from their pen into the backyard, scratching, foraging and having a good time. Then the hawks came and we lost one of our favorites. Just when I think it's safe again, I see them circling around and don't want to take any chances. Our flock includes 9 and they seem to have enough room to roam. We make sure to provide them with greens, clippings, grass, things to do, and places to hide. We're good to our chickens because they're good to us. We haven't bought store eggs in years. I use their bedding and manure for the gardens after composting and dry and crush the eggshells for garden fertilizer and to control slugs.
Submitted in memory of my Grandmother and for all of our grandchildren who live, love, and learn from our little flock.
However, I'd noticed some contractors working nearby on electrical lines and every time I drove by I'd see these huge crates they were using to haul transformers on. Hmmm, I thought, they look perfect for the beginnings of a chicken coop! I asked about them & was told they'd be hauled off by the contractor for the trash. Of course, I asked if I could have one (with no thought about how I'd get it home) and they said have at it! I was soooo excited. We managed to get it loaded on hubby's truck with the help of one of the workers.

Unloading back at the house. Almost ready made!
The crate was heavy and had to be remodeled to my own coop specs (no plans available, just in my head). I removed a lot of 2x4's from the the inside bottom and ends & some from the sides so there'd be more floor room and allow room for two outside nesting boxes and doors. Little by little, it started coming together.


Logistics were a problem since I'd have to remove the overhead netting and the old coop before setting up the new one on the side of the house. Hence, I built it in the garage rather than "on site" which definitely posed some moving problems which you'll see later.
Piece by piece, I used old 1x4 fence posts I had around to side the back and and parts of the ends and finished that off before working on the roof.
Piece by piece, I used old 1x4 fence posts I had around to side the back and and parts of the ends and finished that off before working on the roof.

Next, on to the roof....used some of the left over 2x4's for framing. Enlisted the help of my Dad for the bird's nest cuts, never can get those things right!

This is about the time my husband and neighbors started asking how I was going to move it. The more I added, the heavier it got! How will we move it - they keep asking. I'm starting to worry now...it may look small but it IS heavy. My Dad started a joke about hiring a crane...
With the back mostly sided and the roof framed out, I started on the nesting boxes, used what I had, some old knobs, hinges, 1x12's, etc. For some reason, I don't have photos of the that construction process. Just your basic carpentry four-sided boxes with lids. Sided the front with some plywood & left room for doors. We called on one of our buds who brought over his motorcycle trailer and believe it or not, we used that to move it. On the trailer & ready to roll.

Just kidding, we didn't use the motorcycle. The push is on!
It's starting to get dark so we brought out the flashlights. Moved the old coop out of the way best we could and set the new one on concrete blocks, leveled up & shut down the chicks for the night in the old coop.


Old coop gone, doors installed on hinges and finished up the painting. Stapled some recycled window screens over the openings for windows. Will fabricate some wood windows before cool weather sets in. Managed to get some netting strung up temporarily to keep the hens in. One had a yearning for freedom and managed to escape twice but she always came back! Luckily she didn't run into any trouble.
Got the doors on, the coop painted. I did pick up a new roll of rolled roofing and adhesive. My Dad supplied some leftover roofing nails and flashing he had around. The chicken's door is hinged at the bottom with lock on top. Just used a piece of plywood and tacked some 1x2 wood strips on the inside.


The chickens seem pretty happy with their new home. It may not be the fanciest coop ever made but it works for us and for the space we have to work with. My only regret is that the chickens can't free range anymore. They used to be able to come and go from their pen into the backyard, scratching, foraging and having a good time. Then the hawks came and we lost one of our favorites. Just when I think it's safe again, I see them circling around and don't want to take any chances. Our flock includes 9 and they seem to have enough room to roam. We make sure to provide them with greens, clippings, grass, things to do, and places to hide. We're good to our chickens because they're good to us. We haven't bought store eggs in years. I use their bedding and manure for the gardens after composting and dry and crush the eggshells for garden fertilizer and to control slugs.
Submitted in memory of my Grandmother and for all of our grandchildren who live, love, and learn from our little flock.