Coop plans for a simple 4x8 coop
The reason I decided to make this coop in the first place, was because my chicken tractor was too small for as many birds as I had. I wanted a simple solution, and because 4x8 is such a universal size, I figured I couldn't lose with an 8 foot wide, 4 foot deep, 4 foot tall coop.
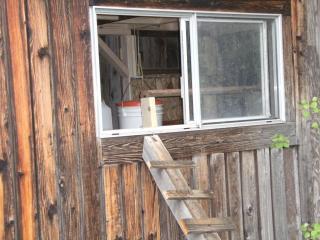
I had a garage that was used mostly for storage, and not much else. There was a window about 3½ to 4 feet off of the ground, and just in case “chicken fever” wore off someday, I’d better not be cutting pop holes in the garage. (My sweet wife helped me with that decision.)

Window from outside of Garage
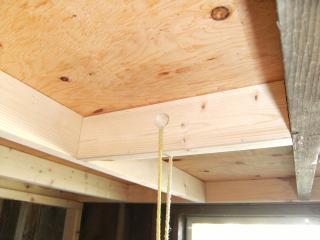
I needed to build the coop on legs because the window was so high, so I calculated the height of the legs so the top of the coop would be just above the window opening.
Picture showing coop ceiling just above window
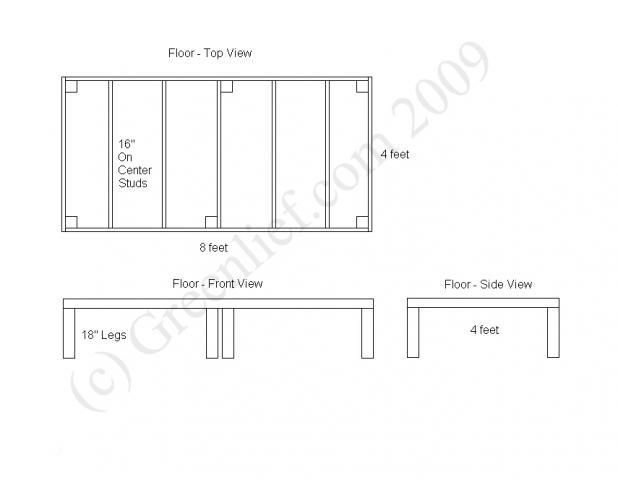
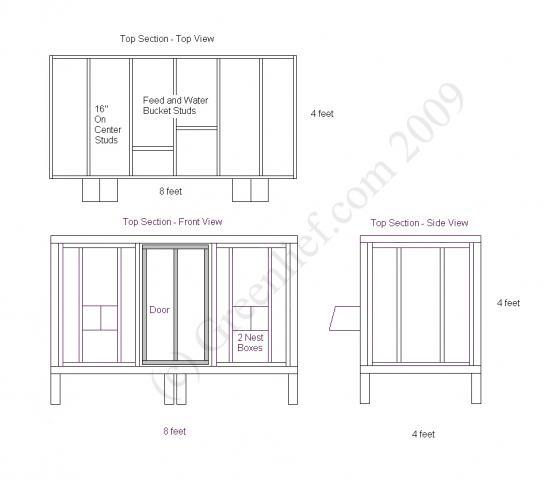
Below are the plan drawings for the floor. [Sidebar - About all of the (c)opyright notices. You are welcome to use these plans for personal use. But do not copy them with the intent to sell them and make money]
The reason I decided to make this coop in the first place, was because my chicken tractor was too small for as many birds as I had. I wanted a simple solution, and because 4x8 is such a universal size, I figured I couldn't lose with an 8 foot wide, 4 foot deep, 4 foot tall coop.
I had a garage that was used mostly for storage, and not much else. There was a window about 3½ to 4 feet off of the ground, and just in case “chicken fever” wore off someday, I’d better not be cutting pop holes in the garage. (My sweet wife helped me with that decision.)
Window from outside of Garage
I needed to build the coop on legs because the window was so high, so I calculated the height of the legs so the top of the coop would be just above the window opening.

Picture showing coop ceiling just above window
Below are the plan drawings for the floor. [Sidebar - About all of the (c)opyright notices. You are welcome to use these plans for personal use. But do not copy them with the intent to sell them and make money]
For the legs, I cut an old 4x4 fence post into 6 pieces, 18” high. I lifted the 4x8 foot frame, and screwed in the legs. I leveled the frame while screwing on the legs, and it's not a one man job. For the middle two legs I put them on either side of the middle 2x4 brace, opting for some symmetry. (I have no idea if it needed to be so, but it look better that way.) The 18" legs also allows me to store food and other goodies below the coop.
Picture of one of the legs
Most people on BYC say that you need 4 square feet of coop space for every bird. That would make this coop big enough for 8 birds. They also say about 10 square feet of run space per bird. I’ve got such a huge run (900 sq feet) and they’re out for most of the day, so I figured my 11 birds would have no problem in this coop. And for about 4 weeks, I haven’t seen any problems. (knock on wood!) 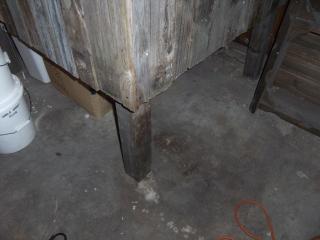
Picture of one of the legs
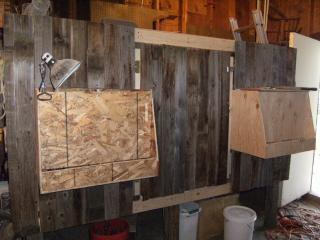
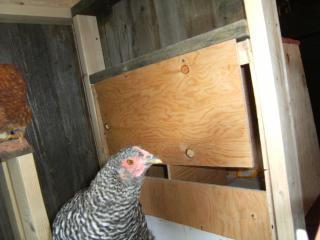
With 11 birds 3 nest boxes would have been enough, but I found some really good dual roll out nest box plans by Opa, and thought 4 boxes couldn’t hurt.
As you can see comparing these drawings with the photographs, the drawings aren't to scale. The nest boxes are a little higher, larger, and wider, but you get the idea.
I put in 2 dual roll out nest boxes on either side of the coop. Since the nest boxes are 24" wide, the 2x4s on either side of them aren't 16" on center, but I think the structural integrity will be fine.
Because my hens aren't ready to lay yet, I've blocked off the nest boxes so they won't learn to sleep/poop in them. Once we get eggs, I'll put some dark cloth over the front of the boxes for some privacy and open the nest boxes up.
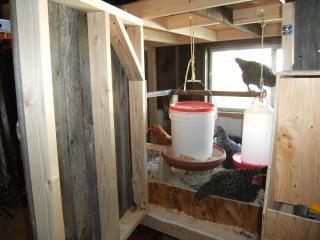
View from inside, looking at the right dual nest box
Once the nest box frames were in, I added a door frame with about 1/2 inch clearance on all side.
Open Door
On the above picture, you can also see where I've hung the food and water (10" high, about the height of the back of the chicken. This reduces spilling)
Here's a closer look at the food/water hanging boards
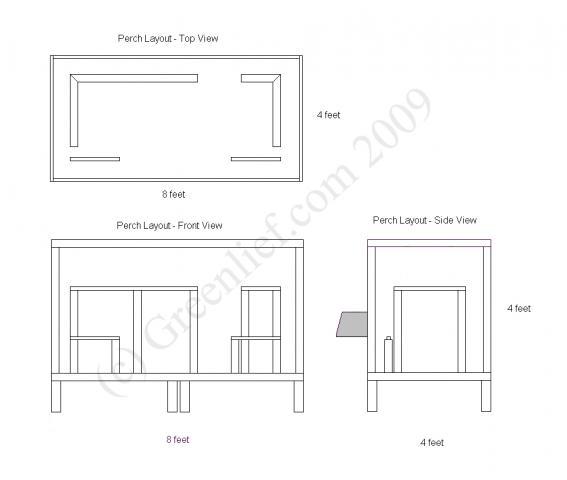
I wanted to put in a perch ladder, but with a 4x8 coop, you just can't do it. Below are a few hard and fast (ok, really soft and slow) rules that you have to use when placing roosts. Kudos to Pat and Chickens with this post for helping me out with my perch ladder questions.
Seven Hard and Fast (or Soft and Easy) rules for placing perches
1) Roost length should be 10-12" per bird. (Depending on breed)
2) There should be 14" for head room
3) Roosts should be 12-18" from the wall, or you will get poop on the wall
4) Perches should be the highest spot for them to be, or they will not sleep on them.
5) Lowest roost should start about 24" from the ground
6) Lowest roost should be higher than nest box
7) Don't put nest box under a roost (without the roof of the nest box being a dropping board)
Here is the layout I came up with
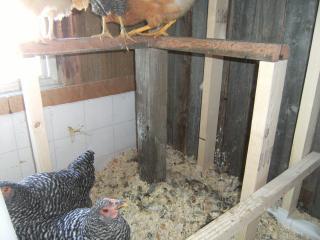
I opted for a break in the (approx.) 6 foot long perch, because the birds needed access from the window. (see the 2nd picture on this page, above.)
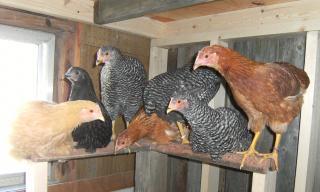
Like I said, those hard and fast rules aren't always hard and fast. My ladies all like to crowd on the smaller, right hand perch
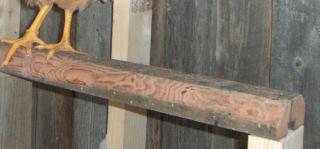
You'll notice that I used 2x4s with the "flat side up" so the birds can lay on their feet and keep them warm in the winter. But I also cut a 45º angle on the long sides, so they could get a little better grip. This is not an easy task with just a circular saw. But, you can do it.
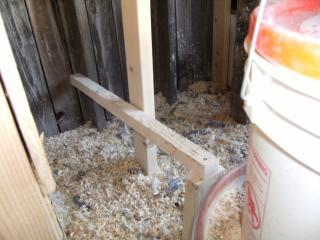
I placed 2 smaller 2x2 perches, 12" off of the ground, at nest box height, right in front of the next boxes, so they can hop in easily. Folks at BYC were correct; my birds don't roost on these lower perches.
Lower Left Perch in front of nest box
I used good solid 4x4 posts from my old fence where the "L" in the corner of the roosts meet. This made it much easier to attach the perches on
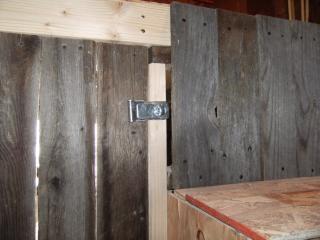
The whole outside of the coops is made with old 1x6 fencing. And as always, a good heavy hasp lock. I've read I may have problems later with mites, but so far so good. (That's what DE is all about, right?)
I'm using the Deep Litter Method (DLM) so I placed a 10" littler board to (mostly) keep the shavings in the coop
I still have to put more ventilation in (Thanks Pat and Chickens...) and maybe put more 1x6 fencing on for looks. Other than that, it makes happy hens and is very functional
Here's the outside view with the nest boxes
As you can see comparing these drawings with the photographs, the drawings aren't to scale. The nest boxes are a little higher, larger, and wider, but you get the idea.
I put in 2 dual roll out nest boxes on either side of the coop. Since the nest boxes are 24" wide, the 2x4s on either side of them aren't 16" on center, but I think the structural integrity will be fine.
Because my hens aren't ready to lay yet, I've blocked off the nest boxes so they won't learn to sleep/poop in them. Once we get eggs, I'll put some dark cloth over the front of the boxes for some privacy and open the nest boxes up.
View from inside, looking at the right dual nest box
Once the nest box frames were in, I added a door frame with about 1/2 inch clearance on all side.
Open Door
On the above picture, you can also see where I've hung the food and water (10" high, about the height of the back of the chicken. This reduces spilling)
Here's a closer look at the food/water hanging boards
I wanted to put in a perch ladder, but with a 4x8 coop, you just can't do it. Below are a few hard and fast (ok, really soft and slow) rules that you have to use when placing roosts. Kudos to Pat and Chickens with this post for helping me out with my perch ladder questions.
Seven Hard and Fast (or Soft and Easy) rules for placing perches
1) Roost length should be 10-12" per bird. (Depending on breed)
2) There should be 14" for head room
3) Roosts should be 12-18" from the wall, or you will get poop on the wall
4) Perches should be the highest spot for them to be, or they will not sleep on them.
5) Lowest roost should start about 24" from the ground
6) Lowest roost should be higher than nest box
7) Don't put nest box under a roost (without the roof of the nest box being a dropping board)
Here is the layout I came up with
I opted for a break in the (approx.) 6 foot long perch, because the birds needed access from the window. (see the 2nd picture on this page, above.)
Like I said, those hard and fast rules aren't always hard and fast. My ladies all like to crowd on the smaller, right hand perch
You'll notice that I used 2x4s with the "flat side up" so the birds can lay on their feet and keep them warm in the winter. But I also cut a 45º angle on the long sides, so they could get a little better grip. This is not an easy task with just a circular saw. But, you can do it.
I placed 2 smaller 2x2 perches, 12" off of the ground, at nest box height, right in front of the next boxes, so they can hop in easily. Folks at BYC were correct; my birds don't roost on these lower perches.
Lower Left Perch in front of nest box
I used good solid 4x4 posts from my old fence where the "L" in the corner of the roosts meet. This made it much easier to attach the perches on
The whole outside of the coops is made with old 1x6 fencing. And as always, a good heavy hasp lock. I've read I may have problems later with mites, but so far so good. (That's what DE is all about, right?)
I'm using the Deep Litter Method (DLM) so I placed a 10" littler board to (mostly) keep the shavings in the coop

I still have to put more ventilation in (Thanks Pat and Chickens...) and maybe put more 1x6 fencing on for looks. Other than that, it makes happy hens and is very functional
Here's the outside view with the nest boxes