Beaks and Claws...every bird has them! Birds use their beaks for grooming, they explore their environment with their beaks, they can feel textures and temperatures with them, scratch in the dirt for bugs and dust bathing, preen their feathers, pick up objects such as food, nesting materials, etc... The beak is like our hands and fingers! But just what are they made of, do they keep growing and what to do about them when they grow too long?
Is it a Beak or a Bill? Birds don't have teeth like other creatures, however, they do come equipped with beaks and bills instead. There is no difference between the terms beak and bill, however, the beak is more often used when referring to birds with hooked beaks such as Hawks and other Birds of Prey. (Since this article will be referring to our poultry, mainly our chickens, I will use the word "beak" when referring to that apparatus that hangs off the face of our birds.)
When discussing the parts of the beak or bill the technical terms are "upper mandible" or "lower mandible". The beak actually has two parts, the bony skeleton of the jaw and the outside layer which is similar to our own fingernails and hair made of Keratin. Both the beak and claws continue to grow throughout the entire life of the bird just as our hair and fingernails do. They are both soft enough that the bird will generally wear them down during daily use of scratching in the dirt or bedding, wiping their beaks after eating, dust bathing, etc... However, there may come a time in a bird's life when trimming down the long beak or claws becomes necessary.
It does not hurt the bird to trim this dead Keratin of beak and claws. Claws can grow long and crooked causing the bird painful walking or scratching, long upper mandibles can make it difficult to pick up food. Generally, chicks and younger birds will take care of their beaks and claws on their own with vigorous scratching and such. However, older birds that are less active, house chickens that may not get outside for long hours, and birds that have been kept in hospital cages for long periods of time, all of these types may require attention at some point.
You can tell long claws, they are thick and start to grow twisty. Overgrown claws can not only cause pain when the bird walks, but long claws become prone to getting caught in tiny cracks which can rip the entire claw out of the bone. As for the beak, the upper mandible of the beak will start to resemble a Hawk's beak. If the beak gets too long it can make it nearly impossible to pick up food and become detrimental to their health and lives.
I have an old hen that is 8 years young. (She is the subject in the photos used here.) She is not as active as she used to be, she has arthritis so she isn't big on scratching much anymore with her beak or claws. Every 6 or 7 weeks I have to trim both her beak and claws. I used to think that a nail file was the only way to trim the beak and of course, if you have ever tried using a nail file it's a long process for both you and the bird.
Since I have to trim her beak so often, I had to come up with a new way to get her beak trimmed easier and quicker with less stress on her. One day the bulb above my head lit up, why not try one of those battery-operated foot callus removers on her beak!! And it worked like a charm. (I tried both the Ped Egg and the Amope Pedi and found the Amope Pedi works more smoothly on the beak, the roller is very fine (fine is good) and lasts a lot longer than the Ped Egg.) Off brands of either of these products work well too.
Ok, so it's Spa Day for "Hilda". The first thing you want to do is gather your things in advance so you aren't having to stop halfway through to go find something. You will need the following:
- 1 large bath-sized towel for wrapping up the bird
- Hand-held battery-operated Amope Pedi or Ped Egg Callus Remover (fine roller)
- Guillotine-style dog nail clippers
- Corn Starch or Kwik Stop Styptic Powder (in case of a bleed)
- Alcohol wipes (for dirty claws before trimming)
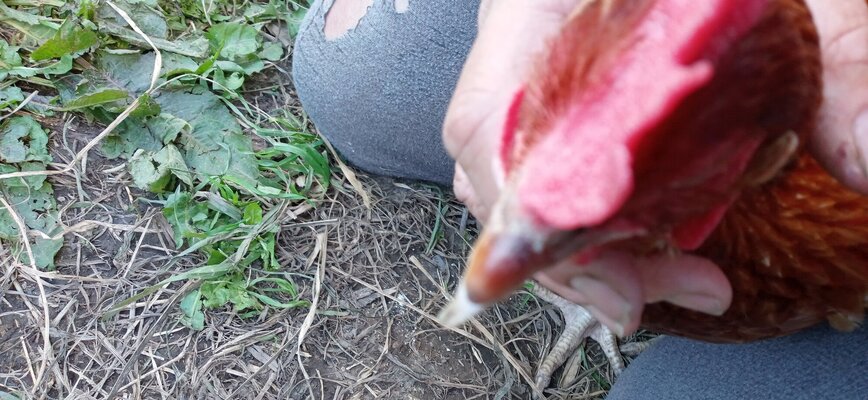
Find your favorite bench or someplace comfortable to work on and lay out all your materials. Bring the bird to the bench, stand them up, and wrap them up in the large towel. (Start over the back at the right shoulder and wrap around over the back, around the breast area, back around the shoulders, wings, and back again, tight enough that the wings are under control.)

Flip the bird over and lay in your lap. (Once they get used to having their beaks trimmed you may not even need to wrap them in a towel, this bird here is so used to me doing this she lets me lean over her, hold her beak and trim. But for the sake of this article, I have wrapped her up so you can see how it is done.)

Come up and under the beak with the trimmer as you see here.
VERY IMPORTANT: Hold the trimmer so that the roller turns OUT and AWAY from the bird and beak, not toward the beak and bird as this will cause chattering at the beak and could hurt the bird. *Note the direction of the arrow*

Hold the bird's beak shut so that you only trim the upper mandible and you don't accidentally hit the tongue. You are only going to grind off the tip and the sides of the tip. Gently touch the roller to the tip and sides of the upper mandible so they get a feel for it. It may tingle a bit at first so go slow with new birds that have never had beaks trimmed. (rarely if ever do you need to trim the lower mandible, at least on the standard healthy beaked bird. Cross beaks are a whole other matter and you should consult your Veterinarian or Avian Specialist before trimming Cross Beaked birds.)
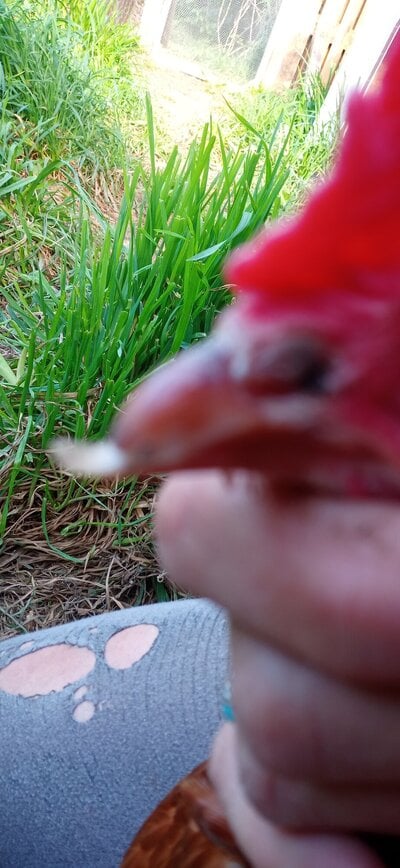
Lightly grind down the tip smoothing it out, both sides of the tip of the upper mandible, honestly it only takes about 15 seconds to grind it down. Trim off just enough that the upper mandible hangs over the lower mandible just a bit. Don't over-trim so that the upper is shorter than the lower but if that does happen, never fear, the beak will grow back again soon.
(After trimming)
If you are dealing with a VERY long overgrown beak, you will need to trim the bird's beak down in steps over time. There is a bloodline near the tip of every beak that on most birds never dips below the lower mandible level when the beak is shut. Look very closely at the upper mandible and you can see this bloodline near the tip. (You can just barely see the bloodline in the photo at the top of this page on the Barred Rock's upper mandible.)
You do not want to trim into this line, causing pain, bleeding, or possible infection, but grind fairly close enough to the bloodline that it will naturally back off after each trimming. The next time you trim, the bloodline will have moved a bit higher and you can trim a bit more. Work the beak down to an acceptable level over time, as you see it gaining length, trim again.
Do claws need to be trimmed as well? If claws are getting to be longer than 1 inch, twisting and turning, (every bird is of a different size, the length will vary greatly between breeds) then it's time for a trimming.
If you have just trimmed the beak, your bird is prepped in the towel and ready to go. If the beak was not an issue this time around, towel up the bird with the long claws. (Remember to keep the Alcohol wipe and the Cornstarch handy in case you cut into the bloodline.) I like to use the Guillotine style nail clippers because they are less prone to splitting the nail. Make sure they are kept sharp so the cut is clean. If the bird's claws are really dirty with mud or poo, you might want to use the Alcohol wipe on them to clean them off. It's not a huge deal to keep the area so sterilized, however just as a precaution you might want to clean extra dirty claws just in case you do cut into the bloodline.
Now on some birds, you can actually see the bloodline in the claw, it's generally within a 1/8th inch or closer to the end of the claw. I don't like to take chances and trim too deeply, so I will suggest you trim off about a 1/16th of an inch from any front toe that is long. The back nails generally don't get overgrown as much however if this one seems to be a tad long, trim it as well. Insert the nail into the guillotine clipper with a 1/16th of an inch sticking out the top and with a quick squeeze, lob the tip off.

Sometimes only 1 or 2 nails need to be trimmed, so don't bother with shorter claws. If the bird has extremely long claws, just as with an overgrown beak, you will need to shorten the claws over time. You can't trim the entire nail off on a long claw without risking pain, bleeding, and injury to the bird when cutting into the bloodline. You will want to trim a small bit off, come back a couple of weeks later, trim again, and keep this process up as the bloodline backs off you can trim the claw shorter.
Now if you trim a tip off and it bleeds, don't be alarmed, it happens. Get a big pinch of Cornstarch (Kwik Stop Styptic Powder is wonderful and works really well on severe bleeds) and pack the tip at the bleed. Sometimes it bleeds through the first packing, so pack it again with more Cornstarch. Keep the bird in your lap for a couple of minutes until the bleeding stops. You can then put the bird someplace clean for 30 minutes or so, and check during this time to make sure the bleeding has stopped. At this point, the bird is good to go!
Beaks and claws are very important parts of the bird that when not functioning properly can adversely affect the bird's life. Most people may never have to trim either of these down during their time keeping chickens, however, should the need arise you will now have all the tools you need to keep your birds healthy and happy!
For more help trimming beaks and claws or other issues with your flock regarding management practices be sure and visit our Managing your Flock section of BYC or other threads pertaining to trimming beaks and claws and other management issues.
Forum:
https://www.backyardchickens.com/forums/managing-your-flock.2/
Thread:
https://www.backyardchickens.com/articles/trimming-your-chickens-nails-tutorial.64401/


 )
)
")