My free range coop
Here are pictures of a coop I built based on an online pdf file. It is very easy to build and very inexpensive, even with new materials.
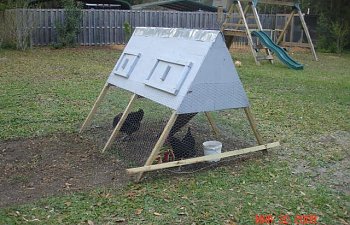
A key to success in any pastured poultry operation is to have a pen that is easy to move, lightweight, easy to build, and it has space for hens to lay their eggs and forage for bugs and greens. Recently I was confronted with a project to construct a movable chicken coop for our family flock of chickens. I had researched the subject many times before and I found a suitable design. The answer is a chicken ark. This is an A framed pen popular in Great Britain that has a tent shaped compartment in the top for the hens to sleep and lay their eggs, a ramp to provide access to the bottom where the hens forage on grass and insects. I found a pdf design on the internet: http://www.organicgardening.com/pdf/coop_plans.pdf.
It was a little difficult to construct the angled frame but after that was over is was very easy to build the rest. I used a lot of new lumber but it can be used with old stuff if you have two sheets of 8×4 plywood available. It’s a pen six feet long, five feet wide at the base, and four and a half feet tall. These are the materials I used.

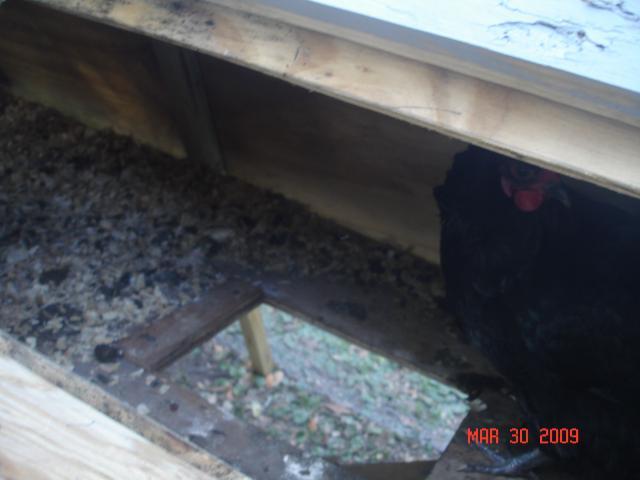
The picture on the far left is the pen. The pen has two doors, one to collect the eggs (picture 3) and the other is to clean out the pen. The picture after it is of the nest box, very simple. The fourth picture is of the hole going down into the bottom of the pen. A ramp can be lifted to shut the hens up at night. The last picture shows the ramp and the hens below. The hens eat in the bottom and roost and lay eggs in the top. I scatter feed for the hens in the bottom, instead of using a feeder and I use a bucket for a waterer. The board across the bottom keeps the hens in, since they were escaping that way and I will eventually add wheels to it for an easier move.
A key to success in any pastured poultry operation is to have a pen that is easy to move, lightweight, easy to build, and it has space for hens to lay their eggs and forage for bugs and greens. Recently I was confronted with a project to construct a movable chicken coop for our family flock of chickens. I had researched the subject many times before and I found a suitable design. The answer is a chicken ark. This is an A framed pen popular in Great Britain that has a tent shaped compartment in the top for the hens to sleep and lay their eggs, a ramp to provide access to the bottom where the hens forage on grass and insects. I found a pdf design on the internet: http://www.organicgardening.com/pdf/coop_plans.pdf.
It was a little difficult to construct the angled frame but after that was over is was very easy to build the rest. I used a lot of new lumber but it can be used with old stuff if you have two sheets of 8×4 plywood available. It’s a pen six feet long, five feet wide at the base, and four and a half feet tall. These are the materials I used.
- Two sheets of 8×4 foot plywood 3/8 inch thick
- Four 8 foot 2×4s which I split to make the legs and three short pieces to reinforce the A frames and to screw the plywood to
- Four small pieces of old plywood measured and cut to make plates which joined the A frames (1 plate for the 2 outer frames and 2 plates for the middle frame
- screws- I used 1.25 inch screws and 3 inch screw to connect everything
- 1 strap hinge for the ramp
- a ramp made from old plywood (the pdf file calls for a 42 inch ramp but we guessed the length)
- scrap plywood to make doors
- 8 feet of thin cable
- One 3×25 roll of 1 inch chicken wire


The picture on the far left is the pen. The pen has two doors, one to collect the eggs (picture 3) and the other is to clean out the pen. The picture after it is of the nest box, very simple. The fourth picture is of the hole going down into the bottom of the pen. A ramp can be lifted to shut the hens up at night. The last picture shows the ramp and the hens below. The hens eat in the bottom and roost and lay eggs in the top. I scatter feed for the hens in the bottom, instead of using a feeder and I use a bucket for a waterer. The board across the bottom keeps the hens in, since they were escaping that way and I will eventually add wheels to it for an easier move.