2022 was our third year raising chicks. Every year we improved our setup and learned what worked well for us. Since we are very pleased with how our third edition worked for us I thought to share it here for anyone interested.
This time around we decided that we wanted to setup the brooder in our sunroom and not in the basement. It made sense, since we enjoy watching the chicks, interacting with them and we also wanted to give them natural light. Another plus was that the brooder would be closer to the kitchen making things easier.

The Brooder DIY Video
Below is the youtube video with instructions for the original brooder by Lumnah Acres. We chose this configuration because the brooder is a nice size, sturdy and cat-safe and furthermore it comes apart and stores flat. It is not me in the video, and we give all the credit for the design to Lumnah Acres, it really was easy to build.
Upgrades:

The top part of the brooder is cat-proof and build with wood and hardware cloth. To keep the temperature consistent we used some vinyl sheets to cover the openings. The sheets can be removed or partially opened when needed.

For keeping the chicks warm (our sunroom is not heated, but we can leave the house doors open to increase the temperature) we used one heating plate installed on the back wall and one installed horizontally as a brooder. They were on different setting (one heater, the other brooder) and both ran off a separate temperature controller. The goal was to give the chicks a warmer area under the brooder plate and a cooler area as well.
Below: the brooder ready for the chicks: sand covered with puppy pads, brooder on the left, heater in the back wall, feeder trough, nipple waterer on the right with adjustable base to be able to set it at higher levels as the chicks grew.

Below: our Brooder/Heating plates. We got them at Tractor Supply.
The temperature controllers: We had 3, one for each one of the heating plates, and one just used as a temperature monitor in the front of the brooder.
We had 2 different settings: we placed one of the sensors underneath the horizontal brooder plate, this way we were able to regulate the actual temperature. The other sensor regulating the vertical heating plate was placed away form it and was used to keep the overall temperature inside the box warm but not as warm as under the brooder plate. This way the chicks could have areas with different temperatures to choose from.

Below a side view, you can see the temperature controllers, light switch for a small LED we placed on the inside, a power strip to keep everything tidy, we also placed a couple of our wifi cameras inside to be able to enjoy watching the chicks while away
As you can see we placed a carddoard box reinforced with some ducktape and filled with sand in top of the brooder plate. The chicks loved it and it kept the plate clean.
For bedding we used sand, the first few days we covered it with puppy pads to make sure the chicks understood what their food was and would not eat the sand. After ALL the chicks became familiar with the feeder we removed the pads.
We acquired our chicks from 2 separate sources. The first 4 were a gorgeous quartet of English Lavender Orpingtons that I was able to pickup in person from the breeder. The second group of 19 more chicks came by mail 5 days later. The additional 19 were Buff Orpintons, Bielefelders, and English Orpingtons. They all adjusted and the group blended.
We placed a container with a grid under the nipple drinker to catch water and avoid getting the sand wet. Worked well.
We placed a couple of our Arlo cameras in there because we just love to watch our chicks.
And so does Attila
Time to move out
Once the chicks were accustomed to the outdoor temperatures and sufficiently developed, we moved them to the integration area of our coop.
The area consists of 2 zones, one inside the coop, one in the run. We have elctricity so we gave them one heating brooder plate in the beginning.
The coop area
And the run area

We added little doors that we used to gradually allow the youglings to interact with the existing flock, while having a way to retreat to their safe area.
To keeep the adult flock out of the younglings area I sinply screwed a coupme of wood sticks to the opening, so that if was too narrrow for the adults. Worked great.


This time around we decided that we wanted to setup the brooder in our sunroom and not in the basement. It made sense, since we enjoy watching the chicks, interacting with them and we also wanted to give them natural light. Another plus was that the brooder would be closer to the kitchen making things easier.
The Brooder DIY Video
Below is the youtube video with instructions for the original brooder by Lumnah Acres. We chose this configuration because the brooder is a nice size, sturdy and cat-safe and furthermore it comes apart and stores flat. It is not me in the video, and we give all the credit for the design to Lumnah Acres, it really was easy to build.
Upgrades:
- We added a plywood base with wheels so we could easily move it to allow the chicks to look out the patio doors or at us in the family room.
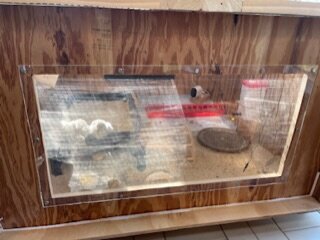
- We also added a Plexiglass window on one of the brooder sides for that purpose. We ended up framing the opening to make it an easy access for us and an opening to allow the chicks to come out and interact with us, when Attila was NOT in the room.
The top part of the brooder is cat-proof and build with wood and hardware cloth. To keep the temperature consistent we used some vinyl sheets to cover the openings. The sheets can be removed or partially opened when needed.
For keeping the chicks warm (our sunroom is not heated, but we can leave the house doors open to increase the temperature) we used one heating plate installed on the back wall and one installed horizontally as a brooder. They were on different setting (one heater, the other brooder) and both ran off a separate temperature controller. The goal was to give the chicks a warmer area under the brooder plate and a cooler area as well.
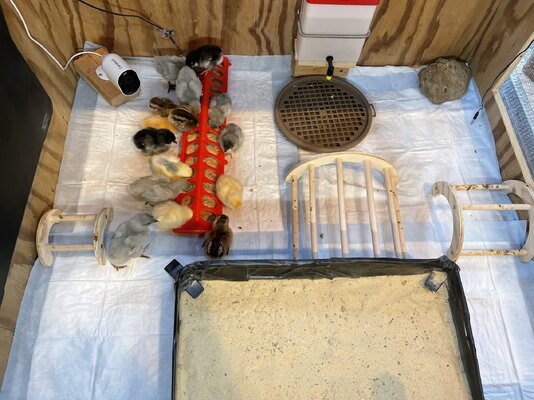
Below: the brooder ready for the chicks: sand covered with puppy pads, brooder on the left, heater in the back wall, feeder trough, nipple waterer on the right with adjustable base to be able to set it at higher levels as the chicks grew.
Below: our Brooder/Heating plates. We got them at Tractor Supply.
The temperature controllers: We had 3, one for each one of the heating plates, and one just used as a temperature monitor in the front of the brooder.
We had 2 different settings: we placed one of the sensors underneath the horizontal brooder plate, this way we were able to regulate the actual temperature. The other sensor regulating the vertical heating plate was placed away form it and was used to keep the overall temperature inside the box warm but not as warm as under the brooder plate. This way the chicks could have areas with different temperatures to choose from.
Below a side view, you can see the temperature controllers, light switch for a small LED we placed on the inside, a power strip to keep everything tidy, we also placed a couple of our wifi cameras inside to be able to enjoy watching the chicks while away
As you can see we placed a carddoard box reinforced with some ducktape and filled with sand in top of the brooder plate. The chicks loved it and it kept the plate clean.
For bedding we used sand, the first few days we covered it with puppy pads to make sure the chicks understood what their food was and would not eat the sand. After ALL the chicks became familiar with the feeder we removed the pads.
We acquired our chicks from 2 separate sources. The first 4 were a gorgeous quartet of English Lavender Orpingtons that I was able to pickup in person from the breeder. The second group of 19 more chicks came by mail 5 days later. The additional 19 were Buff Orpintons, Bielefelders, and English Orpingtons. They all adjusted and the group blended.
We placed a container with a grid under the nipple drinker to catch water and avoid getting the sand wet. Worked well.
We placed a couple of our Arlo cameras in there because we just love to watch our chicks.
And so does Attila
Time to move out
Once the chicks were accustomed to the outdoor temperatures and sufficiently developed, we moved them to the integration area of our coop.
The area consists of 2 zones, one inside the coop, one in the run. We have elctricity so we gave them one heating brooder plate in the beginning.
The coop area
And the run area
We added little doors that we used to gradually allow the youglings to interact with the existing flock, while having a way to retreat to their safe area.
To keeep the adult flock out of the younglings area I sinply screwed a coupme of wood sticks to the opening, so that if was too narrrow for the adults. Worked great.


 )!
)!