Building a Treadle Feeder
I like wild birds. I used to feed them on purpose, but now that I have chickens the wild birds have become a cost and potential risk. The wild birds were eating more of my chicken feed than were the chickens. I dealt with the doves with a shade cloth curtain over the chickens' door but the little sparrows were undeterred. They wormed their way straight through the layers of cloth and get inside. Then I worried about all the pests and pathogens vectored by the little beasts. I reduced the risk by feeding outside where they free-range, but if I didn't get the amount just right, the wild birds finished it off. I came to realize that a treadle feeder would be my best solution; it would also allow my birds free access to food. I looked here on BYC and all over the web for various treadle feeders and borrowed many great features to design my own. I've linked videos of treadle feeders in action at the bottom of this page. Also, after building my first feeder, I took note of what I would change and used that to build my second feeder. The only substantive thing that I changed in the second feeder was the treadle-cover assembly. I include the updated plans for the re-designed treadle-cover assembly at the end of this page.
The Plans:
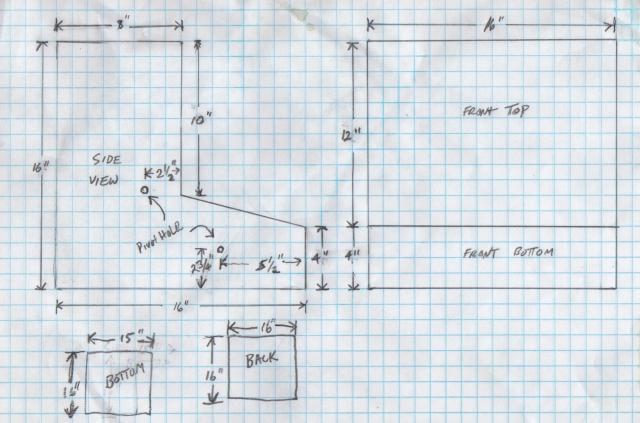
I designed the feeder so that it could be largely made from 1/2 sheet of 1/2" plywood, which I had left over from another project.

Tools Used:
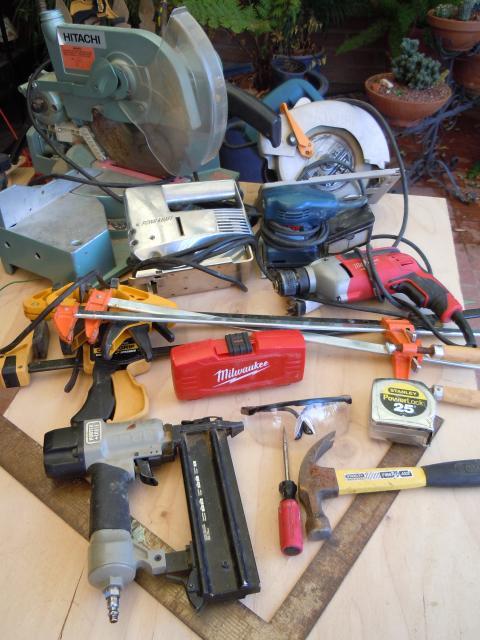
I used a number of tools to build the feeder, but many are interchangeable with other tools. All the plywood was cut with a circular saw, but a table saw would be better. I cut the treadle, cover, and connecting arms with a chop saw, but any kind of saw could be used. I used a jig saw to cut out the inner lip part, but a coping saw could be used as well. I used 1/8", 1/4' and 1/2" (or larger) drill bits and drill. Finally, I used clamps (4-6) that hold something at least 16" wide, pneumatic nail gun, electric sander, screw driver, hammer, protective eye-ware, tape measure and square. I realize that not everyone has a pneumatic nail gun laying around (the one I used is borrowed), screws could be used instead. You also wouldn't need an electric sander, your birds won't care that it looks smooth (sand the inside lip by hand). In reality, every power tool pictured here could be replaced with hand tools, power tools just make it easier.
Making the Cuts and Assembly:
I first cut the sheet into two strips, 16" X 48". From those pieces I cut out 4 16" X 16" squares. On two of these squares I drew the lines and cut out the shapes for the two lateral sides. I then took another square and cut off the 4" front piece, being sure to cut it to match the angles of the side pieces. The remaining larger piece became the upper front of the feeder. Another 16" X 16" square became the back. I cut the bottom of the box to fit inside the four walls, this made it about 15" X 16". The remaining 17" X 16" piece was then cut to a width of 8" to use for the top lid.
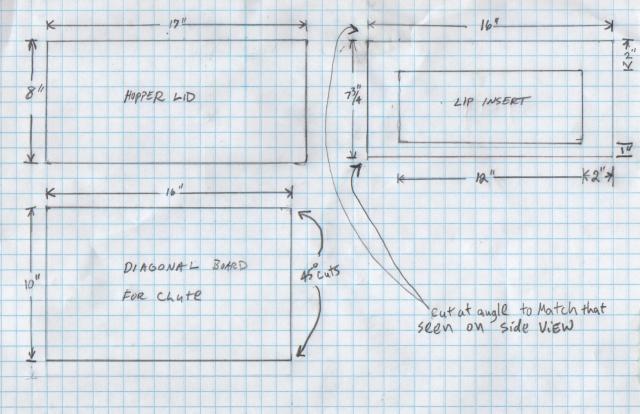
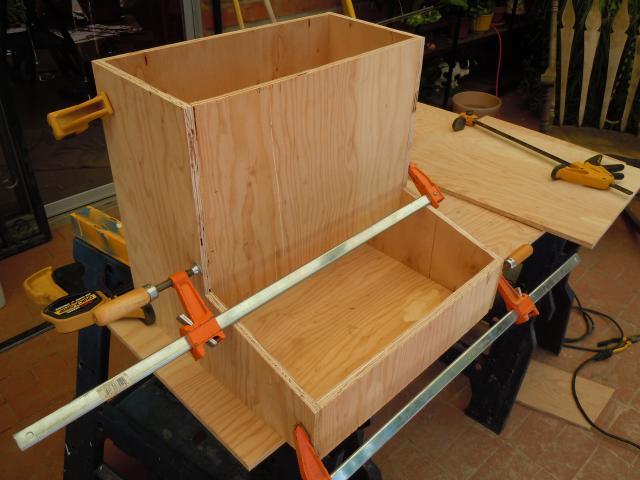
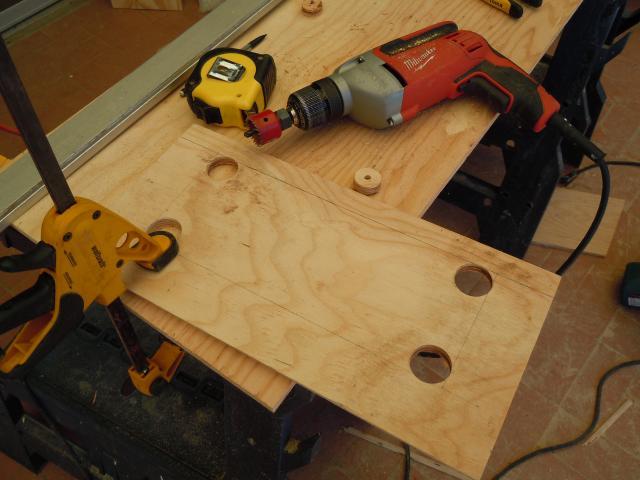
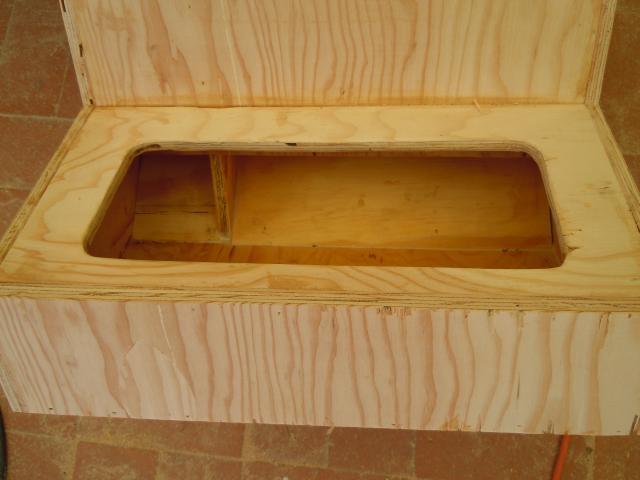
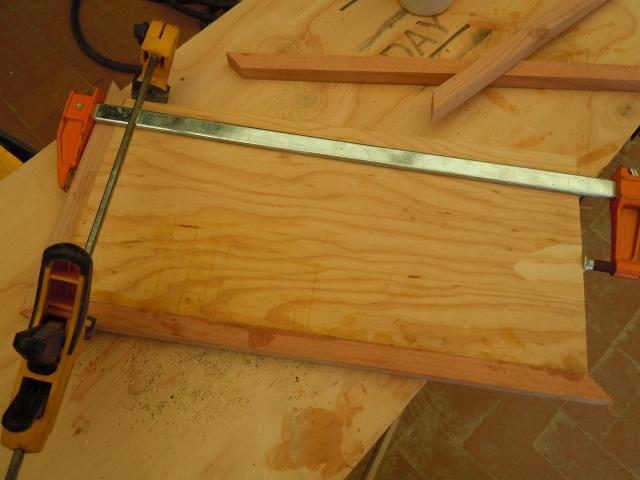
Once the main pieces were cut, I put it together using clamps. When temporarily assembled, I measured for the lip insert that will help prevent the chooks from pulling food out. I cut that piece of wood left over from the square used to get the lid. After being cut to size, I measured and drew the inner cut-out and drilled holes at the four corners and cut out the remainder of the center with a jig-saw. A good fit was made by matching the angle long cuts (16") to the angle of the side view.
Once it was all together, I started to permanently assemble it. I loosened the two clamps at the back and removed that piece. I glued the two lateral sides of the panel and put it back in, positioning it well and re-clamping it. I then used a pneumatic nail gun to nail it together. I moved to the upper front piece next, loosened the clamps, applied glue, re-inserted, positioned, re-clamped and nailed. I did the same for the bottom front piece and, finally, the bottom panel of the feeder.
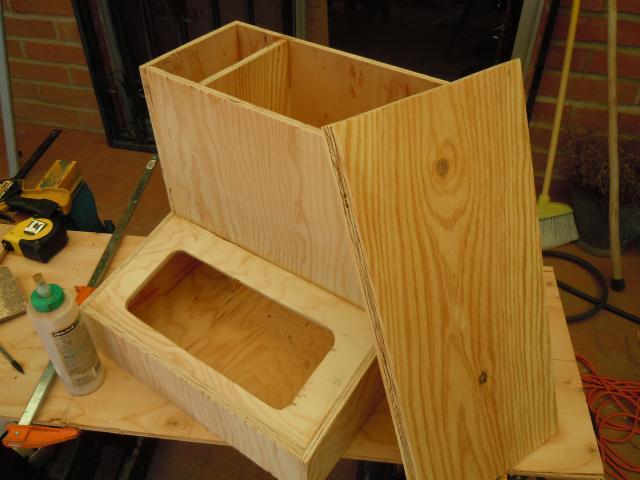
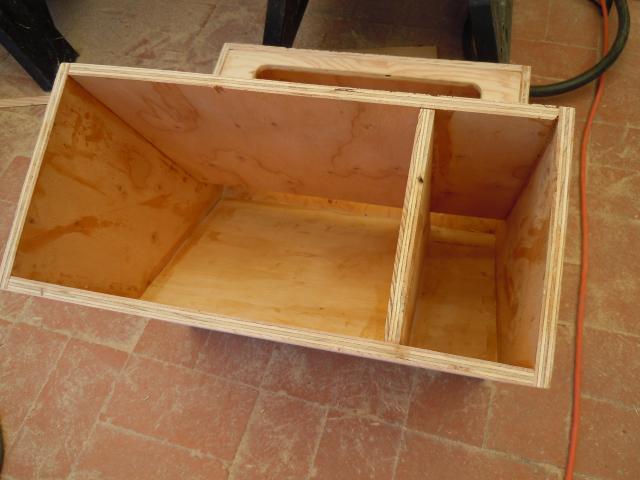
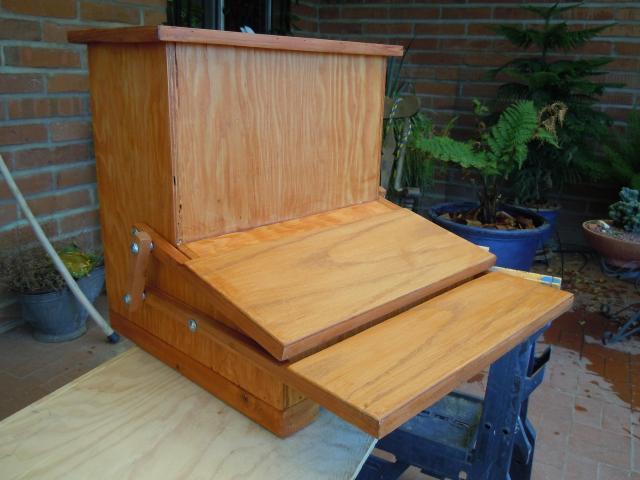
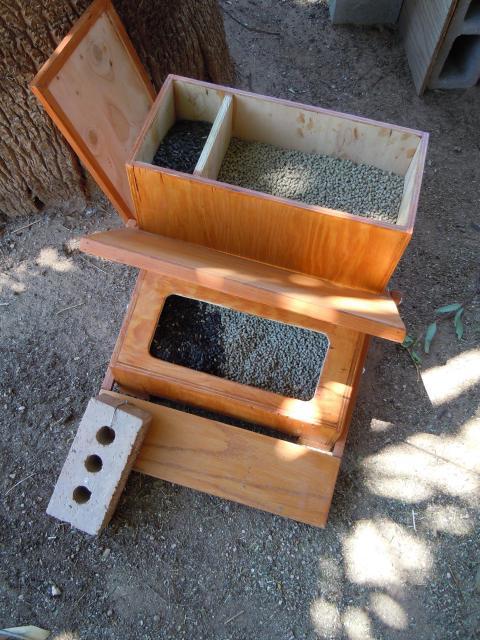
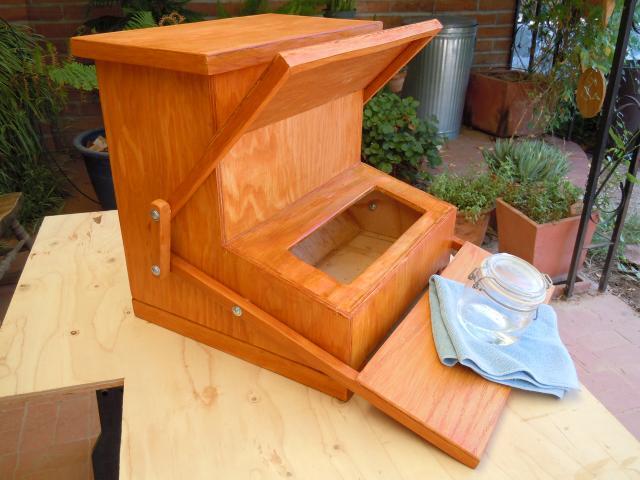
Next, I installed the lip insert for the feeder access area. I rounded the inner edge with sandpaper to make it smoother where the birds might come in contact. Following that, I installed a piece (7" X 15 1/2") of plywood down through the top of the feeder to divide off one smaller section of the hopper. I'll use this separate area to add in extra grainy/seedy treats such as BOSS and I 'll use the larger area for layer pellets. For easier construction, omit the divider. I needed to make a chute to direct the feed to the front of the feeder; so I so cut a piece that was about 11" X 16", cutting at a 45 degree angle along each long (16") side. I cut that into pieces that were 12" and 3.5", to fit into the larger and smaller openings, respectively. I glued those pieces into place.
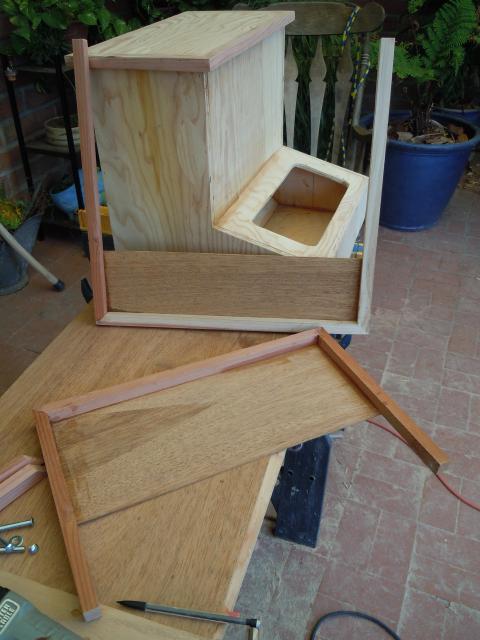
To make the lid, I took the lid board (8" X 17") and made a frame around the outside edge using some 3/4" X 3/4" redwood plant stakes I had. I would liked to have used better machined wood, but it was cheap.
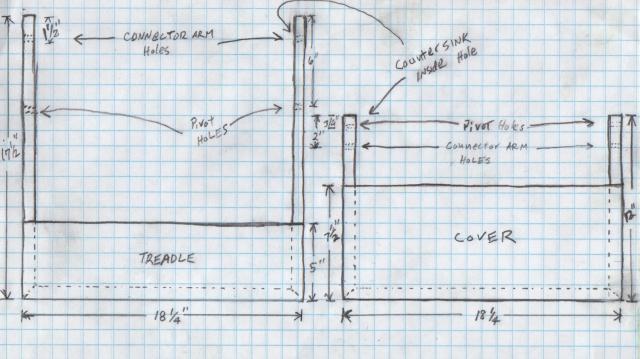
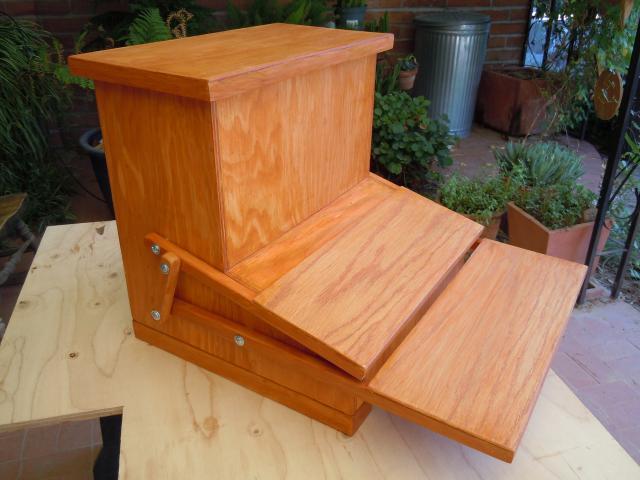
I'll admit here that I don't know much at all about the physics of the treadle arm connections. In fact, I think I hurt my brain figuring it out. In the end, it seemed much easier than I imagined. I used the same 3/4" X 3/4" redwood to make the arms for the treadle. I started with the top cover and cut two 12" pieces, cut at a 45 degree angle on one end. I took those pieces and clamped them to the sides as they ultimately would be positioned. I then measured this space and added 1/8" to give the arms room for movement. That gave me the width (18 1/4") of the top cover. I then decided that 7 1/2" was enough to cover the feed opening and extend a bit over the front. I cut the 7 1/2" X 18 1/4" cover from an old piece of 1/8" oak veneer that I had left over from rehabbing a table. I then laid out the arms on the cover and clamped, glued and nailed them together. Now that I knew the width, I cut another piece of the oak veneer for the treadle (5" X 18 1/4"). I then cut the arms (3/4" X 3/4" X 17 1/2") for the treadle arms and another ~18 1/4" piece to span the distance between the arms. I glued the veneer to the arms of the cover and the treadle and clamped them until dry.
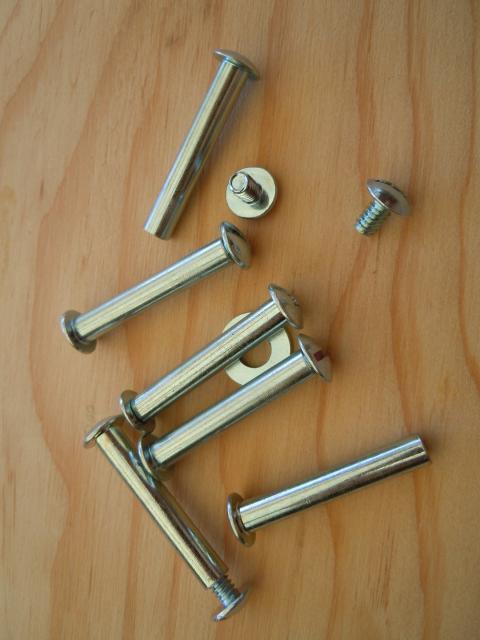
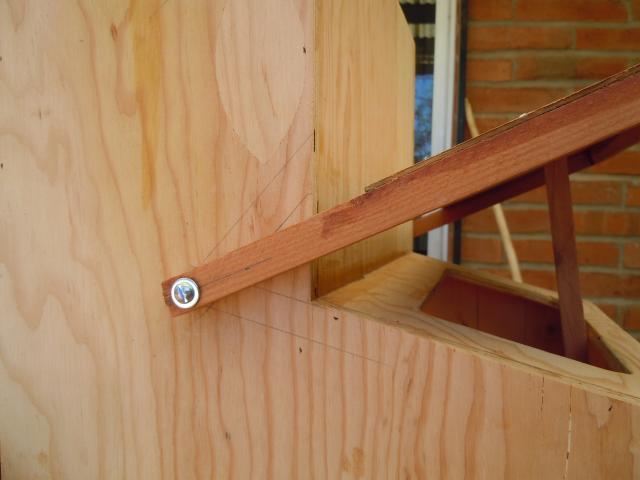
I used screw posts (1/4" #20, 1 1/2" long --Ace Hardware) to connect the cover and treadle to each other and to the feeder. I started by positioning the cover so that the spacing was correct around the front and sides and used washers to keep the gap between the arms and the wall of the feeder. I clamped it in place and drilled the holes for the pivoting hinge. I started by drilling a small 1/8" hole straight through the arm and in through the wall of the feeder. I then enlarged that hole with a 1/4" bit. It was satisfying to find that the cover moved effortlessly once the stud screws were temporarily in place. For the sake of planning the treadle connections, I drew the outline of the cover arm at both the resting and fully opened positions. This will help determine where the connector pieces when the treadle is installed. I repeated the process and mounted the treadle. I determined where the connector arm would need to be placed and drilled the holes for them. Because the screw post hinge head for the connector arm had to be facing inward, I countersunk the hole so that the head would be recessed. Once the screw posts for the connector arms were in place on the cover and treadle, I measured the distance between the two and added 3/4" to each end, cut the arms and drilled the holes.
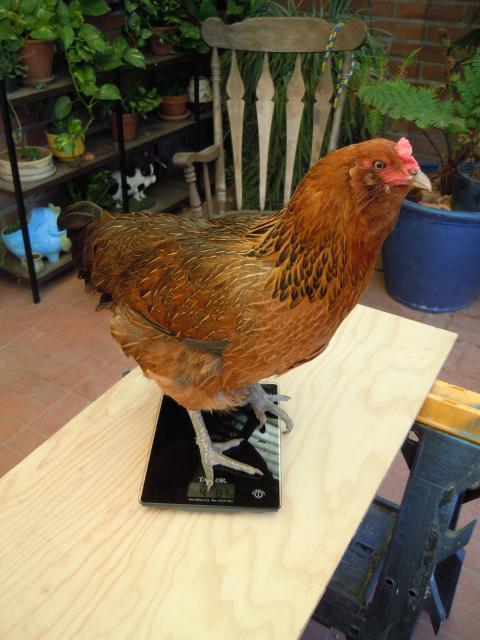
When I first assembled the mechanism, it worked flawlessly, with one big problem. It took 6 lbs of force to open the cover. My lightest bird weighed 4 lbs. 11 oz. So, I had to move the fulcrum point further back on the treadle arm. I filled the holes with short pieces of 1/4" dowel and the mistake was hardly noticeable. The treadle now requires 2 lbs. 6 oz. to open the cover. I also realized that two of the three potential locations I wanted to keep the feeder sometimes get standing water in our infrequent storms. That could result in the loss or degradation of feed. So, I placed two runners made of 2" X 3"s under each side of the feeder, elevating it off the ground. After I determined that it worked, I disassembled the treadle mechanism and sanded everything. I painted all exterior surfaces with wood sealant left over from building my chicken coop.
The feeder is probably much larger than I need; it holds a total of 38 lbs of layer pellets. It's also so heavy (20 lbs. empty) that I wouldn't worry about the birds ever tipping it over. I'm going to keep the cover propped open for a couple days while the birds learn how to use the feeder. I don't actually plan to fill the second area with boss, but showed it full for the pic. I usually just give a cup full in the morning and a cup in the evening.
Things I would change:
I think I made the arms for the cover and the treadle too short. My next feeder would have arms that extend an additional two inches. I also think the treadle could be about two inches wider (7" instead of 5"). The narrowness may be a little awkward for the birds to be so close to the cover as it opens. I might also experiment with using plywood for the treadle itself, rather than the 1/8" veneer, which would make it heavier. Making those changes would allow for less force to be used to open the feeder. I am considering adding a piece of heavy wood to the underside of the treadle. I think I can hide at least 1 lb. of wood there which would reduce the force required to open the feeder to 1 lb 6 oz. On my next feeder I would like to reduce that number to something less than a pound so that smaller chickens could use it.
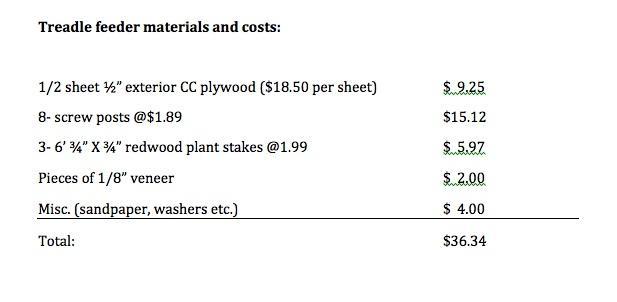
I calculated what it would cost to make this feeder if you had to buy the materials. I had all but the screw posts, the most expensive part. I think that you could use something somewhat cheaper, such as bolts or clevis pins. I'm only guessing at the cost for the veneer, it's left over from a project I completed 13 years ago. I knew I'd find a use for that some day. I also didn't figure in costs of sandpaper, washers, glue and waterproofing stain, but those couldn't amount to more than a few dollars.
Costs:
Keeping wild birds from eating all your chicken feed: Priceless
Here are some videos of treadle feeders in action. I especially love finding videos of feeders made from or inspired by my plans. If you post a video of your birds using a treadle feeder, PM me the link and I'll post it here.
http://www.youtube.com/watch?v=O01VEoDrkb8&feature=related
http://www.youtube.com/watch?v=AVGHIqwIWv4&feature=related (talks about training chickens to use treadle feeder)
http://www.youtube.com/watch?v=nxaM2A_FHcQ (treadle feeder near end)
_____________________________________________________________________________________________________________________________________________________________________________________________________________________
Treadle feeder v. 2.0
I built a second feeder for the yard and addressed the concerns I had after making the first one. I only changed the treadle-cover assembly and made the top part of the lip insert a little wider. The treadle is now wider (7" vs. 5"), which seems a more natural width on which the chickens can stand, bend over and eat their food. I also added a piece of 1/2" plywood (6 1/2" X 17") under the veneer and between the arms of the treadle. It now opens with just 1 lb. 7 oz. of force, so smaller pullets could use it. It takes nearly a full second to close, which provides plenty of time for a chicken to get its head out of the way. Installed and at rest, the cover only weighs 3 oz. If a chicken did get it's head under the lid, it could easily hold it up. I really opens up and closes much more nicely than the first. I also learned through a cabinet maker friend that the screw posts (Ace Hardware) are more commonly known in the industry as "sex bolts". I also found that they can be found online for as low as $0.41. That would significantly reduce the price of the feeder overall, as they were the biggest part of the cost. The other great suggestion my friend made was to use nylon washers instead of metal. The treadle mechanism has to perform hundreds of times a day and who knows how many opening and closing cycles over the lifetime of the feeder and nylon will create less friction and wear than the metal washers would.
*CORRECTION!* In the drawing of the lip insert above, I have the front edge of the lip at 1" wide. That should read, 1 1/2". The extra width to the lip helps to further limit billing feed out of the feeder.
Update:
It's been about three weeks now since I've finished the feeders. I started by propping the feeders wide open with a brick on the treadle. I kept them open like this for a week to get the girls used to stepping on the treadle to eat. I stood two cement blocks at the sides of the feeder to limit access from there and force them to step on the treadle. During the second week I propped the cover open so that it closed or opened only about 1" when the chickens stepped off or on the treadle. That got them used to to the movement of the cover mechanism. I now have the cover propped 1/2 way open and the chickens must step on the treadle to access the food. I only prop the feeders open for brief periods of time, usually about 20-30 min in the morning and late afternoon. The rest of the time the chickens can step on the treadle and open the cover and access the food. Two of my birds (EE and BA) quickly learned to fully use the feeder at will. They calmly step up and open the feeder and eat. The others then move in as three can easily eat at once. Typically, they all eat if one of the two birds opens the feeder. I hope to have all 6 up to speed by the end of the week. Having the feeders has had an immediate and dramatic effect on the wild bird population. I now have fewer wild birds visiting my yard than I did before I got chickens. I'm also going through much less food.
Second Update:
It's now been over a year since I completed the feeders. All the birds quickly learned to use them, albeit in an interesting way. The chickens learned to use the feeder in an almost perfect rendition of reverse-pecking order; birds lowest on the pecking order learned to use it first and the highest ranking bird learned last. Several others have also reported a similar learning pattern. I just thought that was cool. I was also curious about what would happen when new chicks were hatched and how they would adapt to the feeder. It turned out that they never even approached it until they were about 21 weeks old, in large part because the older birds kept them away while they were feeding. This worked out well as it allowed me to continue feeding the older birds layer pellets without the younger pullets eating them. Then, at about 22 weeks of age, they just suddenly started opening the feeder on their own. That worked out well as they began laying eggs that week. I would also point out that, despite opening and closing the feeder thousands of times over the past year or more, no chicken was ever hit in the head with the closing cover. That seems to be the biggest question I get concerning the feeder.
Improved plans:
I want to thank fellow BYC member ajhaig for her most awesome rendering of the treadle feeder plans. I have not yet closely examined all of the measurements, but it's so much more legible than mine that I want to immediately share them here. Thanks again ajhaig!
To the intellectual property thieves: I took the time to make this page so that I could freely share my ideas on how to make a treadle feeder with the BYC community. I did not make this page so that you could manufacture this feeder to sell it or to sell the plans or to take the plans and give them away without giving proper attribution. Doing any of these things is theft.
I like wild birds. I used to feed them on purpose, but now that I have chickens the wild birds have become a cost and potential risk. The wild birds were eating more of my chicken feed than were the chickens. I dealt with the doves with a shade cloth curtain over the chickens' door but the little sparrows were undeterred. They wormed their way straight through the layers of cloth and get inside. Then I worried about all the pests and pathogens vectored by the little beasts. I reduced the risk by feeding outside where they free-range, but if I didn't get the amount just right, the wild birds finished it off. I came to realize that a treadle feeder would be my best solution; it would also allow my birds free access to food. I looked here on BYC and all over the web for various treadle feeders and borrowed many great features to design my own. I've linked videos of treadle feeders in action at the bottom of this page. Also, after building my first feeder, I took note of what I would change and used that to build my second feeder. The only substantive thing that I changed in the second feeder was the treadle-cover assembly. I include the updated plans for the re-designed treadle-cover assembly at the end of this page.
The Plans:
I designed the feeder so that it could be largely made from 1/2 sheet of 1/2" plywood, which I had left over from another project.
Tools Used:
I used a number of tools to build the feeder, but many are interchangeable with other tools. All the plywood was cut with a circular saw, but a table saw would be better. I cut the treadle, cover, and connecting arms with a chop saw, but any kind of saw could be used. I used a jig saw to cut out the inner lip part, but a coping saw could be used as well. I used 1/8", 1/4' and 1/2" (or larger) drill bits and drill. Finally, I used clamps (4-6) that hold something at least 16" wide, pneumatic nail gun, electric sander, screw driver, hammer, protective eye-ware, tape measure and square. I realize that not everyone has a pneumatic nail gun laying around (the one I used is borrowed), screws could be used instead. You also wouldn't need an electric sander, your birds won't care that it looks smooth (sand the inside lip by hand). In reality, every power tool pictured here could be replaced with hand tools, power tools just make it easier.
Making the Cuts and Assembly:
I first cut the sheet into two strips, 16" X 48". From those pieces I cut out 4 16" X 16" squares. On two of these squares I drew the lines and cut out the shapes for the two lateral sides. I then took another square and cut off the 4" front piece, being sure to cut it to match the angles of the side pieces. The remaining larger piece became the upper front of the feeder. Another 16" X 16" square became the back. I cut the bottom of the box to fit inside the four walls, this made it about 15" X 16". The remaining 17" X 16" piece was then cut to a width of 8" to use for the top lid.
Once the main pieces were cut, I put it together using clamps. When temporarily assembled, I measured for the lip insert that will help prevent the chooks from pulling food out. I cut that piece of wood left over from the square used to get the lid. After being cut to size, I measured and drew the inner cut-out and drilled holes at the four corners and cut out the remainder of the center with a jig-saw. A good fit was made by matching the angle long cuts (16") to the angle of the side view.
Once it was all together, I started to permanently assemble it. I loosened the two clamps at the back and removed that piece. I glued the two lateral sides of the panel and put it back in, positioning it well and re-clamping it. I then used a pneumatic nail gun to nail it together. I moved to the upper front piece next, loosened the clamps, applied glue, re-inserted, positioned, re-clamped and nailed. I did the same for the bottom front piece and, finally, the bottom panel of the feeder.
Next, I installed the lip insert for the feeder access area. I rounded the inner edge with sandpaper to make it smoother where the birds might come in contact. Following that, I installed a piece (7" X 15 1/2") of plywood down through the top of the feeder to divide off one smaller section of the hopper. I'll use this separate area to add in extra grainy/seedy treats such as BOSS and I 'll use the larger area for layer pellets. For easier construction, omit the divider. I needed to make a chute to direct the feed to the front of the feeder; so I so cut a piece that was about 11" X 16", cutting at a 45 degree angle along each long (16") side. I cut that into pieces that were 12" and 3.5", to fit into the larger and smaller openings, respectively. I glued those pieces into place.
To make the lid, I took the lid board (8" X 17") and made a frame around the outside edge using some 3/4" X 3/4" redwood plant stakes I had. I would liked to have used better machined wood, but it was cheap.

I'll admit here that I don't know much at all about the physics of the treadle arm connections. In fact, I think I hurt my brain figuring it out. In the end, it seemed much easier than I imagined. I used the same 3/4" X 3/4" redwood to make the arms for the treadle. I started with the top cover and cut two 12" pieces, cut at a 45 degree angle on one end. I took those pieces and clamped them to the sides as they ultimately would be positioned. I then measured this space and added 1/8" to give the arms room for movement. That gave me the width (18 1/4") of the top cover. I then decided that 7 1/2" was enough to cover the feed opening and extend a bit over the front. I cut the 7 1/2" X 18 1/4" cover from an old piece of 1/8" oak veneer that I had left over from rehabbing a table. I then laid out the arms on the cover and clamped, glued and nailed them together. Now that I knew the width, I cut another piece of the oak veneer for the treadle (5" X 18 1/4"). I then cut the arms (3/4" X 3/4" X 17 1/2") for the treadle arms and another ~18 1/4" piece to span the distance between the arms. I glued the veneer to the arms of the cover and the treadle and clamped them until dry.
I used screw posts (1/4" #20, 1 1/2" long --Ace Hardware) to connect the cover and treadle to each other and to the feeder. I started by positioning the cover so that the spacing was correct around the front and sides and used washers to keep the gap between the arms and the wall of the feeder. I clamped it in place and drilled the holes for the pivoting hinge. I started by drilling a small 1/8" hole straight through the arm and in through the wall of the feeder. I then enlarged that hole with a 1/4" bit. It was satisfying to find that the cover moved effortlessly once the stud screws were temporarily in place. For the sake of planning the treadle connections, I drew the outline of the cover arm at both the resting and fully opened positions. This will help determine where the connector pieces when the treadle is installed. I repeated the process and mounted the treadle. I determined where the connector arm would need to be placed and drilled the holes for them. Because the screw post hinge head for the connector arm had to be facing inward, I countersunk the hole so that the head would be recessed. Once the screw posts for the connector arms were in place on the cover and treadle, I measured the distance between the two and added 3/4" to each end, cut the arms and drilled the holes.
When I first assembled the mechanism, it worked flawlessly, with one big problem. It took 6 lbs of force to open the cover. My lightest bird weighed 4 lbs. 11 oz. So, I had to move the fulcrum point further back on the treadle arm. I filled the holes with short pieces of 1/4" dowel and the mistake was hardly noticeable. The treadle now requires 2 lbs. 6 oz. to open the cover. I also realized that two of the three potential locations I wanted to keep the feeder sometimes get standing water in our infrequent storms. That could result in the loss or degradation of feed. So, I placed two runners made of 2" X 3"s under each side of the feeder, elevating it off the ground. After I determined that it worked, I disassembled the treadle mechanism and sanded everything. I painted all exterior surfaces with wood sealant left over from building my chicken coop.
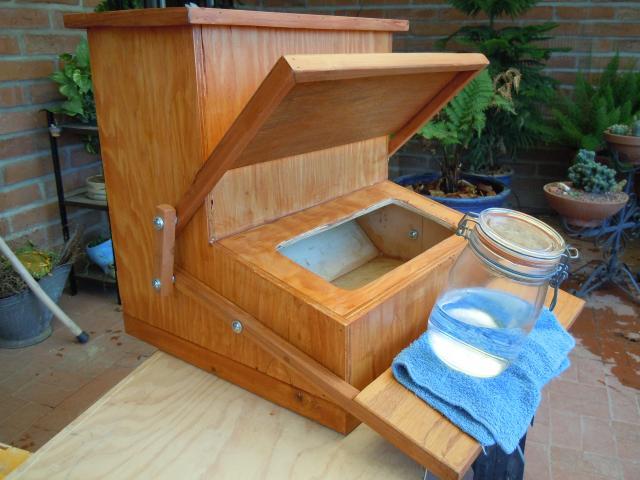
The feeder is probably much larger than I need; it holds a total of 38 lbs of layer pellets. It's also so heavy (20 lbs. empty) that I wouldn't worry about the birds ever tipping it over. I'm going to keep the cover propped open for a couple days while the birds learn how to use the feeder. I don't actually plan to fill the second area with boss, but showed it full for the pic. I usually just give a cup full in the morning and a cup in the evening.
Things I would change:
I think I made the arms for the cover and the treadle too short. My next feeder would have arms that extend an additional two inches. I also think the treadle could be about two inches wider (7" instead of 5"). The narrowness may be a little awkward for the birds to be so close to the cover as it opens. I might also experiment with using plywood for the treadle itself, rather than the 1/8" veneer, which would make it heavier. Making those changes would allow for less force to be used to open the feeder. I am considering adding a piece of heavy wood to the underside of the treadle. I think I can hide at least 1 lb. of wood there which would reduce the force required to open the feeder to 1 lb 6 oz. On my next feeder I would like to reduce that number to something less than a pound so that smaller chickens could use it.
I calculated what it would cost to make this feeder if you had to buy the materials. I had all but the screw posts, the most expensive part. I think that you could use something somewhat cheaper, such as bolts or clevis pins. I'm only guessing at the cost for the veneer, it's left over from a project I completed 13 years ago. I knew I'd find a use for that some day. I also didn't figure in costs of sandpaper, washers, glue and waterproofing stain, but those couldn't amount to more than a few dollars.
Costs:
Keeping wild birds from eating all your chicken feed: Priceless

Here are some videos of treadle feeders in action. I especially love finding videos of feeders made from or inspired by my plans. If you post a video of your birds using a treadle feeder, PM me the link and I'll post it here.
http://www.youtube.com/watch?v=AVGHIqwIWv4&feature=related (talks about training chickens to use treadle feeder)
http://www.youtube.com/watch?v=nxaM2A_FHcQ (treadle feeder near end)
_____________________________________________________________________________________________________________________________________________________________________________________________________________________
Treadle feeder v. 2.0
I built a second feeder for the yard and addressed the concerns I had after making the first one. I only changed the treadle-cover assembly and made the top part of the lip insert a little wider. The treadle is now wider (7" vs. 5"), which seems a more natural width on which the chickens can stand, bend over and eat their food. I also added a piece of 1/2" plywood (6 1/2" X 17") under the veneer and between the arms of the treadle. It now opens with just 1 lb. 7 oz. of force, so smaller pullets could use it. It takes nearly a full second to close, which provides plenty of time for a chicken to get its head out of the way. Installed and at rest, the cover only weighs 3 oz. If a chicken did get it's head under the lid, it could easily hold it up. I really opens up and closes much more nicely than the first. I also learned through a cabinet maker friend that the screw posts (Ace Hardware) are more commonly known in the industry as "sex bolts". I also found that they can be found online for as low as $0.41. That would significantly reduce the price of the feeder overall, as they were the biggest part of the cost. The other great suggestion my friend made was to use nylon washers instead of metal. The treadle mechanism has to perform hundreds of times a day and who knows how many opening and closing cycles over the lifetime of the feeder and nylon will create less friction and wear than the metal washers would.

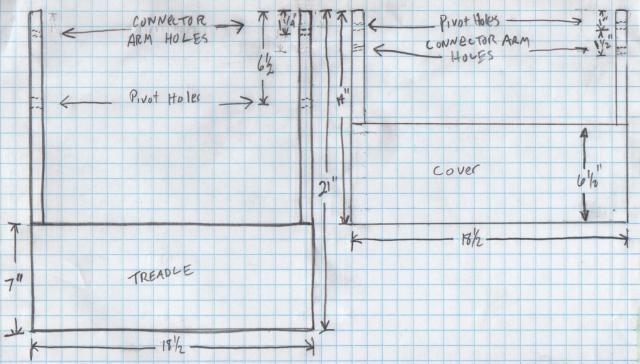
*CORRECTION!* In the drawing of the lip insert above, I have the front edge of the lip at 1" wide. That should read, 1 1/2". The extra width to the lip helps to further limit billing feed out of the feeder.
Update:
It's been about three weeks now since I've finished the feeders. I started by propping the feeders wide open with a brick on the treadle. I kept them open like this for a week to get the girls used to stepping on the treadle to eat. I stood two cement blocks at the sides of the feeder to limit access from there and force them to step on the treadle. During the second week I propped the cover open so that it closed or opened only about 1" when the chickens stepped off or on the treadle. That got them used to to the movement of the cover mechanism. I now have the cover propped 1/2 way open and the chickens must step on the treadle to access the food. I only prop the feeders open for brief periods of time, usually about 20-30 min in the morning and late afternoon. The rest of the time the chickens can step on the treadle and open the cover and access the food. Two of my birds (EE and BA) quickly learned to fully use the feeder at will. They calmly step up and open the feeder and eat. The others then move in as three can easily eat at once. Typically, they all eat if one of the two birds opens the feeder. I hope to have all 6 up to speed by the end of the week. Having the feeders has had an immediate and dramatic effect on the wild bird population. I now have fewer wild birds visiting my yard than I did before I got chickens. I'm also going through much less food.
Second Update:
It's now been over a year since I completed the feeders. All the birds quickly learned to use them, albeit in an interesting way. The chickens learned to use the feeder in an almost perfect rendition of reverse-pecking order; birds lowest on the pecking order learned to use it first and the highest ranking bird learned last. Several others have also reported a similar learning pattern. I just thought that was cool. I was also curious about what would happen when new chicks were hatched and how they would adapt to the feeder. It turned out that they never even approached it until they were about 21 weeks old, in large part because the older birds kept them away while they were feeding. This worked out well as it allowed me to continue feeding the older birds layer pellets without the younger pullets eating them. Then, at about 22 weeks of age, they just suddenly started opening the feeder on their own. That worked out well as they began laying eggs that week. I would also point out that, despite opening and closing the feeder thousands of times over the past year or more, no chicken was ever hit in the head with the closing cover. That seems to be the biggest question I get concerning the feeder.
Improved plans:
I want to thank fellow BYC member ajhaig for her most awesome rendering of the treadle feeder plans. I have not yet closely examined all of the measurements, but it's so much more legible than mine that I want to immediately share them here. Thanks again ajhaig!

To the intellectual property thieves: I took the time to make this page so that I could freely share my ideas on how to make a treadle feeder with the BYC community. I did not make this page so that you could manufacture this feeder to sell it or to sell the plans or to take the plans and give them away without giving proper attribution. Doing any of these things is theft.
