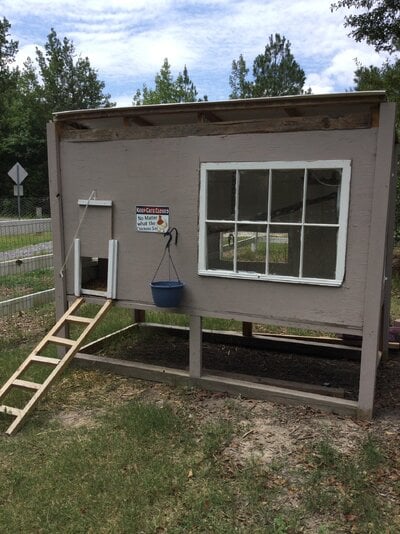
We built this 4x8 chicken house for a new batch of chickens who just started laying eggs.
This coops L,W and H can be changed, depending on how big you want the coop. We pretty much winged it... but here are the measurements and supplies needed.
16-2x4s @8ft
8-2x4s @ 7ft
4-4x8 plywood
Scrap 1x1s ( for sliding door)
2- large hinges for back door
1- handle also for back door
3- old windows ( can be found on Facebook market place)
Hardware cloth to cover window holes
building screws
just to save money, we split our 2x4s to make 2x2s, but there still are some places you will need only 2x2s.
And again, I didn’t follow any plans for the coop, although I did make up plans with a video as a guide. But I will give as much as I know with best details possible.
 The first thing we did was frame the coop. Used 2x4s to frame the bottom, but as you may be able to tell, we ran out a used some scrape 4x4s ( not listed on supp list) We did 2x4s in an L shape on four corners. Cut the back two L’s about 5in shorter than the front, so that the roof can be slanted for rain water to run off easily.
Then connected the 2x4s on corners together with 2x2s and placed our ply board on the floor with lots of screws.
We then added the other ply boards on the sides, cutting the spots for windows air vents. This is also when we cut the door holes and atatched the back door on and built the sliding door. Which was actually fun, just took a lot of changing things to get it to fit and slid nicely.
We had the roofing pre-buildt from an old coop we once had, so this article does not include building the roof, athough a look at the picture could probably tell you how it was built.
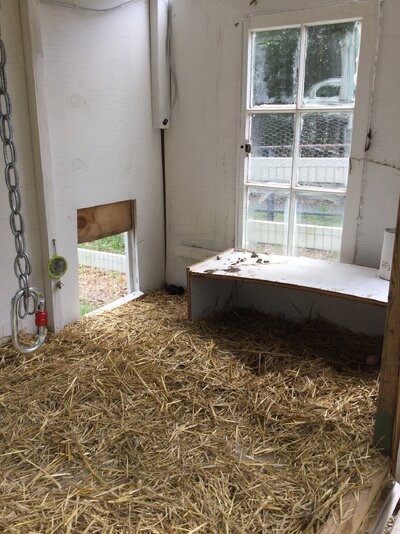
For the roosts, I was able to screw In some branches. And the tree house look definitely adds a cute touch.
It gives a nice outdoor view, much to the girls appreciation.
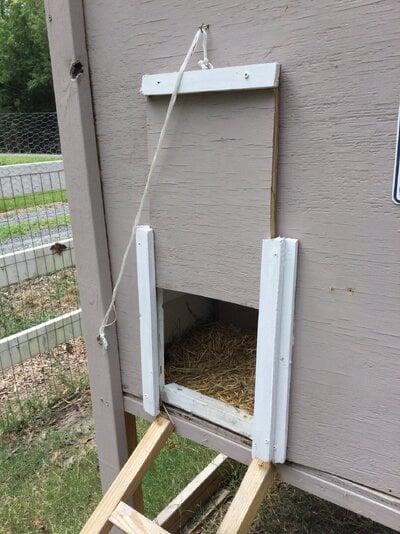
As you may be able to see the nest boxes, I just built a half box which gives nice privacy to the hens who recently started laying eggs. On the back door I plan on building a nest box onto the door for easier gatherin, but the half box has been fine, as for the time. So as you can see in one of my photos, I have hardware cloth on the back for now. And with the gaps above... I do plan on doing something there as someone mentioned, just haven’t yet
Looking back, I wish I would of done a smaller door in the back. The piece of ply board is a little warped, which puts a lot of weight on the hinges. I also would of liked the roof hanging off the top a little bit, because with heavy rains rain water has found its way into the coop. So I also will fig that out. But for now they are enjoying it and I love it!
Here are the finished photos, but I will post some of the building process.
the back of the coop has a large door which makes cleaning easy and lots of big vent to let air flow especially in the heat this summer. l love the white as inside, it makes the coop bright and fun to be in and I cant wait till winter to get thoseLED lights on and have a bright coop to look at!
More building process photos:
And here are my babies right after they moved in!
3-americana
3- blue rock
3- speckled Sussex
1- lavender Orpington
Well, that’s the south caralina chicken house coop! Hopefully you have enjoyed this post as BYC people!
This coops L,W and H can be changed, depending on how big you want the coop. We pretty much winged it... but here are the measurements and supplies needed.
16-2x4s @8ft
8-2x4s @ 7ft
4-4x8 plywood
Scrap 1x1s ( for sliding door)
2- large hinges for back door
1- handle also for back door
3- old windows ( can be found on Facebook market place)
Hardware cloth to cover window holes
building screws
just to save money, we split our 2x4s to make 2x2s, but there still are some places you will need only 2x2s.
And again, I didn’t follow any plans for the coop, although I did make up plans with a video as a guide. But I will give as much as I know with best details possible.
Then connected the 2x4s on corners together with 2x2s and placed our ply board on the floor with lots of screws.
We then added the other ply boards on the sides, cutting the spots for windows air vents. This is also when we cut the door holes and atatched the back door on and built the sliding door. Which was actually fun, just took a lot of changing things to get it to fit and slid nicely.
We had the roofing pre-buildt from an old coop we once had, so this article does not include building the roof, athough a look at the picture could probably tell you how it was built.
For the roosts, I was able to screw In some branches. And the tree house look definitely adds a cute touch.
As you may be able to see the nest boxes, I just built a half box which gives nice privacy to the hens who recently started laying eggs. On the back door I plan on building a nest box onto the door for easier gatherin, but the half box has been fine, as for the time. So as you can see in one of my photos, I have hardware cloth on the back for now. And with the gaps above... I do plan on doing something there as someone mentioned, just haven’t yet
Looking back, I wish I would of done a smaller door in the back. The piece of ply board is a little warped, which puts a lot of weight on the hinges. I also would of liked the roof hanging off the top a little bit, because with heavy rains rain water has found its way into the coop. So I also will fig that out. But for now they are enjoying it and I love it!
Here are the finished photos, but I will post some of the building process.
More building process photos:
And here are my babies right after they moved in!
3-americana
3- blue rock
3- speckled Sussex
1- lavender Orpington
Well, that’s the south caralina chicken house coop! Hopefully you have enjoyed this post as BYC people!